
Allow Sites to Record Receipts
If you wish to allow your sites to record their own CACFP expenses in KidKare, you must set Policy T.01 Centers Can Record Receipts to Y. Please note that this permission does not impact a site's ability to capture and record receipts in Parachute.
Claim Month & Receipts
All CACFP receipts are tied to a specific claim month in order to provide a clear audit trail for sponsors. This means, that whenever you or your sites record a receipt, you must select a Claim Month. This is set independently of the Transaction Date. This means that you can tie receipts dated between/close to the end of the current claim month to the following claim month--if those purchases apply.
For example, Center ABC purchased food and CACFP supplies on July 31, 2025. Their purchases will be used in early August 2025 for August claims. When entering expenses, you would select the August 2025 claim month.
Note: KidKare will remember the method you used to enter receipts for the next time you go to Add Receipts.
Milk & Receipts
On May 8, 2026, the USDA announced their Final Rule Expanding Fluid Milk Options in Child Nutrition Programs (CNPs). This rule allows whole and reduced-fat (2%) milk to be offered to participants ages two (2) and up in the CACFP, National School Lunch Program (NSLP), School Breakfast Program (SBP), and Special Milk Program (SMP). The rule goes into effect on June 8, 2026.
If you have enabled expanded milk options for your centers (set policy M.21 to Y), you and your centers, if you allow them to record receipts, will be able to record milk purchases for the following milk types for transaction dates on or after 6/8/2026:
- Whole
- Reduced-fat (2%)
- Low-fat (1%)
- Fat-Free (Skim)
- Substitute
If M.21 is set to N, you will only see options for Whole, 1%/Skim, and Substitute milks.
Add Receipts: Itemized Entry
When you use itemized entry to add expenses, you enter each item on the receipt in detail. Itemized entries include the item category, amount, quantity, total cost, and an optional description.
-
From the menu to the left, click Center Management.
-
Select Receipt Verification.
-
Click Add Receipt. The Add Receipts page opens.
-
Click the Itemized Entry tab.
- Click the Center drop-down menu and select the center to which this receipt belongs.
- Click the Claim Month drop-down menu and assign a claim month to this receipt. This field is required.
-
Complete the remainder of the Expense Detail section.
-
The Transaction Date, Vendor, and Receipt Total boxes are required.
-
We recommend you also enter a Payment Method and a Description for reporting purposes.
-
-
Complete the Receipt Details section.
-
Click the Select Category drop-down menu and select the expense category. All expense categories except Unapproved count towards reimbursement for the food program.
-
Enter the item quantity. You can enter up to four (4) decimal places. This box defaults to 1.
-
If you selected a Milk category, you can use the Gallons Converter.
-
Click
 or type + (plus sign) in the quantity box.
-
Enter the number of pints, quarts, half-gallons, and/or ounces of milk you purchased.
-
Click Save.
-
-
-
Click the $ box and enter the item's unit price. The system automatically multiplies the unit price by the quantity and provides a total. You cannot change the calculated total.
-
Click the Description box and enter a description for this line item. You can enter up to 255 characters. This box is optional.
-
Click
 to add another line.
-
-
Click Save in the top-right corner. You can also click Save/Add Another to save your entry and begin adding another one.
You cannot save your entry if the receipt and running total do not match. The receipt and running total must also both be greater than zero. You must also complete all required fields before saving.
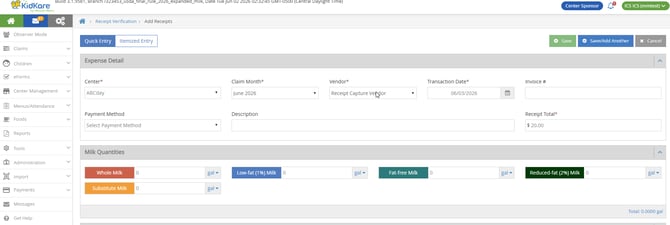
Add Receipts: Quick Entry
When you use Quick Entry to add expenses, you enter receipt items into category fields by dollar amount. The category fields calculate the total for the category by taking the sum of all numbers entered for the category. The running total is then compared to the receipt total.
- From the menu to the left, click Center Management.
- Select Receipt Verification.
- Click Add Receipt. The Add Receipts page opens.
- Click the Center drop-down menu and select the center to which this receipt belongs.
- Click the Claim Month drop-down menu and assign a claim month to this receipt. This field is required.
-
Complete the remainder of the Expense Detail section.
-
The Transaction Date, Vendor, and Receipt Total boxes are required.
-
We recommend you also enter a Payment Method and a Description for reporting purposes
-
- Enter your milk quantities in gallons. You can also use the Gallons Converter.
-
Click the Gal link next to the milk type, or type + (plus sign) in the milk quantity box.
-
Enter the number of pints, quarts, half-gallons, and/or ounces of milk you purchased.
-
Click Save.
-
-
-
Enter expenses in the Expenses Items section.
-
Click the box next to the category to record, and enter the dollar amount. All expense categories except Unapproved count towards reimbursement for the food program.
-
Press Tab to enter multiple, separate dollar amounts in each category.
-
Click X next to a dollar amount to remove it.
-
Type / (forward slash) in a box to populate it with the remaining difference.
-
-
Click Save in the top-right corner. You can also click Save/Add Another to save your entry and begin adding another one.
You cannot save your entry if the receipt and running total do not match. The receipt and running total must also both be greater than zero. You must also complete all required fields before saving.