---
title: Send Invitations
description: Customize the emails parent/guardians receive when you send enrollment invitations, send forms back for revision, and approve enrollments. You can also customize the Thank You email sent when the pare
---
[Skip to content](https://knowledge.kidkare.com/centers/send-invitations#main-content)

- [Customer Portal](https://support.kidkare.com/_hcms/mem/login)
- [Access KidKare](https://app.kidkare.com/)
- [Support & Releases](https://knowledge.kidkare.com/support-releases)
- [Contact KidKare Support](https://knowledge.kidkare.com/support-releases/contact-our-support-team)
Open main navigation
Close main navigation
- [Customer Portal](https://support.kidkare.com/_hcms/mem/login)
- [Access KidKare](https://app.kidkare.com/)
- [Support & Releases](https://knowledge.kidkare.com/support-releases)
- [Contact KidKare Support](https://knowledge.kidkare.com/support-releases/contact-our-support-team)
Hello. How can we help you?
- There are no suggestions because the search field is empty.
1. [Centers and Center Sponsors](https://knowledge.kidkare.com/centers?hsLang=en)
2. [Sponsors of Centers](https://knowledge.kidkare.com/centers/sponsors-of-centers?hsLang=en)
3. [eForms](https://knowledge.kidkare.com/centers/sponsors-of-centers?hsLang=en#eforms)
# Send Invitations
Table of Contents
## In This Article
### Customize eForms Email Templates
Customize the emails parent/guardians receive when you send enrollment invitations, send forms back for revision, and approve enrollments. You can also customize the Thank You email sent when the parent submits their information to you or your center.
1. From the menu to the left, click **eForms**.
2. Click **Send Invitations**. The Send Invitations page opens.
3. Click **Edit Email**. The Initial Invitation Template page opens by default.
4. Click the drop-down menu at the top of the page and select the template to edit. For example, select **Thank You for Your Submission Template** to edit the automated email parents/guardians receive upon form submission.
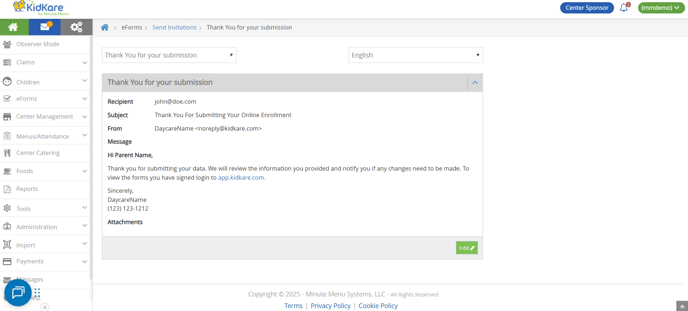
5. Use the **Language** drop-down menu to the right to switch between templates in **English** and **Spanish**. When you send invitations, the parent/guardian will receive all communications and eForms in the language that is set on their contact record in the **Manage Child Information Contacts** tab.
6. Click **Edit** in the bottom-right corner. The Rich Text Editor (RTE) opens. You can edit the **Subject**, **From**, and **Message** fields.
7. Use the toolbar to format your message text.

- **H1 - H6:** Create headings. The largest heading is H1. The headings become progressively smaller from there.
- **P:** Designate text as Paragraph text. This should be the main body of your message.
- **Pre:** Create pre-formatted text for copying and pasting.
- **":** Create a block quote.
- **B:** Bold text.
- ***I*****:** Italicize text.
- **U:** Underline text.
- **S:** Strikethrough text.
- **•/123:** Create bulleted or numbered lists.
- **Undo/Redo:** Click the arrows to undo changes and re-do changes.
- **Alignment Options:** Left-align, center, right-align, or justify text.
- **Indentation:** Indent a line or remove an indentation.
- **\:** Switch to HTML mode and use HTML to format instead of the RTE.
- **Images:** Click the picture icon to embed an image.
- **Link:** Click the link icon to add a hyperlink.
- **Video:** Click the play button to embed a video.
8. **Variables** you can use are listed at the bottom of the editor. To use this variables, click in the message and type the variable exactly as it appears. These will populate user-specific information in the message when it is sent. For example, #ParentName# will display as John Smith if this email is sent to John Smith.
9. Click **Add Attachment** to add an attachment to this message.
10. When finished, click **Save**.
---
### Send New Enrollments with eForms
Sending enrollment forms to new participants can be completed at the sponsor level, or at the site level as long as permissions are set. Note that at **Step 3**, these are the same steps a center would follow to send an enrollment form to a new participant.
1. From the menu to the left, click **Observer Mode**.
2. Select the Center in which you are wanting to enroll the new participant.
3. From the menu to the left, click **Children.**
4. Click **List Children**
5. Click and select **Send** **eForms**. Note that the **Add** button defaults to this selection upon page revisit.
6. Complete the **Participant Details** section.
1. Click the **First Name** and Last Name boxes and enter the participant's first and last name.
2. Click the **Birth Date** box and enter the participant's birth date.
3. Click the **Classroom** drop-down menu and select the classroom to which to assign the participant. You can select **Unassigned** to assign the participant to a classroom later. You can also click "**+**" to add a new classroom.
4. If you need to enroll a sibling at the same time, click **Add Participant**. Repeat **Steps 3a - 3c** for the additional child. You can add as many siblings, as needed. Adding children this way ensures that the parent only needs to complete one income eligibility form for the household.
7. Complete the **Guardian Details** section.
1. Click **Existing** to select an existing parent/guardian. Then, select the contact.
2. Click **New** to add a new parent/guardian and enter their information.
8. Click the **Language** drop-down menu and choose the primary guardian's preferred language. You can choose from **English** or **Spanish**.
9. Click **Send Invitation**.
#### What Do I Do if the Guardian Does Not Have an Email Address?
If the guardian does not have an email address, they can complete the form on-site.
1. From the menu to the left, click **eForms**.
2. Click **View Status**.
3. Locate the appropriate record. For instructions, see [**View Status.**](https://knowledge.kidkare.com/centers/view-status-1?hsLang=en)
4. Click  in the column to the far right. This opens the form on the device you are using.
5. Have the guardian complete and sign the form.
#### Next Steps
Once parents complete the necessary enrollment and income eligibility forms, you must approve and renew participants on the Approve & Renew page. For more information, see [**Approve & Renew**](https://knowledge.kidkare.com/centers/approve-renew?hsLang=en). You can also monitor enrollment status on the View Status page. For more information, see [**View Status**](https://knowledge.kidkare.com/centers/view-status-1?hsLang=en).
---
### Send Renewal Invitations with eForms
1. From the menu to the left, click **eForms**.
2. Click **Send Invitations**.
3. Set filters for the centers/children to include.
1. Click the **State** drop-down menu and select the state(s) to view. This option is only available if you are set up for multiple states.
2. Click the **Centers** drop-down menu and select the specific center(s) to view.
3. Click the **Child Expired and Expiring Within** drop-down menu and select 30 Days, 60 Days, 90 Days, or Custom Date. If you select Custom Date, set a date range in the **From/To** boxes.
4. Click  next to **Hide Invitations That Are Currently Open** to hide open invitations. This is set to No by default.
5. In the **What Forms Would You Like to See** section, click elect Enrollment, Income Form, or both.
6. Click **Go**.
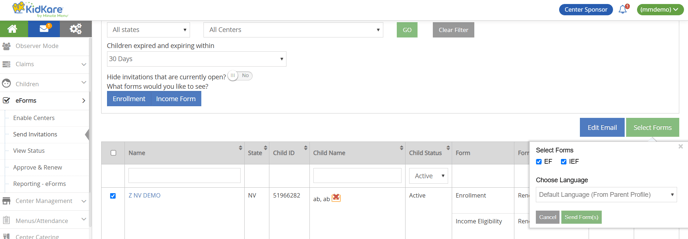
4. Check the box next to the child/center to which to send an invitation. You can also check the box at the top of the column to select all displayed records.
5. Click **Select Forms.** A pop-up opens.
1. Check the box next to each form to select. You can select **EF, IEF,** or both.
2. Click the **Choose Language** drop-down menu and select the language in which to send the invitations. You can choose from the following:
3. Click **Send Form(s)**.
- [Centers](https://knowledge.kidkare.com/centers/centers?hsLang=en#main-content)
- [Home Page & Settings](https://knowledge.kidkare.com/centers/centers?hsLang=en#home-page-settings)
- [Children](https://knowledge.kidkare.com/centers/centers?hsLang=en#children)
- [eForms](https://knowledge.kidkare.com/centers/centers?hsLang=en#eforms)
- [Menus/Attendance](https://knowledge.kidkare.com/centers/centers?hsLang=en#menus-attendance)
- [Calendar](https://knowledge.kidkare.com/centers/centers?hsLang=en#calendar)
- [Claims](https://knowledge.kidkare.com/centers/centers?hsLang=en#claims)
- [Expenses](https://knowledge.kidkare.com/centers/centers?hsLang=en#expenses)
- [Parachute](https://knowledge.kidkare.com/centers/centers?hsLang=en#parachute)
- [Reports](https://knowledge.kidkare.com/centers/centers?hsLang=en#reports)
- [Administration](https://knowledge.kidkare.com/centers/centers?hsLang=en#administration)
- [Import](https://knowledge.kidkare.com/centers/centers?hsLang=en#import)
- [Messages](https://knowledge.kidkare.com/centers/centers?hsLang=en#messages)
- [Guardian Portal](https://knowledge.kidkare.com/centers/centers?hsLang=en#guardian-portal)
- [At-Risk/SFSP Sites](https://knowledge.kidkare.com/centers/centers?hsLang=en#at-risk-sfsp-sites)
- [Sponsors of Centers](https://knowledge.kidkare.com/centers/sponsors-of-centers?hsLang=en#main-content)
- [Home Page & Settings](https://knowledge.kidkare.com/centers/sponsors-of-centers?hsLang=en#home-page-settings)
- [Observer Mode](https://knowledge.kidkare.com/centers/sponsors-of-centers?hsLang=en#observer-mode)
- [Claims](https://knowledge.kidkare.com/centers/sponsors-of-centers?hsLang=en#claims)
- [Children](https://knowledge.kidkare.com/centers/sponsors-of-centers?hsLang=en#children)
- [eForms](https://knowledge.kidkare.com/centers/sponsors-of-centers?hsLang=en#eforms)
- [Center Management](https://knowledge.kidkare.com/centers/sponsors-of-centers?hsLang=en#center-management)
- [Menus/Attendance](https://knowledge.kidkare.com/centers/sponsors-of-centers?hsLang=en#menus-attendance)
- [Foods](https://knowledge.kidkare.com/centers/sponsors-of-centers?hsLang=en#foods)
- [Reports](https://knowledge.kidkare.com/centers/sponsors-of-centers?hsLang=en#reports)
- [Tools](https://knowledge.kidkare.com/centers/sponsors-of-centers?hsLang=en#tools)
- [Administration](https://knowledge.kidkare.com/centers/sponsors-of-centers?hsLang=en#administration)
- [Import](https://knowledge.kidkare.com/centers/sponsors-of-centers?hsLang=en#import)
- [Payments](https://knowledge.kidkare.com/centers/sponsors-of-centers?hsLang=en#payments)
- [Messages](https://knowledge.kidkare.com/centers/sponsors-of-centers?hsLang=en#messages)
- [At-Risk & SFSP](https://knowledge.kidkare.com/centers/sponsors-of-centers?hsLang=en#at-risk-sfsp)
- [Minute Menu CX User Manual](https://knowledge.kidkare.com/centers/sponsors-of-centers?hsLang=en#minute-menu-cx-user-manual)
- [KidKare Academy for Sponsors](https://knowledge.kidkare.com/centers/sponsors-of-centers?hsLang=en#kidkare-academy-for-sponsors)
- [Beacon Verify](https://knowledge.kidkare.com/centers/sponsors-of-centers?hsLang=en#beacon-verify)
- [Get Help/Support](https://knowledge.kidkare.com/centers/get-help-support?hsLang=en)
Support Hours M-F 9am-5pm CST
Copyright © 2025, KidKare