
When a parent completes a paper enrollment or income eligibility form, you and/or your centers can scan and upload it to the child record. Each form you upload allows for notes and tracks who uploaded it, when it was uploaded, and the year to which it applies. At this time, you may only upload PDF forms.
Note: Storing a form does not impact any child enrollment or expiration dates, nor does it clear an expired form on the record. The child record itself must still be updated. Set any new dates for the child in the child's general information or CACFP tab, complete a new IEF calculation in the Oversight tab, or use eForms to manage child information.
Enabling Form Upload for Your Centers
If you wish to allow your centers to upload forms to child records, you must enable it for them. This setting only determines whether centers can upload forms. It does not impact sponsor users.
- From the menu to the left, click
 to open the Settings page.
 - Set Would you like to allow centers to upload scanned copies of enrollment and income eligibility forms to child records? to Yes. Your changes are saved automatically.
Upload Forms to Child Records
- From the menu to the left, click Children.
- Select Manage Child Information.
- Select the center to which the child belongs at the top of the page.
- Select the child to update.
- Click the Forms tab. This tab displays forms in a table, where each row is one form type for one year.
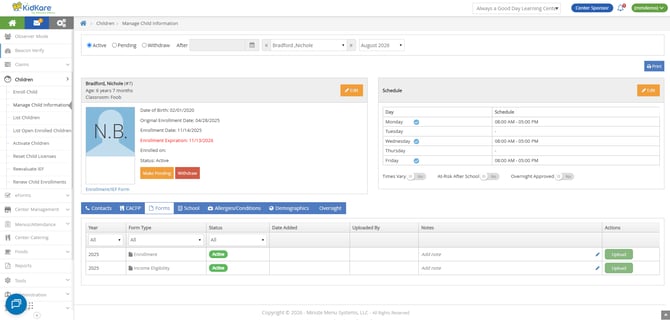
You can filter this table by:- Year: The year to which the form belongs. Years are added to Child Information when enrollment and income eligibility dates are updated on the child profile.
- Form Type: Choose to view and upload Enrollment forms, Income Eligibility forms, or All forms.
- Status: Choose from Active or Expired. Remember, this only refers to the enrollment expiration date and/or income eligibility expiration date - not the form itself.
- Once you find the row you need, click Upload. The upload new form modal opens.
- Click the Notes box and enter any notes about this form, as needed. You can add these notes later, as well.

- Click Choose File, navigate to the form to upload, and click Open. The form will upload, the modal will close, and you will see the newly uploaded form, the date it was uploaded, and who updated it.
- If you need to add additional notes or edit existing notes:
- Click
 in the Notes column. The Edit Note pop-up opens.
 - Update the note.
- Click Save.
- Click
Replacing & Downloading Uploaded Forms
The Forms tab stores all forms you've uploaded, including those in the past, and allows you to quickly retrieve scanned paper forms at a later date. Note that you must access a form from the Forms tab to see the form you've uploaded. You cannot download these from Reports or the Enrollment/IEF Form link under the child photo.
Replace a Form
If you need to replace a previously uploaded form:
- Locate the form to replace.
- On the row for the form, click Upload.
- Repeat Steps 7-8 from the Upload Forms to Child Records heading, above.
When you've replaced an uploaded form, the original form type will display in gray, and the Actions column will show Replaced instead of the upload button.
Tip: You can return to a replaced form row later to add additional notes, if needed.
Download a Form
The form type will display in blue text if a form is available to download. To download a form, click the form link in the Form Type column. For example, in the screenshot below, we can download the Enrollment Form, but the other forms have not been uploaded.
