The following Payments reports are available. This list is not comprehensive. To access these reports, click the Reports menu, select Payments, and then select the appropriate report.
-
Check ACH File - This re-generates an ACH file for a batch of direct deposits.
-
Check Payment Details - This re-prints a check stub for any check.
-
Check Register - This report allows you to print a check register for a batch of checks or direct deposits.
-
Check Register Batch Summary - This report lists all of the individual claim submission batches that exist for a given claim month, specifically noting the outgoing payments to providers. Compare this with the final State Claim Summary report and your bank account records to ensure that all funds have been accounted for. This report effectively represents the same information as found on the last page of the Check Register report (above).
-
Check Transaction File - This report allows you to regenerate the file used to export payment information to QuickBooks® or other accounting software.
-
Claims Not Paid - This report lists all claims that have not been accounted for as paid (whether a positive claim or a negative claim adjustment). This is useful for identifying any old claims that have slipped through cracks, zero-dollar claims, or claims that were put on hold and need to be cleared out of the system.
-
Non-Claim Payment Adjustments - This report provides a list of all non-claim payment adjustments.
-
Provider Tax - This report provides a total of the payments issued to providers in the calendar year. Note that the payments included are based on the actual payment dates, so it lags by at least a month. This report also includes a computation for the IRS Standard Meal Deduction, which is the total of all meals the provider attempted to claim, including disallowed meals, multiplied by the Tier 1 rate of reimbursement as of January for the given tax year. Print this report at the end of the calendar year and mail it to your providers.
Print the Check Register Report
The Check Register reports list your payments (checks and direct deposits), as well as any payments you have received from your providers. You can print this report from the List Payment History window or from the Reports menu. This article provides instructions for printing the report from the Reports menu.
-
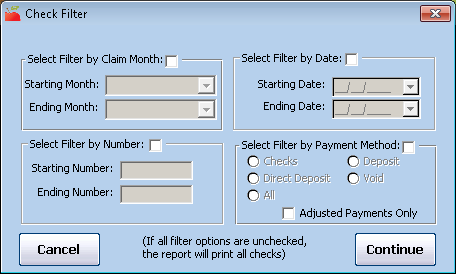
Click the Reports menu, select Payments, and click Check Register. The Check Filter dialog box opens.
-
Set filters for the checks to include. To print all checks, leave all of the filters blank.
-
Filter by Claim Month: Check this box, click the Starting Month and Ending Month drop-down menus, and select starting and ending months for the report. Note that if a check was issued and included payment for more than one claim month it is included if any of the claims paid by the check are included in the selected claim months.
-
Filter by Date: Check this box, click the Starting Date and Ending Date boxes, and set a starting and ending date for the report.
-
Filter by Number: Check this box, click the Starting Number and Ending Number boxes, and set a date range for the report.
-
Filter by Payment Method: Check this box and then select Checks, Direct Deposit, Deposit, Void, or All. Check the Adjusted Payments Only to include only those payments you've adjusted.
-
-
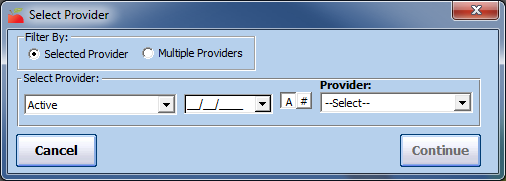
Click Continue. The Select Provider dialog box opens.
-
Select Multiple Providers or Selected Provider.
-
If you choose Selected Provider, click the Provider drop-down menu and select the provider. Go to Step 7.
-
If you choose Multiple Providers, click Continue. The Provider Filter window opens. Set the appropriate filters.
-
-
Click Continue. If you are printing the report for multiple providers, the Provider Nested Sort Order dialog box opens.
-
Click the First Sort By and the And Then By drop-down menus and select the primary and secondary sorts for the report.
-
Click Continue. The report is generated.
Print the Non-Claim Payment Adjustments Report
The Non-Claim Payment Adjustments report provides a list of all non-claim payment adjustments you have entered.
-
Click the Reports menu, select Payments, and click Non-Claim Payment Adjustments Report. The Select Provider dialog box opens.
-
In the Filter By section, select Selected Provider or Multiple Providers.
-
If you select Selected Providers, click the Provider drop-down menu and select the provider for whom to print the report.
-
If you select Multiple Providers, click Continue. The Provider Filter window opens. Set filters, as needed. Continue to Step 3.
-
-
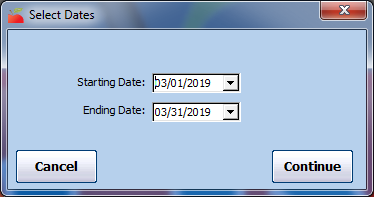
Click Continue. The Select Dates dialog box opens.
-
Click the Starting Date and Ending Date boxes and enter a date range for this report.
-
Click Continue.
-
If you are printing this report for a single provider, the Adjusted Payments Report dialog box opens. Go to Step 8.
-
If you a re printing this report for multiple providers, the Nested Sort Order dialog box opens.
-
-
Click the First Sort By and the And Then By drop-down menus and select the primary and secondary sorts for the report.
-
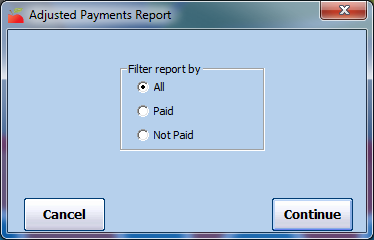
Click Continue. The Adjusted Payments Report dialog box opens.
-
Select All, Paid, or Not Paid.
-
Click Continue. The report (PDF) is generated.
Miscellaneous Reports
The following Miscellaneous reports are available. This list is not comprehensive. To access these reports, click the Reports menu, select Misc, and then select the appropriate report.
-
Export File Reports: This report lists of all report formats you have saved from the List Export Files.
-
Sponsor Preference Changes: This report lists the changes you have made to your sponsor preferences for a specified date range.
-
Sponsor Preferences: This report lists all of the sponsor preferences found in the Sponsor Preferences window. It includes a description of each preference and your current setting.