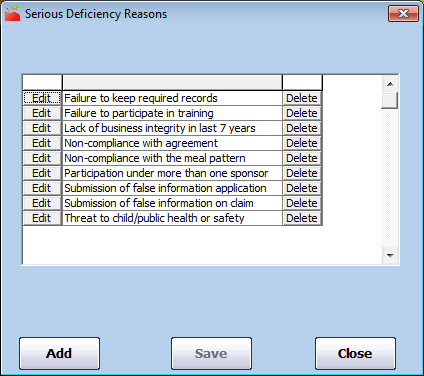
Set Up Serious Deficiency Reasons
Serious deficiency reasons are a list of all the reasons why a provider might be considered Seriously Deficient. These reasons include things like failure to keep daily paperwork, deviation for USDA guidelines, and so on. Minute Menu HX comes with several default serious deficiency reasons, but you can set up additional reasons to suit your business needs.
-
Click the Tools menu and select Serious Deficiency Reasons. The Serious Deficiency Reasons window opens.
-
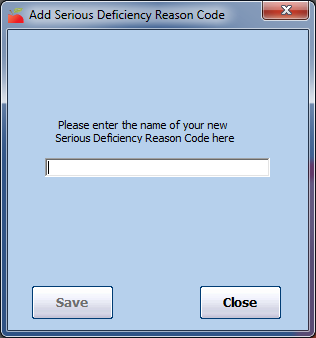
Click Add. The Add Serious Deficiency Reason Code dialog box opens.
-
Click the text box and enter the serious deficiency reason.
-
Click Save.
-
Click OK at the confirmation prompt.
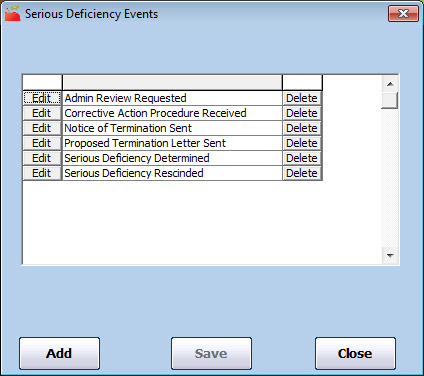
Set Up Serious Deficiency Events
Serious deficiency events are particular milestones in the corrective action process. Each Serious Deficiency begins with notice given to the provider and ends with termination of the provider or documentation that the provider has corrected all mistakes. Set up milestones specific to your corrective action process in the Serious Deficiency Events window.
-
Click the Tools menu and select Serious Deficiency Events. The Serious Deficiency Events window opens.
-
Click Add. The Add Serious Deficiency Event Code dialog box opens.
-
Click the text box and enter the new event code.
-
Click Save.
-
Click OK at the confirmation prompt.
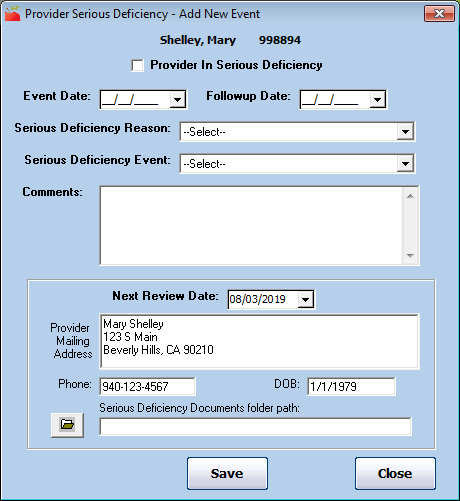
Add a Serious Deficiency Event
Food Program regulations require that you put providers into a corrective action process any time you find a problem with them that is considered a Serious Deficiency. The definition of what constitutes a serious deficiency varies between states, and the required corrective action varies between deficiency types.
Before you put a provider in serious deficiency, first set up serious deficiency reasons and events as shown above.
To add a new serious deficiency event:
-
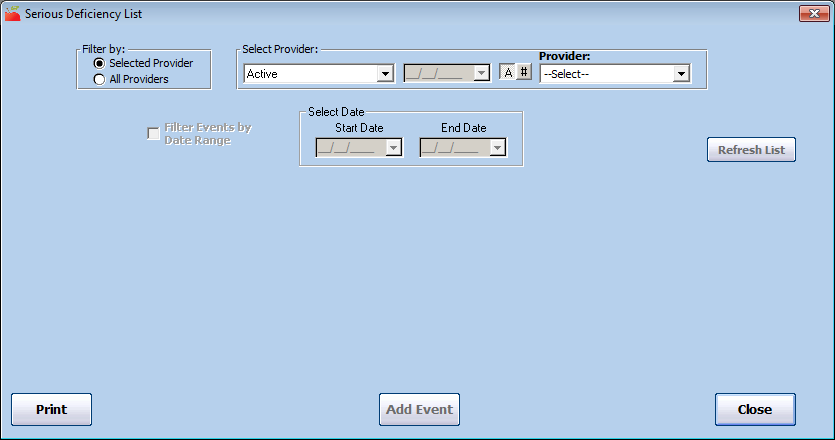
Click the Tools menu and select Provider Serious Deficiency. The Serious Deficiency List window opens.
-
In the Filter By section, click Selected Provider.
-
Click the Provider drop-down menu and select the provider.
-
Click Add Event. The Provider Serious Deficiency Add New Event window opens.
-
If this is the first event for this provider, check the Provider in Serious Deficiency box. When you add additional events later, this box is checked by default. Clear it once the provider is no longer in Serious Deficiency.
-
Click the Event Date box and enter the date of the event. This is typically the current date.
-
Click the Follow-up Date box and enter the due date for the next action. This could be a response from the provider or a response from you.
-
Click the Serious Deficiency Reason drop-down menu and select the reason you are placing this provider in Serious Deficiency. If this is a secondary event, this reason defaults to the one you selected when you initially placed this provider in Serious Deficiency. A provider could also have multiple serious deficiency reasons at once.
-
Click the Serious Deficiency Event drop-down menu and select the step in the Serious Deficiency process you are recording. For example, you may have an event called Serious Deficiency Determined that you would assign if you are just now placing this provider in Serious Deficiency.
-
Click the Comments box and enter any details about this event.
-
Click the Next Review Date box and set a new review date for this provider, if needed. Setting a date here updates the provider's profile automatically.
-
Copy the provider's address, phone number, and date of birth and paste them into the form letter you use for Serious Deficiency, if needed.
-
Click
 next to the Serious Deficiency Documents Folder Path box and select a file location in which you store documents (letters, forms, and so on) associated with the provider's Serious Deficiency. When you review this Serious Deficiency moving forward, you can open this folder to review those files.
 -
When finished, click Save.
-
Click OK at the confirmation prompt.
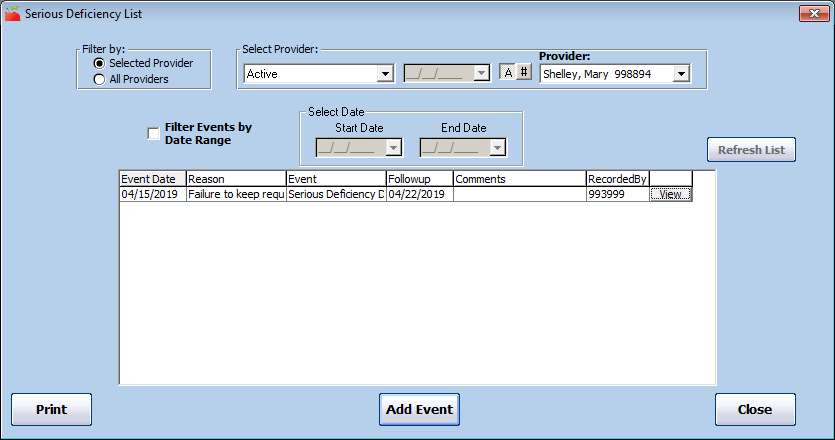
Review Serious Deficiencies
You can review the progression of a provider's Serious Deficiency process in the Provider Serious Deficiency List window.
-
Click the Tools menu and select Provider Serious Deficiency. The Serious Deficiency List window opens.
-
In the Filter By section, select All Providers or Selected Provider. If you choose Selected Provider, click the Provider drop-down menu and select the provider to view.
-
Check the Filter Events by Date Range box to filter events in a specific date range. Then, click the Start Date and End Date boxes and select the date range to view.
-
Click Refresh List. Providers meeting the limits you set display.
-
Click View next to an event to view event details. When finished, click Close.
-
Click Print at the bottom of the window to print the Serious Deficiency Detail report. This report lists all details associated with the provider's corrective action process. You can also print this report from the Reports menu.