Create Staff Accounts
All sponsor/back-office staff members should have their own, unique login ID and password with which to access Minute Menu HX. This includes your monitors, who may need to log in to Minute Menu HX to access reports that can help them plan home visits.
Each sponsor who uses Minute Menu HX is assigned an administrative login ID to use when running Minute Menu HX for the first time. This three-digit ID is your Minute Menu HX customer number. This login ID is not subject to any user security restrictions. If more than one person (including field staff) will work in Minute Menu HX, you should create a user account for each user.
To add users:
-
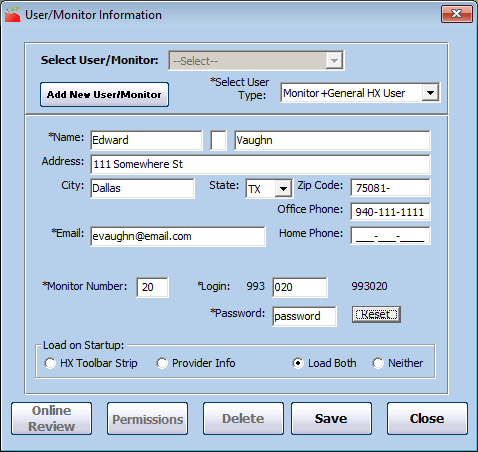
Click the Administration menu and select Users/Monitors. The User/Monitor Information dialog box opens.
-
Click Add New User/Monitor.
-
Click the Select User Type drop-down menu and choose from the following:
-
General HX User: These users log in and use Minute Menu HX, but do not complete home reviews.
-
Monitor: These users are assigned to providers and are associated with reviews.
-
Monitor + General HX User: These users are assigned to providers for reviews and can also use the other features of Minute Menu HX.
-
-
Click the Name boxes and enter the staff member's first and last name. You can also include their middle initial.
-
Enter the staff member's contact information in the Address, City, State, Zip Code, Office Phone, Home Phone, and Email boxes. The Email box is the only box that is required.
-
Click the Login box and enter a login ID for this user. This must be six digits long and must begin with your Minute Menu HX customer number.
-
Click the Password box and enter a password for this user, or accept the password that was randomly generated by the system. Passwords are case-sensitive.
-
To restrict this user to a particular set of providers:
-
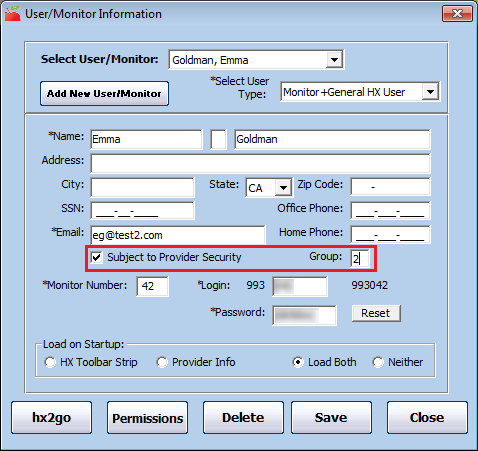
Check the Subject to Provider Security box.
-
Click the Group box and enter the group number to which to restrict this user. For more information about Provider Security, see User Security below.
-
-
If you selected Monitor or Monitor + General HX User in Step 3:
-
Click the Monitor Number box and enter a two-or-three digit number to use on scannable review forms. This is usually also part of the monitor's online review login ID.
-
Click Online Review. The Online Review Permissions dialog box opens.
-
Check the box next to each online review function this user can access.
-
Click Save.
-
-
In the Load on Startup section, specify what this user sees when they log in to Minute Menu HX. They can change these settings later, if needed. You can choose from the following:
-
HX Toolbar Strip
-
Provider Info
-
Load Both
-
Neither
-
-
Click Save.
Manage User Security
You can use security options to divide responsibility among your staff. There are two types of user security available for your users:
-
Functional Security: This type of security allows you to give users full, read-only, or no access to various functions. For example, you can give some users access to the check-writing features, while other users can only view past paid checks. Functional security allows you to completely customize what users can and cannot access in Minute Menu HX.
-
Provider Security: This type of security allows you to assign certain users to a particular set of providers. You assign each provider to a group number and then assign each user to that group number. Users can only see the providers in their own group within any part of the software.
To enable the security type you wish to use for your business:
-
Click the Administration menu and select Sponsor Preferences. The Sponsor Preferences window opens.
-
Click the Select the Category to Move To drop-down menu and select U. General Behavior.
-
Check the box next to the security type to use.
-
Click the Select Setting drop-down menu and select Y or N.
-
Click Save.
These settings can only be changed by the Administrator or by a user that has full permissions for Sponsor Preferences.
Manage User Permissions
If you use Functional Security, you must assign permissions to each user you create.
-
Click the Administration menu and select Users/Monitors.
-
Click the Select User/Monitor drop-down menu and select the user for which to manage permissions. You can also add a new user. For instructions, see Create Staff Accounts above. Note that if you create a new user, you must re-select the user after you save before you can manage their functional permissions.
-
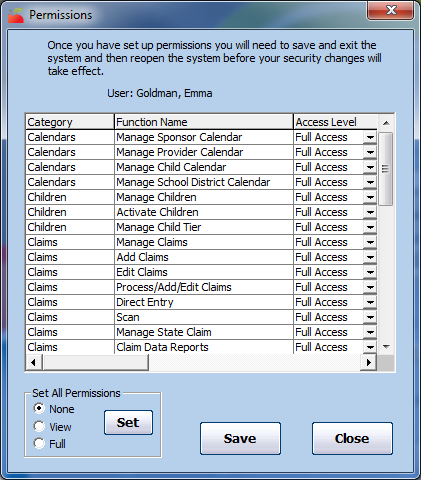
Click Permissions. The Permissions dialog box opens.
-
Click the Access Level drop-down menu for each permission and choose from the following:
-
Full Access: The user can review and update information in the given area.
-
View Only Access: The user can only view information in the given area. The user cannot save any changes. This access level gives the user access to any related reports and on-screen functions.
-
No Access: The user cannot see any information for the given area.
-
-
Click Save.
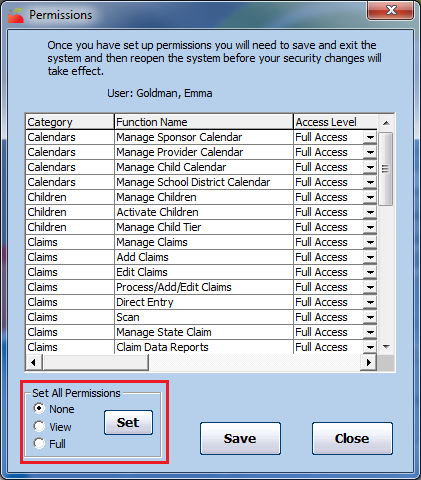
Mass-Changing Access Levels
You can automatically assign all functional groups to one particular access level, if needed. You can then scroll through the list of permissions and update specific functions that should not be the set to the default you select.
In the Set All Permissions section:
-
Select None, View, or Full.
-
Click Set.
-
Change individual functions, as needed.
-
Click Save.
Create Provider Access Groups
If you use Provider Security, you can assign any Minute Menu HX user to any Provider Group Number. Users are still subject to any functional permissions you set, but they can only see data for the providers to which they are assigned. For example, a user assigned to Group 5 can only see providers who are also assigned to Group 5. If you do not specifically assign a user to a provider group, that user can see all providers in the software.
Before you can use Provider Access Groups, you must assign providers to groups and then assign users to those same groups. You can associate multiple Minute Menu HX users with any given Provider group. Several providers are usually assigned to the same group number.
Assigning Users to Provider Groups
To assign a user to a provider group:
-
Click the Administration menu and select Users/Monitors. The User/Monitor Information window opens.
-
Click the Select User/Monitor drop-down menu and select the user/monitor to edit.
-
Check the Subject to Provider Security box. The Group box displays.
-
Click the Group box and enter the appropriate group number.
-
Click Save.
Assigning Providers to Groups
Any user who has full access to Provider Information can edit a provider's group. However, if a user who is subject to provider security changes a provider's group number, they may no longer be able to see the provider. For example, if a user assigned to Group 5 changes a provider from Group 4 to Group 4, the user can no longer see this provider in Provider Information or in any other function. Exercise caution when assigning provider group numbers.
The provider remains in the Provider drop-down menu until the user changes the list filter or closes and re-opens the Provider Information window, which refreshes the list.
To assign a provider to a particular group:
-
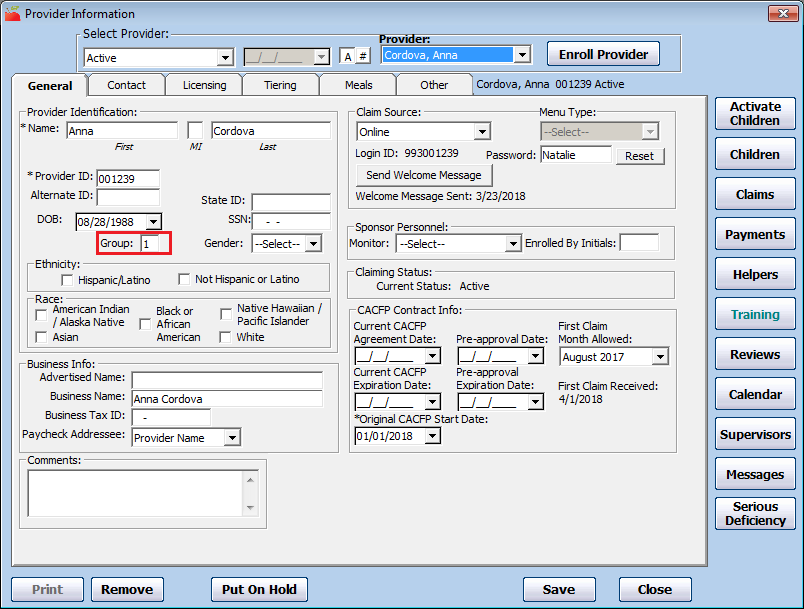
Click the Providers menu and select Provider Information. The Provider Information window opens.
-
Click the Provider drop-down menu and select the provider. The provider details display.
-
In the Provider Identification section in the General tab, click the Group box and enter the appropriate group number.
-
Click Save.
Viewing the Supervisor's List
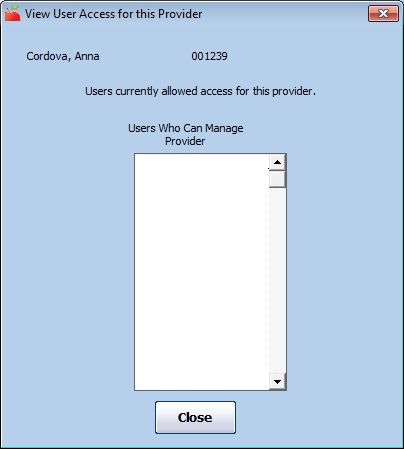
Any user who is not subject to provider security can access the Supervisors list in the Provider Information window. This list notes all users who are able to see this provider's information. This includes all users assigned to this provider's group, and users who are not subject to provider security.
-
Click the Providers menu and select Provider Information. The Provider Information window opens.
-
Click the Provider drop-down menu and select the provider. The provider details display.
-
Click Supervisors (to the right). The View User Access for This Provider dialog box opens.
-
When finished, click Close.