Add Foods
To add a new food to your food list:
-
From the menu to the left, click Foods.
-
Click Food List. The Food List page opens.
-
Click New Food.
-
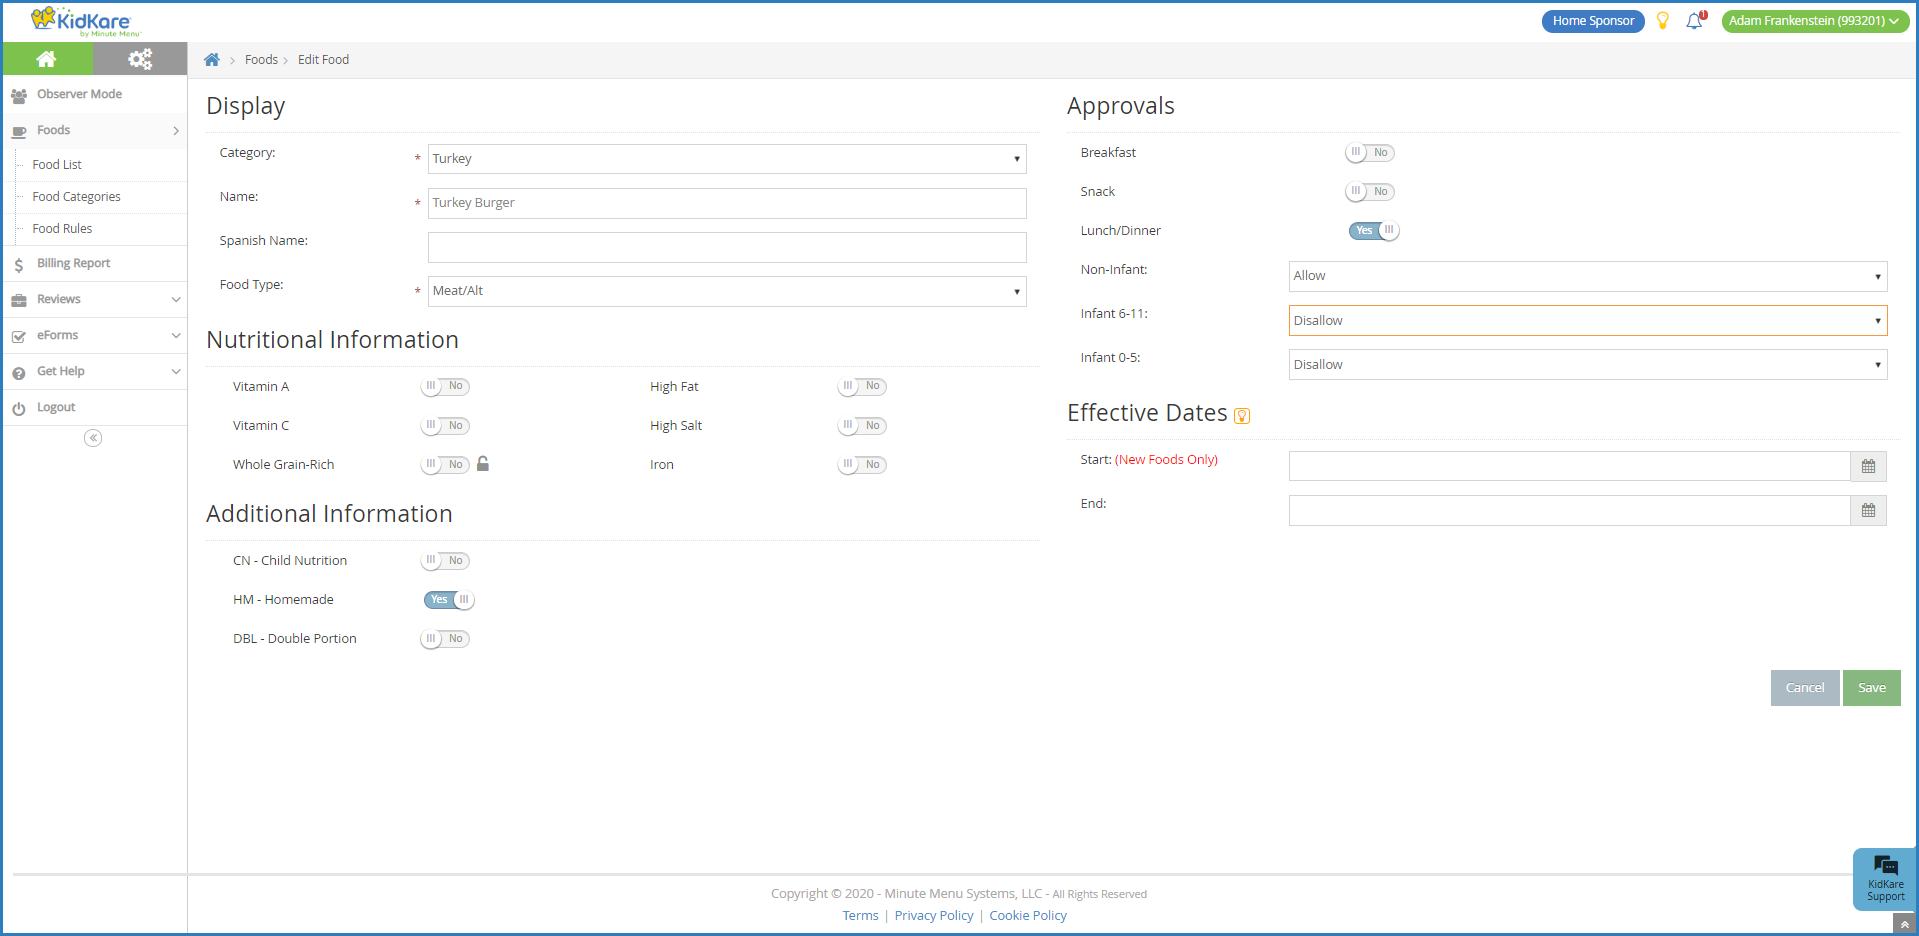
In the Display section:
-
Click the Category drop-down menu and select the category in which to list the food.
-
Click the Name box and enter the name of this food.
-
Click the Spanish Name box, and enter the Spanish name for this food.
-
Click the Food Type drop-down menu and select the food type.
-
If your providers use scannable forms, click the Food Number box and enter a number between 1 and 288 that does not include the digit 9. Use the Food List report to make sure that you do not duplicate food numbers within the same food type. You can also click Suggest to generate a number.
-
-
In the Nutritional Information section, click
 next to each nutritional marker that applies to this food:
-
Vitamin A
-
Vitamin C
-
Whole Grain-Rich
Note: If you set Whole Grain-Rich to Yes, the food defaults to whole grain-rich when centers add the food to their menus.
-
High Fat
-
High Salt
-
Iron
-
-
In the Additional Information section, click
 next to each item that applies:
-
CN - Child Nutrition: A child nutrition label is required.
-
HM - Homemade: The food must be homemade to be creditable.
-
DBL - Double Portion: The food must be a double portion.
-
-
In the Approvals section:
-
Click
 next to each meal for which this food is approved.
 -
Click the Non-Infant, Infant 6-11, and Infant 0-5 drop-down menus and select Allow, Warn, or Disallow.
-
-
In the Effective Dates section:
-
If this food is only approved starting on a specific date, click the Start box and enter a start date for the food. If you want this food to be available immediately, do not add a start date.
-
If this food is only approved for a limited time, click the End box and enter an end date for the food. If you enter a date in this box, the food will not be available once the end date is reached.
-
-
Click Save.
Edit Foods
-
From the menu to the left, click Foods.
-
Click Food List. The Food List page opens.
-
Locate the food to change. You can filter the displayed list, as needed.
-
Click Infant Cereal, Milk, Meat/Alt, Bread/Alt, Vegetables, and/or Fruit to filter to specific food types.
-
Click the Name box and begin typing a food name to filter the food list.
-
Click the Category drop-down menu and select the category to which to filter.
-
Click the Name, Category, Food Type, Start, or End columns to sort information in ascending or descending order.
-
Click
 and select Yes to include expired foods, or select No to exclude expired foods.
-
-
Click the food to change. The Edit Food page opens.
-
Change the food, as needed.
Note: Do NOT add a Start date to existing foods. Adding a start date to an existing food removes the food from your list until the start date is reached. You should only use start dates on new foods.
-
When finished, click Save.
Remove Foods
To remove a food from your food list, set an effective end date. Once this date is reached, the food will no longer be available to providers.
To do so:
-
From the menu to the left, click Foods.
-
Click Food List. The Food List page opens.
-
Locate the food to remove. You can filter the displayed list, as needed.
-
Click Infant Cereal, Milk, Meat/Alt, Bread/Alt, Vegetables, and/or Fruit to filter to specific food types.
-
Click the Name box and begin typing a food name to filter the food list.
-
Click the Category drop-down menu and select the category to which to filter.
-
Click the Name, Category, Food Type, Start, or End columns to sort information in ascending or descending order.
-
-
Click the food to remove. The Edit Food page opens.
-
In the Effective Dates section, click the End box and enter a date. This should be the last day that the food is available to providers. Use today's date to remove the food immediately.

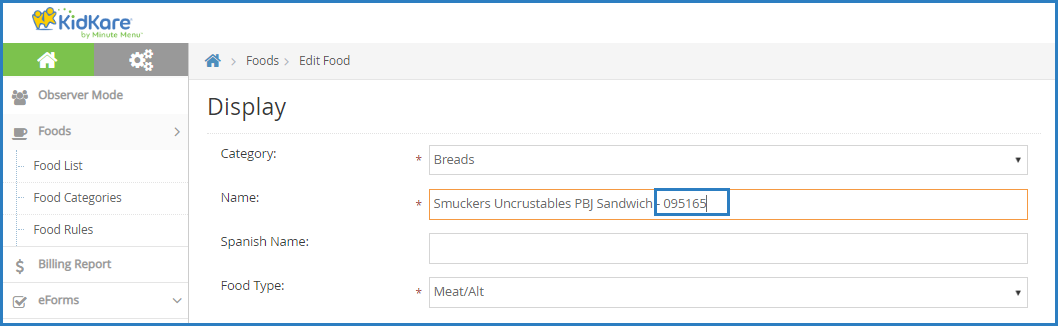
Add CN Label Numbers to Foods
When adding foods to your food list, you can include the CN label number somewhere in the food name. This lets the State and your providers know that the food is a CN-labeled product being offered at meal service. The CN label details should be stored on-location. If you choose to include these label numbers, develop a naming convention that you use consistently across the board. Consistency makes it easier to track these foods.
The figure below show what this might look like in KidKare. The number after the dash is the CN label number.
Mark Whole Grain-Rich Foods
Mark all whole grain-rich foods on your food list. Foods that are marked as whole grain-rich on the food list default to whole grain-rich when providers select it on menus. However, only mark foods that are always whole grain-rich. Providers can mark any bread/alternate as whole grain-rich when the meal is recorded.
Examples of whole grain-rich foods that you can mark as whole grain-rich in the food tool:
-
Whole wheat
-
Brown rice
-
Wild rice
-
Oatmeal
-
Bulgur
-
Whole-grain corn
-
Quinoa
Examples
A provider selects tortilla as the bread/alternate item. They can indicate when recording the tortilla that it was whole grain-rich. Tortillas may or may not be whole grain-rich, so let the center indicate whether it was when the meal was recorded. Do not mark tortillas as a whole grain-rich food in the food tool.
A provider selects brown rice as the bread/alternate item. Brown rice is always a whole grain-rich food. Mark brown rice as whole grain-rich in the food tool so that it automatically defaults as whole grain-rich when the center records the meal.
To mark a food was whole grain-rich:
-
From the menu to the left, click Foods.
-
Click Food List.
-
Click Bread/Alt at the top of the page to filter to just your breads/bread alternates.
-
Click the food you need to mark. The Edit Food page opens.
-
In the Nutritional Information section, click
 next to Whole Grain-Rich to set it to Yes.
 -
To lock the slider in the on/off position, click the lock icon. For example, you can lock the slider to Off for foods like white bread and club crackers, or you can lock it to On for foods like brown rice or whole wheat pancakes.

Providers should be trained to know how to identify whole grain-rich foods and verify that the whole grain-rich option is selected or deselected accordingly when recording the meal, regardless of how the food defaults. Direct your providers to the Enter Meals article on the KidKare help site for more information.
Create Food Categories
Categorize your foods to make it easier for your providers to select them when entering menus. These categories are also included on your food chart. Watch the video below, or click a link on the table of contents to jump to a specific food category task.
Adding Food Categories
-
From the menu to the left, click Foods.
-
Click Food Categories.
-
Click Add Category. A pop-up opens.
-
Click the Name box and enter a name for this category.
-
Click the Spanish Name box and enter a Spanish name for this category.
-
Click Save.
Editing Food Categories
-
From the menu to the left, click Foods.
-
Click Food Categories.
-
Locate the category to edit. You can click the Name box or the Spanish Name box and begin typing a food category to filter the list.
-
Click the category to edit.
-
Update the name and/or Spanish name, as needed.
-
Click Save.
Deleting Food Categories
Before you can delete a food category, you must move all foods assigned to that category to a different category. To do so:
-
From the menu to the left, click Foods.
-
Click Food List.
-
Click the Category drop-down menu and select the category you are removing. The foods assigned to that category display.
-
Click the first food in the list. The Edit Food page opens.
-
Click the Category drop-down menu and select a new category for this food.
-
Click Save.
-
Click
 at the top of the page to move to the next food.
 -
Repeat Steps 7-9 until all foods have been removed from the category you are deleting.
Now you can delete the category:
-
Click Foods.
-
Click Food Categories.
-
Select the category to remove. A pop-up opens.
-
Click Delete.
-
At the Are You Sure prompt, click Delete.
Create Food Rules
Adding Food Frequency Rules
We strongly recommend that you review your existing rules before adding a new one to ensure that you are not adding a duplicate.
-
From the menu to the left, click Foods.
-
Click Food Rules. The Rules page opens.
-
Click New Rule and choose from the following:
-
Limit Foods/Day
-
Limit Foods/Week
-
Limit Foods/Month
-
-
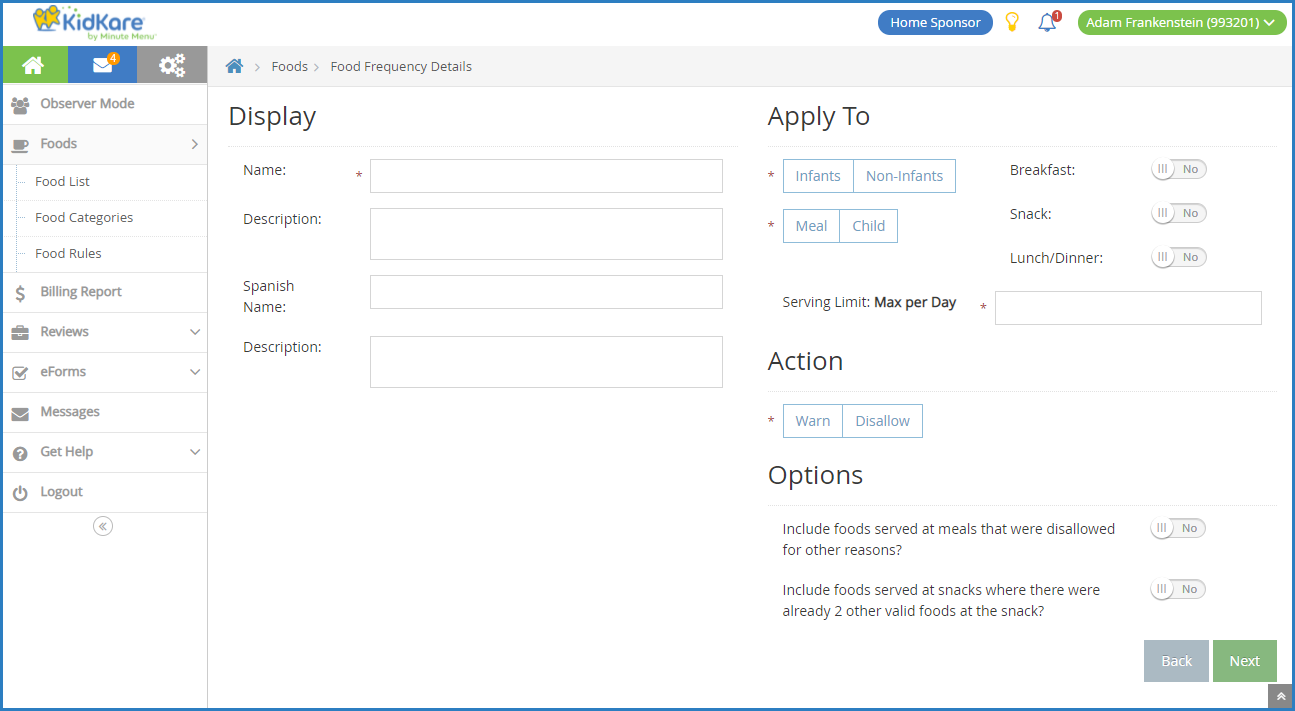
The Food Frequency Details page opens. In the Display section:
-
Click the Name box and enter a name for this rule. This box is required.
-
Enter a description, Spanish name, and Spanish description, if needed.
-
-
In the Apply To section, select the age group and meals to which the rule applies:
-
Click Infants or Non-Infants.
-
Click Meal or Child.
-
Click
 next to each meal to which this rule applies.
 -
Click the Serving Limit box and enter the number of servings of this food allowed for the time period you selected in Step 5.
-
-
In the Action section, select Warn or Disallow.
-
In the Options section, click
 next to each setting that applies:
-
Include Foods Served at Meals that were Disallowed for Other Reasons
-
Include Foods Served at Snacks Where There were Already 2 Other Valid Foods at Snack
-
-
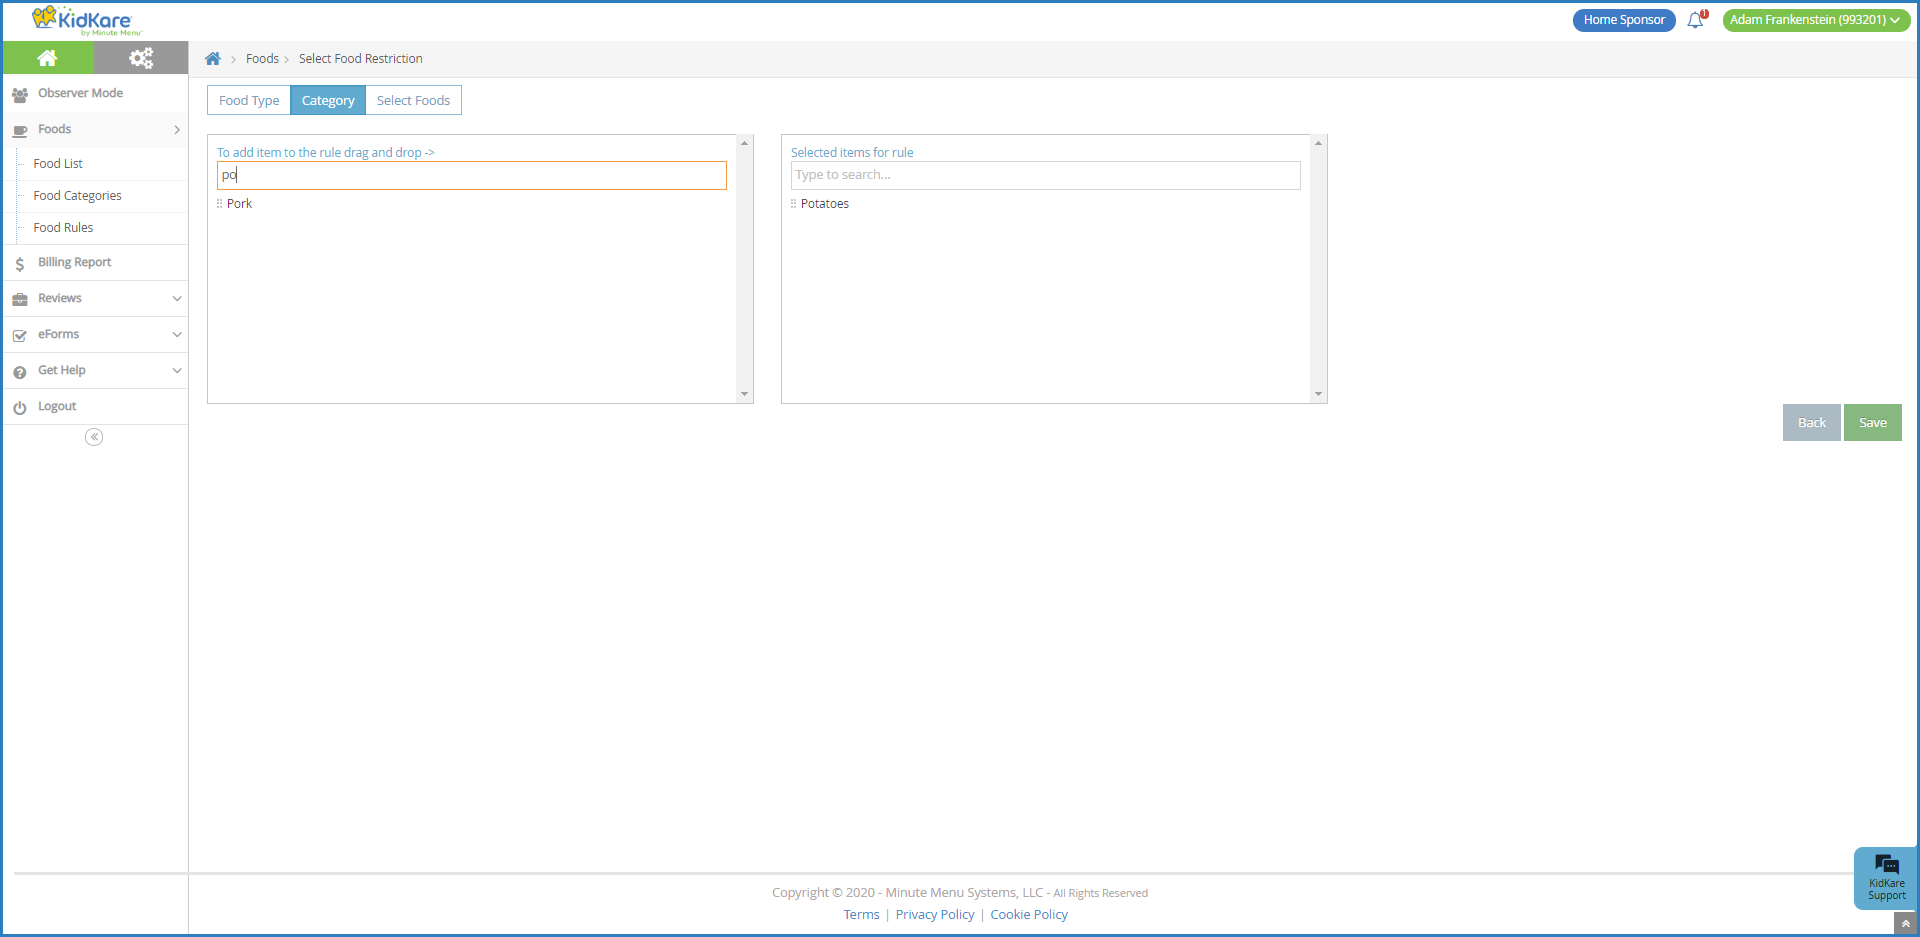
Click Next. The Select Food Restriction page opens.
-
Select a food type, category, or food to restrict.
-
To restrict a food type:
-
Click Food Type.
-
Select the type.
-
-
To restrict a food category:
-
Click Category.
-
Click the category in the first box and drag and drop it into the Selected Items for Rule box. You can click the Type to Search box and enter a category name to filter the categories that display.
-
-
To restrict a specific food:
-
Click Select Foods.
-
Click the food in the first box and drag and drop it into the Selected Items for Rule box. You can click the Type to Search box and enter a food name to filter the foods that display.
-
-
-
Click Save.

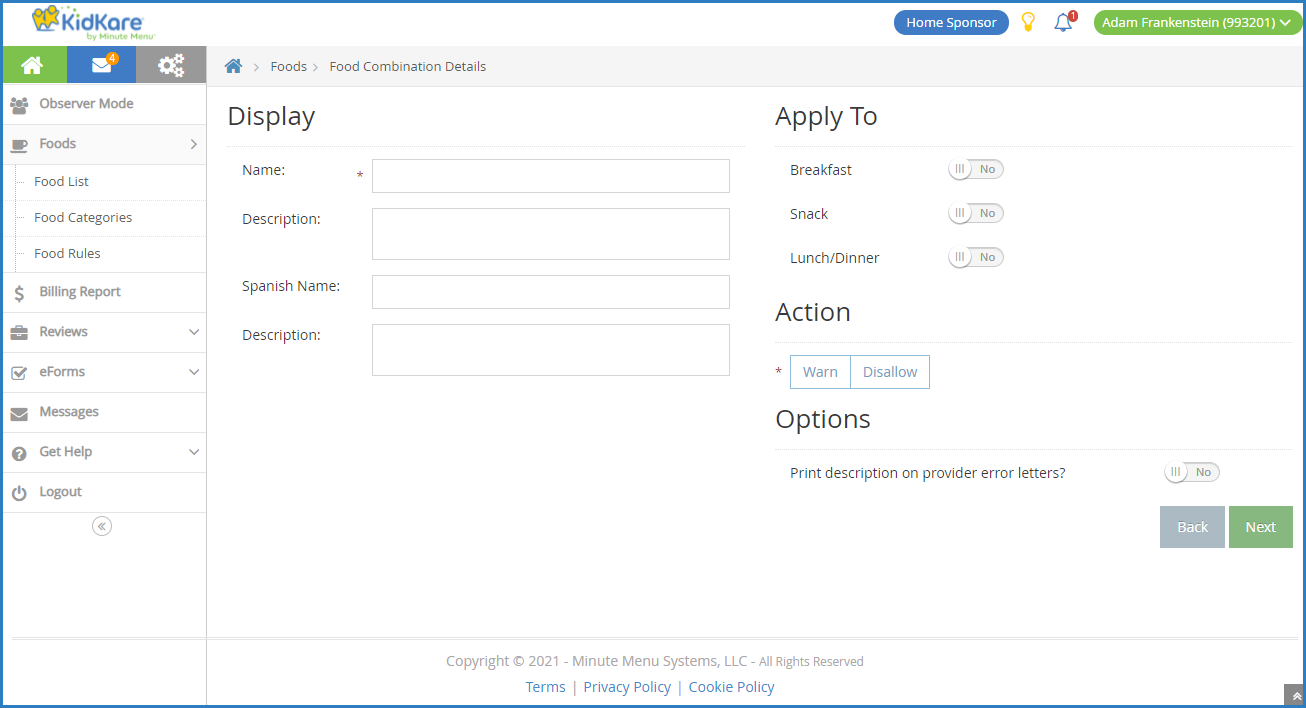
Adding Food Combination Rules
-
From the menu to the left, click Foods.
-
Click Food Rules. The Rules page opens.
-
Click New Rule and choose from the following:
-
Any 2 Foods
-
All Foods
-
-
The Food Combination Details page opens. In the Display section:
-
Click the Name box and enter a name for this rule. This box is required.
-
Enter a description, Spanish name, and Spanish description, if needed.
-
-
In the Apply To section, select the meals to which the rule applies.
-
In the Action section, select Warn or Disallow.
-
In the Options section, click
next to Print Description on Provider Error Letters to include this warning/disallowance on Provider Error Letters. -
Click Next. The Select Food Restriction page opens.
-
Select a food type, category, or food to restrict.
-
To restrict a food type:
-
Click Food Type.
-
Select the type.
-
-
To restrict a food category:
-
Click Category.
-
Click the category in the first box and drag and drop it into the Selected Items for Rule box. You can click the Type to Search box and enter a category name to filter the categories that display.
-
-
To restrict a specific food:
-
Click Select Foods.
-
Click the food in the first box and drag and drop it into the Selected Items for Rule box. You can click the Type to Search box and enter a food name to filter the foods that display.
-
-
-
Click Save.
Limit Juice
Juices are limited to once per day for non-infants and not allowed at all for infants. As such, you need to ensure that you do the following:
-
Mark all juices as juice in the food tool.
-
Ensure that all juices are set to Disallow for infants.
-
Ensure that juices are all stored in the Juices category.
To do so:
-
From the menu to the left, click Foods.
-
Click Food List.
-
Click the Name box and type juice to filter to the majority of juices. You may also need to search for cider or any other juice that does not have the word juice in the name later. You can also click Vegetables and Fruit at the top of the page to limit to all foods in those categories, and then search within those categories.
-
Click the juice to update.
-
Click the Category drop-down menu and assign the juice to your Juice category.
-
Ensure that the Food Type is correct. For example, apple juice should be a fruit, and carrot juice should be a vegetable.
-
Click
 next to Juice to mark this as a juice. The Infant 6-11 and Infant 0-5 boxes in the Approvals section are automatically set to Disallow and cannot be changed.
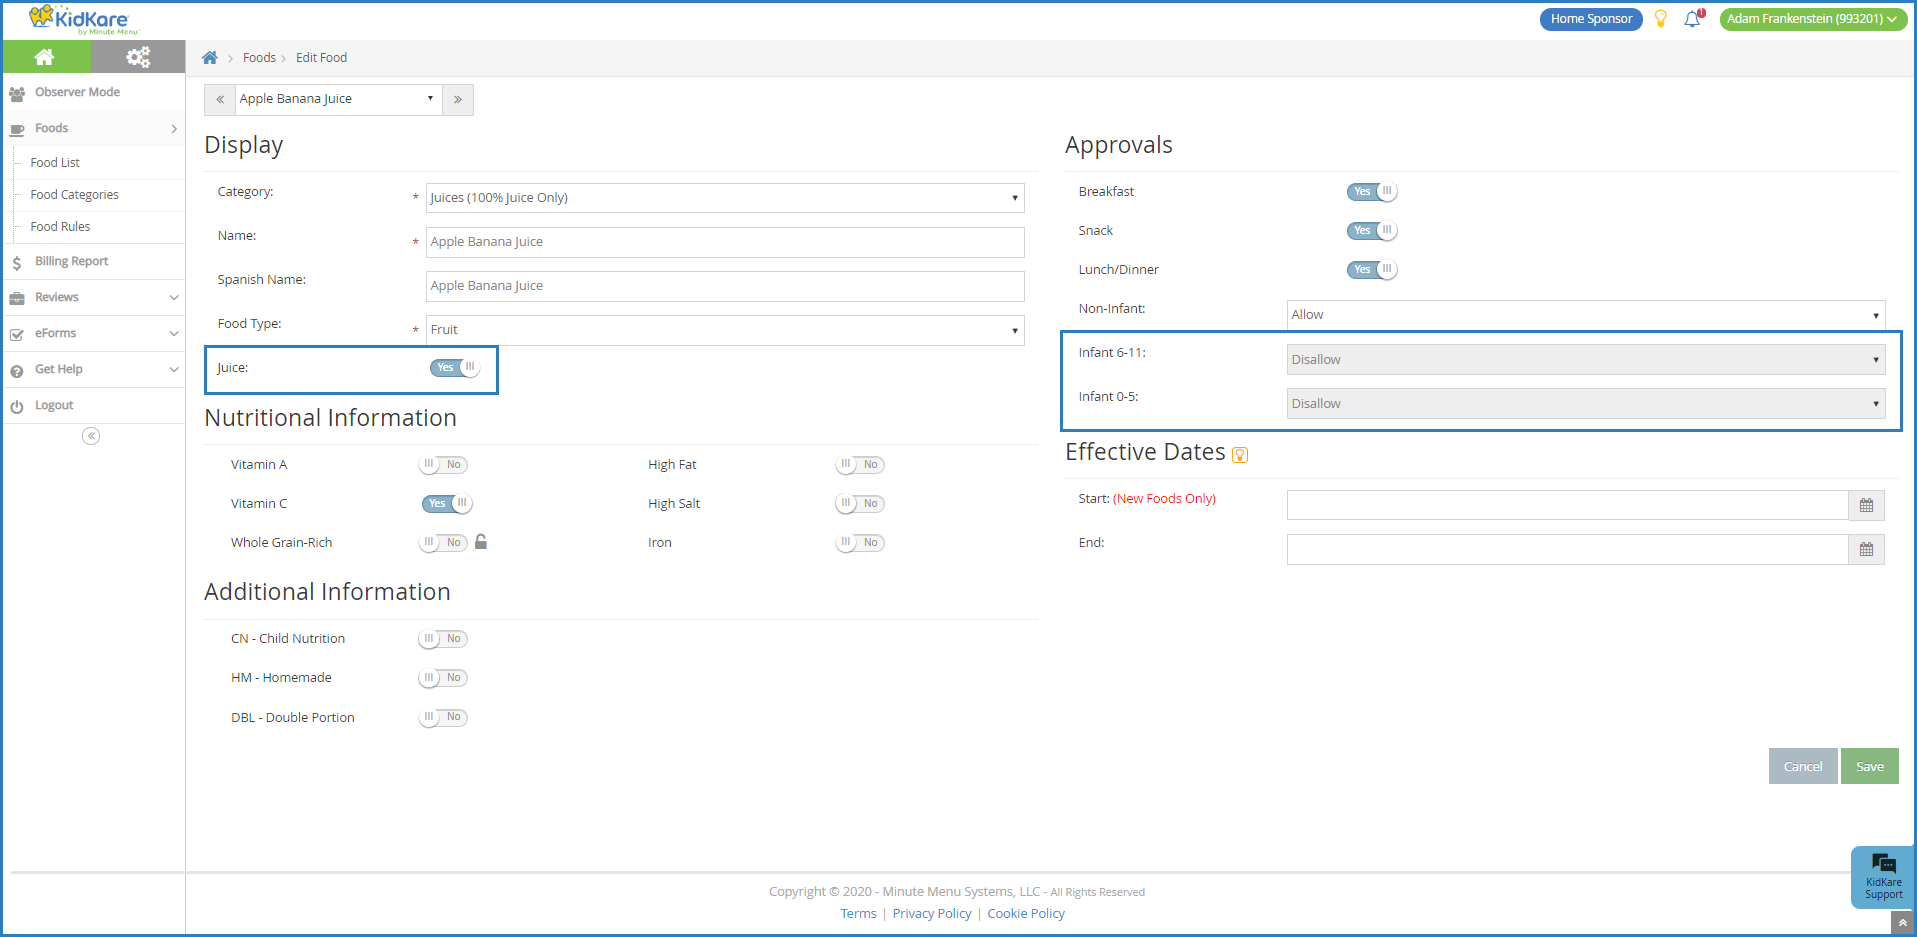
-
Click Save.
-
Click
 to move to the next juice on your list.
Print Your Food Chart
In order to print your food list:
-
From the menu to the left, click Foods and select Food List.
-
Click Export. A spreadsheet downloads. From here, you can customize the list with your own logo, contact information, and so on.

Sample report:
