Create a Manual Claim
If a provider sends meal and attendance information on manual forms, you can either handle the claim as a Direct Entry claim or as a manual claim. If you handle this as a manual claim, you must determine the appropriate meal count information manually. Then, you can enter these claim counts and any claim notes into Minute Menu HX.
Note that these counts are not subject to the same checks as Direct Entry or other processed claims. However, Minute Menu HX still applies certain checks to these claims to provide some basic checks and balances.
-
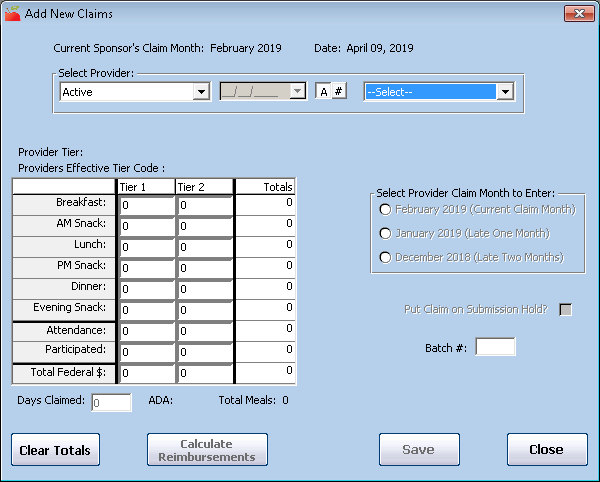
Click the Claims menu and select Enter New Claim Manually. The Add New Claims window opens.
-
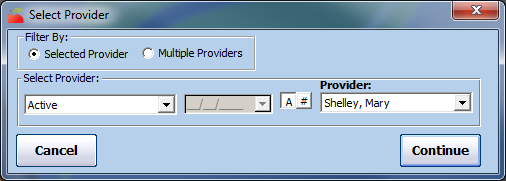
In the Select Provider section, select the provider for whom to enter a claim.
-
Click the first drop-down menu and select the provider status by which to filter the Provider drop-down menu.
-
Click # to sort the list by number, and click A to sort by name.
-
Click the Provider drop-down menu and select the provider.
-
-
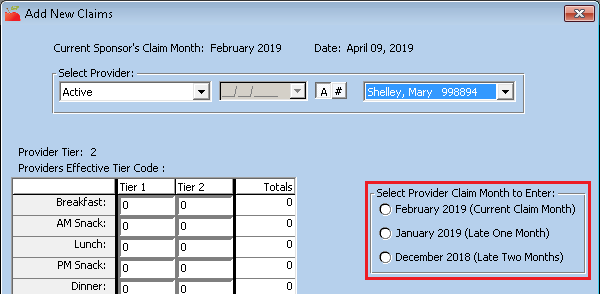
In the Select Provider Claim Month to Enter section, select the claim month for which to enter totals. If a claim already exists for the provider in the month you select, you must select a different claim month before you continue. You can enter claims up to two months prior to the current claim month.
Note: The provider's Effective Tier is the provider's Tier as of the first day of the claim month you selected. This is determined by cross-checking the provider's Tier eligibility dates in the provider's file. Even if the provider is marked as Tier 1, their Effective Tier is Tier 2 if the eligibility dates in their file do not cover this claim month. When you save this claim, the Claim Tier is assigned based on this Effective Tier and the claim's meal counts. This means that if the provider's Effective Tier is 2 and you save only Tier 1 meal counts, the claim is saved as a Tier 2 Hi claim. If the system assigns the wrong Tier, you can make a claim adjustment later to change the claim's tier.
-
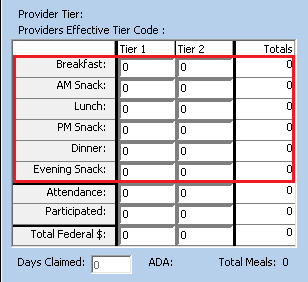
In the table to the left, click each Meal field and enter the total number of each reimbursable meals for the month. Ensure that you only enter Tier 1 totals in the Tier 1 column and enter Tier 2 totals in the Tier 2 column.
-
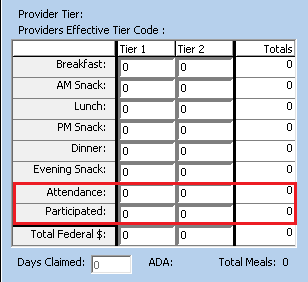
Click the Attendance box and enter the total attendance for the month per child tier. This represents the total number of unique children of the given Tier served per day. This information is verified when you attempt to save and is cross-checked against the children (of the relevant Tier) who were enrolled with the provider in the selected month. This must be at least as high as the highest meal count in the relevant Tier before you can save the manual claim. It cannot be higher than the number of children who participated in the claim (in the given Tier) times the number of days claimed.
-
Click the Participated box and enter the number of unique children (by Tier) who participated in the provider's claim. This is cross-checked against the enrolled children in the provider's file when you attempt to save this claim.
-
Click the Days Claimed box and enter the number of days for which the provider records meals and attendance.
-
Check the Put Claim on Submission Hold box to prevent this claim from being included on reports to the State and from subsequent payment. If you put manual claims on hold, you must take them off hold just as you would processed claims.
-
If you use some kind of organization to keep your claims together, click the Batch # box and enter the batch number in which to include this claim. Leave this box blank if you do not use batches.
-
Click Calculate Reimbursement to to review ADA (the combined total of Tier 1 and Tier 2 attendance divided by the days claimed) and the claim's dollar totals before you save the claim. This also provides a count of the total of all meals claimed (adding both meals and snacks together, for both Tiers).
-
When finished, click Save. Certain checks are applied when you attempt to save. If any of these checks fail, you are notified appropriately. In some cases, you cannot save the claim until you correct these issues.
-
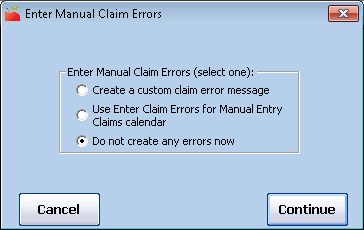
Once you have successfully saved the claim, you are prompted to:
-
Create a custom claim error message. For more information, see Create Custom Claim Error Messages for Manual Claims below.
-
Enter claim errors for manually entered claims. For more information, see Enter Claim Errors for Manually Entered Claims below.
-
Do not create any errors now.
-
-
When finished, click Close.
Create Custom Claim Error Messages for Manual Claims
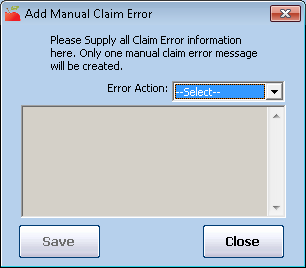
Custom manual claim error messages are open-ended/free-form text messages you create. They appear on the Provider Error Letter and Office Error report for this claim. This step is optional, and you can record any message you like. This is useful if you use Minute Menu HX to send Provider Error Letters to providers to tell them what they did wrong on their claim, rather than sending a manual report to them. If you send your traditional error forms to the providers (which you've filled-out by hand), using this function can be redundant and unnecessary.
You can only record custom claim error messages at the same time you save the manual claim—they cannot be added after the fact.
-
Create a manual claim as shown in the steps above. When you successfully save it, the Enter Manual Claim Errors dialog box displays.
-
Select Create a Custom Claim Error Message.
-
Click Continue. The Add Manual Claim Error dialog box opens.
-
Click the Error Action drop-down menu and choose from the following:
-
Disallowed in Training Period
-
Allow
-
Disallow
-
Training Period
-
Waiver
-
-
Click the Error Description box and enter any error description or message here. This message prints on the Provider Error Letter.
-
Click Save.
-
When finished, click Close.
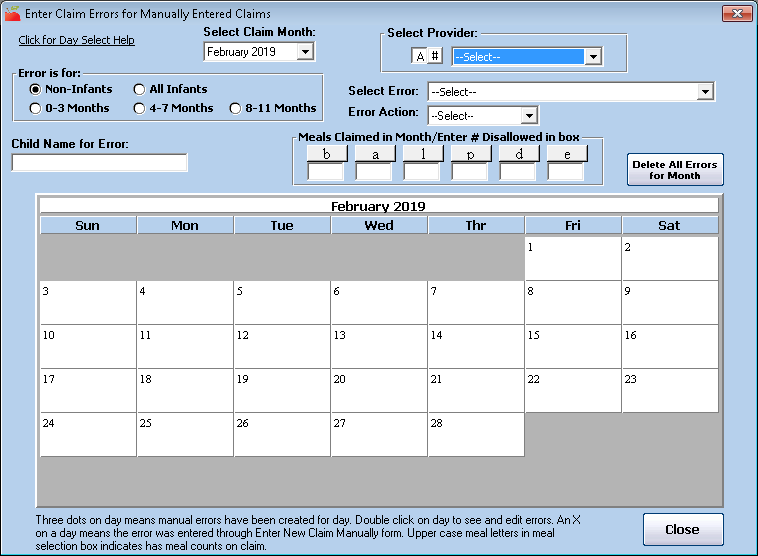
Enter Claim Errors for Manually Entered Claims
You can record disallowance reasons or other error messages on manually entered claims. These message then appear on the Provider Error Letter and the Office Error report. This is useful if you use Minute Menu HX to send Provider Error Letters to providers to tell them what they did wrong on their claim, rather than sending a manual report to them. If you send your traditional error forms to the providers (which you've filled-out by hand), using this function can be redundant and unnecessary.
You can launch this function at the time you are saving a manually entered claim, or you can run it afterwards. You must have already received the manual claim before using this function.
-
Click the Claims menu and select Enter Claim Errors for Manual Entry Claims. The Enter Claim Errors for Manual Entry Claims window opens.
-
Click the Select Provider drop-down menu and select the provider to whom you are applying errors.
-
Ensure you are in the correct claim month. If you need to change it, click the Select Claim Month drop-down menu and select the claim month.
-
Click the day to disallow on the calendar. The meals available for disallowance for that day display.
-
In the Error is For section, select the age group to which this error applies.
-
Click the Select Error drop-down menu and select the error.
-
Click the Error Action drop-down menu and select the error action. You can choose from the following:
-
If this error applies to a specific child, click the Child Name for Error box and enter the name of the child.
-
To indicate the number of meals disallowed, click the box under the appropriate meal abbreviation and enter the number of affected meals.
-
Click the meal button to apply the error to the day you selected. Note that if you need to apply the error to more than one age group, you must repeat Steps 5-10.
Understand Manual Claim Edit Checks
When you enter a manual claim, Minute Menu HX performs a variety of edit checks that are designed to ensure the numbers you enter are consistent with CACFP regulations and with the data you currently have on-file. These edit checks are also enforced if you manually adjust a claim (regardless of the claim source).
The specific checks performed include the following:
-
You recorded all numbers related to the claim, including meal counts, counts of attendance (number of children claimed per-day, added up for the month), counts of participating children (number of unique children claimed throughout the month), and the number of days claimed.
-
Attendance is not less than the highest meal count. For example, if you recorded 100 breakfasts for 10 claimed days, then you must have had at least 10 children claimed on each of those 10 days, for a minimum of 100 attendance. The system does not allow you to enter anything smaller than that.
-
When computing average daily attendance (ADA), HX takes this attendance number and divides it by the days claimed. This number cannot be less than the number of participating children. For example, you can't say that you claimed 10 children a day, on average, but only nine (9) children were claimed during the month.
-
You did not claim any one child for more than two meals and one snack or two snacks and one meal in a day. When you enter a claim manually, this edit check is enforced on the claim as a whole, so it is impossible for you to enter claim numbers that would indicate all children were claimed throughout the month for four meals/snacks a day. This is done with two, specific mathematical checks of the numbers you entered: Breakfasts + Lunches + Dinners/2 or Breakfasts + Lunches + Dinners + Snacks/3. The total attendance cannot be any lower than the result of this equation. If it is, you've indicated that too few children were claimed, so one or more of those children would have gotten paid for a breakfast (or snack, if served) when they should have been disallowed because of the two meals/snack rule. If either of these formulas fail, you cannot save the claim until you verify that you haven't overpaid. Reduce the meal counts to solve this problem. If you under-counted the number of children claimed each day (attendance), increase the attendance to solve this problem.
-
The system compares the counts of participating children with the child information you have on-file. If you claimed 10 unique children as participating in the month, but only nine enrollments are on file, you receive a warning message. You can overrule this message, if needed, because your child files in Minute Menu HX may not be up-to-date. However, if you think your files are up-to-date, do not overrule this message. Instead, find the cause of the discrepancy. For example, you may have miscounted some of this provider's meal counts.
-
The system can also check to ensure that the number of days claimed in the month doesn't exceed what is possible. In February, for example, you can't claim 30 days. However, the system also looks at the provider's start date, termination date, and any licensing approval dates to ensure that the number of days claimed isn't more than is possible.
-
If the provider isn't approved to claim a particular meal and you have configured Minute Menu HX to disallow a provider from claiming a meal for which they are not approved, the system generates a message stating that the provider is not approved for the meal.
Print the Manual Claim Processing Worksheet & Manual Claim Cover Sheet
Manual Claim Processing Worksheet
The Manual Claim Processing Worksheet provides your claim reviewers and menu readers with everything they need to manually process a provider's claim. This includes licensing information, tiering information, and worksheet space to note meal counts.
To print this report:
-
Click the Reports menu, select Claim Forms, and click Manual Claim Processing Worksheet. The Select Provider dialog box opens.
-
Click the Provider drop-down menu and select the provider for whom to print the worksheet.
-
Click Continue. The Select Month dialog box opens.
-
Click the Select Month drop-down menu and select the month for which to print the worksheet.
-
Click Continue. The Select Child Sort Preference dialog box opens.
-
Select Sort By Name or Sort by Number/ID.
-
Click Continue. The worksheet is generated as a PDF. You can now print or export it.
Manual Claim Cover Sheet
The Manual Claim Cover Sheet is an abridged version of the Manual Claim Processing Worksheet. It should typically only be one page, though this depends on the number of children enrolled.
To print this report:
-
Click the Reports menu, select Claim Forms, and click Manual Claim Cover Sheet. The Select Provider dialog box opens.
-
Click the Provider drop-down menu and select the provider for whom to print the cover sheet.
-
Click Continue. The Select Month dialog box opens.
-
Click the Select Month drop-down menu and select the month for which to print the worksheet.
-
Click Continue. The Select Child Sort Preference dialog box opens.
-
Select Sort By Name or Sort by Number/ID.
-
Click Continue. The cover sheet is generated as a PDF. You can now print or export it.