Understand Forms
Child Enrollment Forms
When scanning child enrollment forms, ensure that you have separated different versions of the enrollment forms into different stacks for scanning. For example, if you scan a 3002E enrollment form when the scanner is expecting a 3002G, most of the information will come in properly, but school information and other special information is corrupted.
These are some of the validation checks performed on enrollment forms. Note that this list is not exhaustive.
-
A valid DOB and enrollment date is present.
-
The enrollment date is not a date in the future. If the date on the form is after the current claim month, you are prompted to confirm that it is the correct date.
-
The enrollment date should not be a past date. If the date on the form is is before the current month, you are prompted to confirm that it is correct. If you receive this error often, it can indicate that a child number was duplicated.
-
The Infant bubble must be marked for infants. If it is not, you are prompted to confirm that this is actually an infant. Many providers mistakenly use the current year instead of the child's actual date of birth, which causes the child to be entered as an infant in error. This check prevents that from happening.
-
Child numbers must be unique. If they are not, you are prompted to choose from the following options:
-
Change the number or group of the child you are enrolling.
-
Withdraw the previously enrolled child that is using the same number. The withdrawal date will be automatically set to the last day of the month prior to the new child's date of enrollment so no child numbers are duplicated during a given month.
-
Update the existing child. You should do this if you are scanning an enrollment renewal or are re-scanning an enrollment form for some reason. All of the child's existing, non-scannable information remains as it was.
-
Throw out the form being scanned.
-
-
Child names and DOB should be unique. If the child name and DOB match another child, you are prompted to confirm that you are not enrolling a duplicate.
When the validation process is finished, new enrollments are in the Minute Menu HX database. You can view them in the List Children window.
Menu Forms
When scanning menus, separate bubble menus from attendance menus.
Remember to manually review the foods on attendance menus. If any foods are invalid or missing, bubble-in the appropriate shaded column next to the invalid or missing food.
These are some of the validation checks performed on menu forms. Note that this list is not exhaustive.
-
A valid provider ID number must be present.
-
The provider does not have existing claim or menu data for the claim month. If such data does exist, you are prompted to overwrite the existing data or throw out what you are currently scanning. This check helps you identify when a provider fills-out the wrong provider ID on one or more of their forms. If you see this error when you are not deliberately re-scanning a provider's claim, we recommend you do some research to find the reason for the error.
-
If there are two or less of a particular provider ID in a given batch of forms, you are prompted to confirm that those provider IDs are actually correct. Most of the time, this error indicates that a provider has filled out the wrong ID on one or two of their forms.
-
Forms should not be missing a month or have an invalid month. If the month is missing or invalid, you are prompted to confirm that the form being scanned is for the correct month (so a late claim isn't slipped in by mistake).
-
Form columns should not be missing a day or have an invalid day. If the day is missing or invalid and at least one meal has something marked in that column, you are prompted to supply a valid date. If there is no meal claimed in that column, you can select Throw Out Column to ignore the entire column.
-
The provider should not use the same date in two different day columns. If they do so, Minute Menu HX can handle this in one of two ways:
-
Minute Menu HX forces you to correct the problem.
-
Minute Menu HX automatically throws out any column that has a duplicate day marked, and an error is generated on the Provider Error Letter. This informs the provider of the problem.
-
When the validation process is finished, attendance and meal information is in the Minute Menu HX database.
Review Forms
When you scan reviews, ensure that you select the right review form type. When the validation process is complete, the review information is in the system.
If you mark a child number that is not in the database on the scannable review form, the child number is effectively ignored. If you scan a review form that has a new child number on it and later scan an enrollment form for that same child number, you must manually edit that review using the provider reviews function. You must also add that child to the attendance for that meal.
Changes Made to Scan Forms
This section provides information for changes made to scannable forms.
All Menu and Attendance Forms
-
Daily Attendance Area: This field was added based on instruction from the USDA. Federal regulations indicate that daily attendance must be marked separately from attendance at meals.
-
New/Updated Food Fields: Added a Meat/Alt field to Breakfast. Separated the Fruit and Vegetable fields at snacks. Changed one of the Fruit/Vegetable lines to Vegetable at Lunch and Dinner.
-
Provider Attestation: Added the following sentence: I certify that I served at least the minimum required quantities to each child by age and served the correct milk to each child by age.
Other changes for space concerns:
-
Limited child numbers to 1-28
-
Moved Provider ID to the top of the form
-
Moved the provider signature and attestation to the side of the form
Regular Menu and Attendance Forms (1102/1122/8513/8523)
-
Whole Grain Served At: This field allows providers to indicate that a food served that is not always a whole grain (i.e. spaghetti noodles, bagel, and so on) was whole grain-rich in this instance. The HX claims processor always looks at foods bubbled for a whole grain item. If none of the foods served are always whole grain, then it looks at this field for the provider's indication of which item qualifies.
Infant Full Bubble Changes (1203/1223)
Because the USDA requires that you record foods served to individual infants, providers must bubble the meal that they are recording and, if infants in the same age group ate different foods, record that meal for each infant. For this reason, providers may now use multiple columns for the same day without bubbling a second serving without or Group 2 or 3 at the top.
Enrollment Forms
-
Limiting the Child Numbers to 1-28: This change was made per the menu form changes.
-
Parent-Supplied Formula/Breast Milk: The question of whether the parent supplies breast milk or formula has been split into two questions, similar to how it's presented in KidKare. Currently, this does not affect any of the windows in HX.
Can I Use My Old Forms?
The answer to this question depends on which forms you use, and how much work you want to do.
You cannot combine old and new forms in an individual provider’s claim. You must scan batches of claims on the old forms separately from the new forms.
Full Bubble Regular forms (1101/1121): Your providers cannot record Meat/Alt at breakfast or a snack that contains a Fruit and a Vegetable. They will also not have the Whole Grain Served At field, so if the food they bubbled is not indicated as a whole grain in the food properties, they may get disallowed. Other than that, these forms are usable. Providers must not claim child numbers 29-32 after their children are renumbered.
Full Bubble Infant (1202/1222): The processor is only checking that Breastmilk or Formula was served, since all other foods are optional until developmentally appropriate under the new meal pattern. Providers must not claim child numbers 29-32 after their children are renumbered.
Written Foods Regular forms (8511/8521): Disallowances will be tricky, but providers can write whatever you want them to in the food area, so they can record any meal under the new meal pattern. You must manually enter disallowances for Meat/Alt at breakfast and if you want any Fruit or Vegetable errors to display separately. Providers must not claim child numbers 29-32 after their children are renumbered.
Written Foods Infant forms (8512/8522): Providers can write whatever you want them to in the foods area, so they can record any meal under the new meal pattern. We recommend writing the number of the child that received each food beside the food. You must manually enter meal disallowances if you want them to match individual children and match up to the new meal pattern age groups. Providers must not claim child numbers 29-32 after their children are renumbered.
Enrollment Forms: If providers assign a new child a number in the 29-32 range, you are prompted to assign a different number during forms validation. This functionality already exists for when providers try to assign a child number that’s already in use.
Review forms: You can continue to use these.
Complete Scannable Form Spot Checks
Once you receive scannable forms from your providers and begin sorting them for scanning, you should do a quick spot check on each packet. Completing this step helps you catch errors before you have scanned the form, which allows you to attempt to correct them before processing the claim. This minimizes the amount of scanning problems you may have, and maximizes the speed at which you can finish your claim.
If your providers filled-out their forms properly, this process should only take about 30 seconds per-packet.
All Scannable Forms
Check for any problems that would prevent a good scan. This includes the following:
-
Tears or rips.
-
Black marks along the form's timing marks.
-
Food stains.
-
Dirty eraser marks.
If you find any problem that would prevent a good form scan, set that provider's entire claim paperwork to the side so that it gets special attention when claims are scanned and processed.
Menu Forms
When spot-checking menu forms, check the following fields:
-
Provider ID: Ensure that all digits of the provider's ID were bubbled in the bottom right-hand corner on each page.
-
If multiple pages are missing all or some of the Provider ID bubbles, mark them with a #2 pencil and highlight over the marks you make. This ensures that these changes are obvious changes made by you, not the provider, during an audit. Use correction tape (white out strips) to remove any marks that the provider made in error. If you do not resolve this here, it is resolved when you scan the form. However, you do not need to verify every single page. Ensure that at least one of them was bubbled correctly. Consult the provider's CF to find their provider ID. During the validation process, the system notes the previous and next page's provider number to help you more easily identify the provider who has a problem.
-
-
Day Headers: Check each page’s three day column headers and ensure that both digits of the day were bubbled-in for each column
-
If any page is missing all of these bubbles, we recommend you take the time to correct them during this spot-check. However, you do not need to fix day columns that might be missing just one column. The validation process should catch any missing dates, and the system tells you the last three pages' column dates, the current three pages' column date, and the next three pages' column dates. This allows you to fix most of these problems when validating the forms.
-
If the provider did not indicate what the day was supposed to be, either call the provider to correct the problem now, or throw out this column during the validation process.
-
-
Claim Month: Verify that the claim month marked is the month it should be (the provider hasn’t submitted a late claim). Although this is easy to fix during the scanning validation process, so correcting it while performing spot checks isn’t critical.
-
Attendance Form Menu Checks: Verify that the food components have been supplied and are creditable.
-
If any meals aren’t creditable, mark the appropriate shaded column next to the invalid food. For snacks, you must mark both missing and invalid foods to indicate that three of the four foods are invalid, which means the system will disallow the snacks.
-
If you require that the meal bubble in the upper-left corner be bubbled-in for each meal, verify that the provider completed this step.
-
-
Chk By: Have the person who spot checked the menu to initial in the Chk By section on the bottom of these forms.
Enrollment Forms
-
Provider ID: Verify that all digits of the provider's ID are marked. If they are not marked properly, correct the marks and highlight them appropriately.
-
Child Number: Verify that the child's name and number are both bubbled-in and match what was supplied on the enrollment form with what the provider wrote on the CIF.
-
If the numbers on the enrollment form don't match the CIF, you may be able to look at the provider's menu forms to determine the correct number. You may also need to call the provider. Resolve this issue before scanning forms for this provider.
-
If the child number is missing, mark it based what was noted on the CIF. Highlight the marks you make (for auditing purposes).
-
If the CIF is missing, contact the provider and ensure they include the CIF with all future claim paperwork.
-
-
Signed: Verify that the parent signed the form.
-
If it is not signed, set it aside. You must receive a signed child enrollment form before the child can be paid.
-
If you find any problem that would prevent a good form scan, enroll that child manually.
-
Scan Forms
Scanning forms in Minute Menu HX consists of two major steps:
-
Scan the form batch. This gets the raw scanned data from the physical forms into your computer.
-
Validate the form batch. This translates the raw data into valid database values, such as children, foods, meals, and so on. You may need to manipulate this information after it is validated. For example, you may need to supply child tier information. After validation, you should process claims.
Different form types require different steps. Click a link below to jump to the specific form types you're scanning.
Prepare Forms for Scanning
You must prepare forms appropriately for scanning. Different forms must be grouped in a different manner. Carefully sort and stack your forms according to the guidelines listed below.
-
Create neat stacks of enrollment forms, attendance forms, and review forms at the beginning of each months.
-
For attendance menus and full bubble menus:
-
Separate full bubble menus and attendance menus.
-
In each group, sort your forms into two stacks: infant forms and non-infant forms.
-
Group provider forms together within each stack.
-
-
Separate different versions of enrollment forms.
Load Your Scanner
Remember that all of your providers' information must be up-to-date prior to scanning and processing menu forms. This means that you must scan and validate any enrollment and review forms before you scan and validate menus.
-
When you are ready to scan, first make sure that you are scanning the same type of form.
-
If you are scanning a large batch of menu forms, do not split up a provider's menus.
-
You must scan infant menus and non-infant menus separately.
-
-
Load the scanner hopper with the forms you are scanning. Load them face up with the bottom in towards the scanner. This should be the first part of the form scanned.
-
Ensure that forms are stacked neatly in the hopper with edges together, and that all of the forms are facing the same direction.
-
Move the loose paper guide to help the form pages fit tightly together, but not so tight that they are bent or cramped.
-
Turn your scanner on.
Scan Attendance Menus & Full Bubble Menus
Attendance menus and full bubble menus must be scanned in a specific order to process properly. If you are scanning any other form, see the Scan Other Forms heading, below.
-
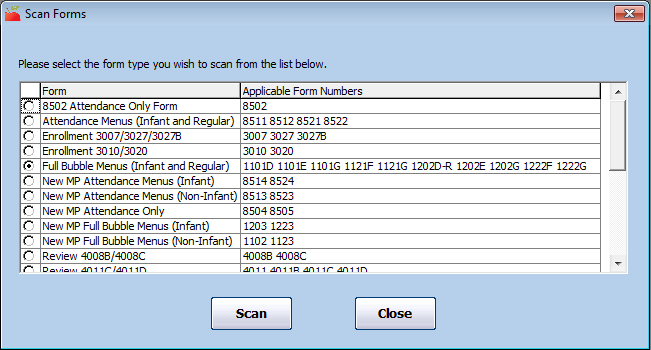
Click the Scanning menu and select Scan Forms. The Scan Forms window opens.
-
Scan infant forms first.
-
Select the type of form you are scanning. It is important that you select the correct form type, as this affects how the information is read and compiled. If you aren't sure which form type to select, look at the form number in the bottom-right corner of the scannable form and match it to the Applicable Form Numbers column.
-
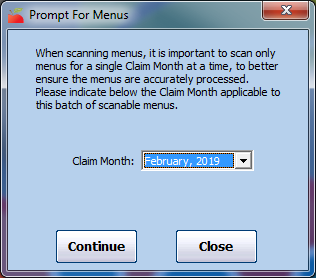
Click Scan. The Prompt for Menus dialog box opens.
-
Click the Claim Month drop-down menu and select the claim month you are scanning.
-
Click Continue.
-
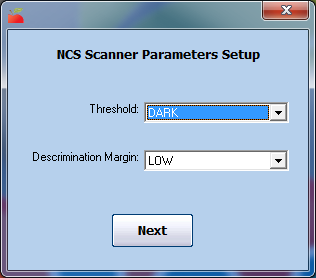
If you are scanning with a Scantron scanner, you are prompted to select a Threshold and Discrimination to apply to the batch.
-
Click the Threshold drop-down menu and select the threshold to use when scanning. This value can vary based on the forms you are scanning, as the scanner evaluates each bubble mark's density. The darker a bubble is, the denser it is. This setting controls the minimum density read by the scanner. Therefore, if you set this to DARK, relatively light bubbles are ignored.
-
We recommend you use DARK for all forms except review forms. Review forms should be set to NORMAL.
-
Adjust the threshold if you notice valid marks or being missed or erased marks are being picked up during scanning.
-
DARK, NORMAL, and LIGHT correspond to the following numerical values: 7 (DARK), 5 (NORMAL), and 3 (LIGHT). If you notice that erased marks are still being picked up on the DARK setting, you can set the threshold to 8.
-
-
Leave the Discrimination Margin set to Low.
-
Click Next.
-
-
Minute Menu HX attempts to connect to your scanner. If you have scanned before, this process should be relatively quick. However, if this is you first time scanning at all, or if this is your first time scanning a particular form, you may see an error at this point if your system is not properly configured. If you do see an error, note the error's details and contact Minute Menu HX Support for assistance.
If there are no errors, Minute Menu HX scans the forms you loaded into the scanner. The system automatically assigns batch numbers to each batch of forms you are scanning based on the highest batch number that already exists for unvalidated forms in your system for the selected month. These are useful when scanning and validating large numbers of forms.
The scanning status displays during the process. The particular status window differs based on whether you use a Scanning Systems scanner or a Scantron scanner. If you see any errors, deal with them appropriately, and click Resume to continue scanning.
Maintain the order of your form stacks until validation and processing is complete. When problems are found during validation, they are referenced by a form's position in the stack of forms you scanned, so keeping them in order is helpful.
-
When the hopper is empty, click Stop or Cancel/Close (depending on your scanner) to finish scanning. The Scan Forms Success Screen dialog box opens.
-
Do not click Validate when you are finished scanning. Instead, close the Scan Forms window, and repeat Steps 3-9 to scan non-infant menus.
-
Click the the Scanning menu and select Validate Forms. Notice that the infant and non-infant batches you scanned have been combined for validation. Complete the validation process as outlined in the Validate Scanned Forms article below.
Scan Other Forms
The scanning and validation process can take some time, so ensure you have enough time to dedicate to the procedure. The length of time spent scanning itself largely depends on the type of scanner you are using. If you are scanning attendance menus or full bubble menus, see the Scan Attendance Menus & Full Bubble Menus heading, above.
-
Click the Scanning menu and select Scan Forms. the Scan Forms window opens.
-
Select the form type you are scanning. It is important that you select the correct form type, as this affects how the information is read and compiled. For example, if you are scanning menus, you would select Full Bubble Menus or Attendance Menus. If you aren't sure which form type to select, look at the form number in the bottom-right corner of the scannable form and match it to the Applicable Form Numbers column in the Scan Forms window.
-
Click Scan. The Prompt for Menus dialog box opens.
-
Click the Claim Month drop-down menu and select the claim month you are scanning.
-
Click Continue.
-
If you are scanning with a Scantron scanner, you are prompted to select a Threshold and Discrimination to apply to the batch.
-
Click the Threshold drop-down menu and select the threshold to use when scanning. This value can vary based on the forms you are scanning, as the scanner evaluates each bubble mark's density. The darker a bubble is, the denser it is. This setting controls the minimum density read by the scanner. Therefore, if you set this to DARK, relatively light bubbles are ignored.
-
We recommend you use DARK for all forms except review forms. Review forms should be set to NORMAL.
-
Adjust the threshold if you notice valid marks or being missed or erased marks are being picked up during scanning.
-
DARK, NORMAL, and LIGHT correspond to the following numerical values: 7 (DARK), 5 (NORMAL), and 3 (LIGHT). If you notice that erased marks are still being picked up on the DARK setting, you can set the threshold to 8.
-
-
Leave the Discrimination Margin set to Low.
-
Click Next.
-
-
Minute Menu HX attempts to connect to your scanner. If you have scanned before, this process should be relatively quick. However, if this is you first time scanning at all, or if this is your first time scanning a particular form, you may see an error at this point if your system is not properly configured. If you do see an error, note the error's details and contact Minute Menu HX Support for assistance.
If there are no errors, Minute Menu HX scans the forms you loaded into the scanner. The system automatically assigns batch numbers to each batch of forms you are scanning based on the highest batch number that already exists for unvalidated forms in your system for the selected month. These are useful when scanning and validating large numbers of forms.
The scanning status displays during the process. The particular status window differs based on whether you use a Scanning Systems scanner or a Scantron scanner. If you see any errors, deal with them appropriately, and click Resume to continue scanning.
Maintain the order of your form stacks until validation and processing is complete. When problems are found during validation, they are referenced by a form's position in the stack of forms you scanned, so keeping them in order is helpful.
-
When the hopper is empty, click Stop or Cancel/Close (depending on your scanner) to finish scanning. The Scan Forms Success Screen dialog box opens.
-
Click Validate to move to the validation process, or click Scan More to scan more forms. You can scan as many batches as needed, but remember that you should never split a provider's claim over multiple batches. This is because one of the validation checks looks to see if forms have been scanned for each provider in a batch. For more information about the validation process, see Validate Scanned Forms article below.
Validate Scanned Forms
Validation is the process that converts raw, scannable form data into legitimate database values, such as children, food, meals, reviews, and so on. When you validate forms, everything on the form is examined to ensure that it was marked and properly read by the scanner. If the system finds any problems in the way a form was completed, the problems display so you can correct them.
Validation is a processor-intense function, so be sure you are doing it on a computer with a fast processor and ample RAM. We strongly recommend that you validate on the computer within the Minute Menu HX database for faster performance. Note that this process can take some time, especially if a large number of errors are found during processing. This is also dependent upon the speed of your hardware and the number of forms involved in the claim.
-
Begin validation.
-
If you have just finished scanning forms, click Validate in the Scan Forms Success Screen dialog box.
-
If you are validating forms later, click the Scanning menu and select Validate Forms.
-
-
Select the form batch to validate. There is usually only one type of form listed.
Note: If you scan from one computer and validate from another computer, pay attention to the Batch and Number of Form columns when selecting a batch to validate. Make sure you select batches that are completely scanned.
-
Click Validate. The progress meter displays. Several different validation passes may be made during this process.
-
If any errors are found, the Scan Validation Error dialog box displays and describes the error in detail. The page number within the page is included with the error, so you can reference the original form, if needed (though you should not need to do this). Correct the problem or throw out the form. Click OK to continue validation.
-
When the process is complete, the Complete message displays. Click OK to close the window.
Validating scannable forms only puts information into Minute Menu HX. You must now process claims to get your claim counts.