![KK Icon.png]](https://knowledge.kidkare.com/hs-fs/hubfs/KK%20Icon.png?width=40&height=40&name=KK%20Icon.png)
Provider photos give sponsors an easy way to confirm a provider's identity when completing Monitoring visits. You can fully manage these photos yourself, or you can also allow your providers to upload their own photos.
Note: Allowing providers to upload their own photo does not prevent you, as the sponsor, from replacing incorrect or inappropriate photos uploaded by a provider.
Uploading Provider Photos
You can upload a provider's photo when enrolling or editing the provider.
- From the menu to the left, click Provider Management.
- If you are enrolling a provider:
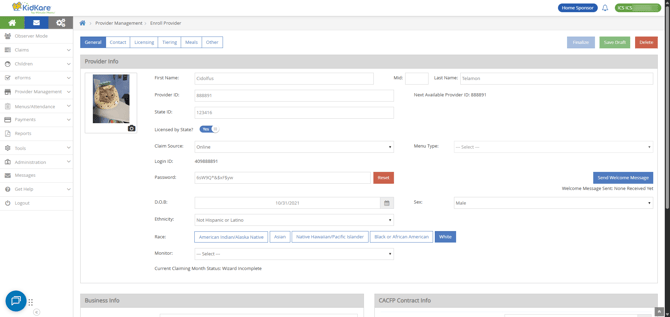
- Click Enroll Provider. A placeholder photo displays to the left of the provider profile fields.
- Click the camera icon in the photo placeholder.
- Click Choose.
- Browse to the location where the photo is stored, select it, and click Open.
- Click
 . The photo is saved.
 - Continue to enroll the provider as you normally would.
- If you are editing an existing provider:
- Click Provider Information.
- Click the Provider drop-down menu and select the provider for whom to upload a photo. The provider's profile opens to the General tab by default. A placeholder photo displays to the left of the provider profile fields.
- Click
 in the photo placeholder.
 - Click Choose.
- Browse to the location where the photo is stored, select it, and click Open.
- Click .
- Click Save.
Changing & Deleting Provider Photos
You can update or remove provider photos at any time—including any photos the provider may have uploaded themselves.
- From the menu to the left, click Provider Management.
- Click Provider Information.
- Click the Provider drop-down menu and select the provider for whom to upload a photo. The provider's profile opens to the General tab by default. A placeholder photo displays to the left of the provider profile fields.
- Click in the photo placeholder.
- To change the photo:
- Click Choose.
- Browse to the location where the photo is stored, select it, and click Open.
- Click .
- Click Save.
- To delete the photo, click Delete. The photo is removed.
Enabling Providers to Upload Their Own Photo
When you allow providers to upload their own photo, they will do so via the My Site page in their version of KidKare. You can disable this ability at any time.
- Click
 . The Settings page opens.
 - Click
 next to Would you like to allow providers to upload a photo of themselves (this will allow providers to overwrite photos you uploaded)? to set it to Yes. You changes are saved automatically.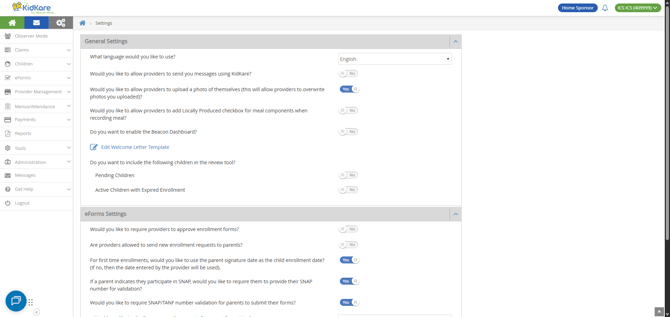
- To disable this ability, simply click again to set it back to No.