You can create invoices and email them to guardians. You can either create an invoice each day/week/month, or you can create recurring invoices. Creating recurring invoices allows KidKare to automatically generate invoices for you using the billing frequency you choose.
Watch the short video below to learn more, or scroll down for step-by-step instructions.
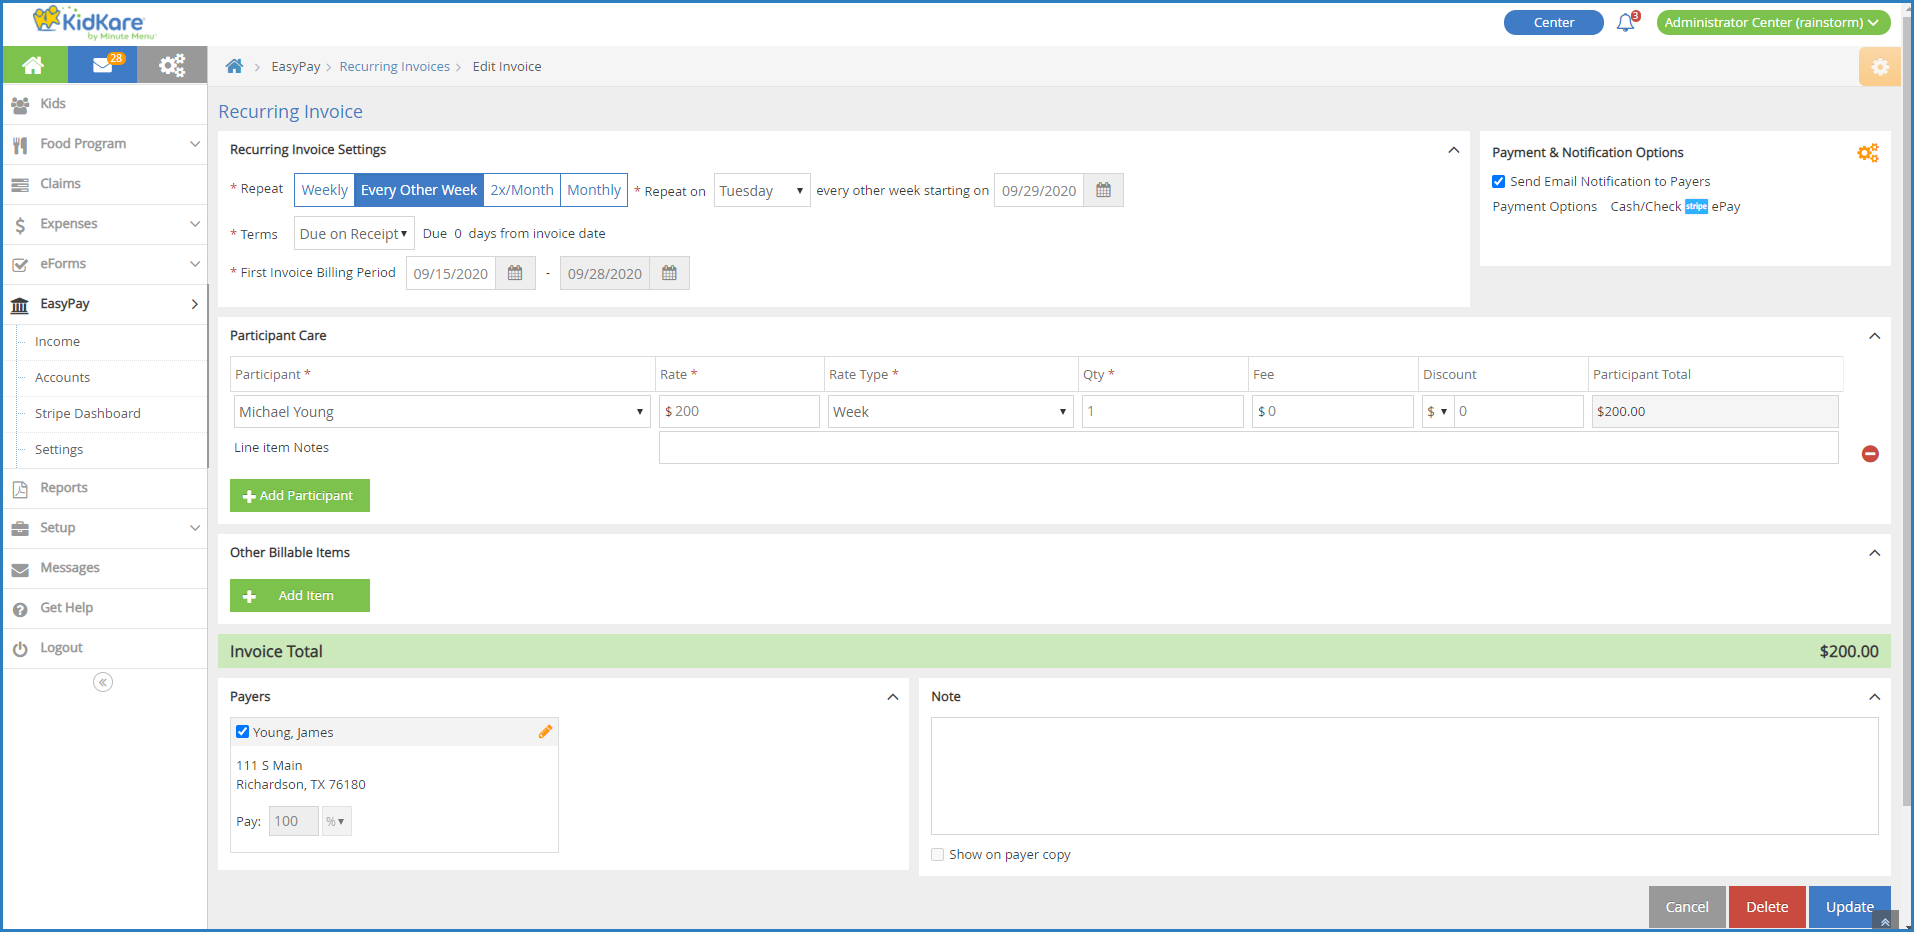
Create Recurring Invoices
- From the menu to the left, click Accounting.
- Click Income.
- Enter your Accounting PIN and click Go.
Note: If you do not have an Accounting PIN set, you are prompted to set one.
- Click
 and select Recurring Invoices.
 - Click
 . The New Invoice page opens.
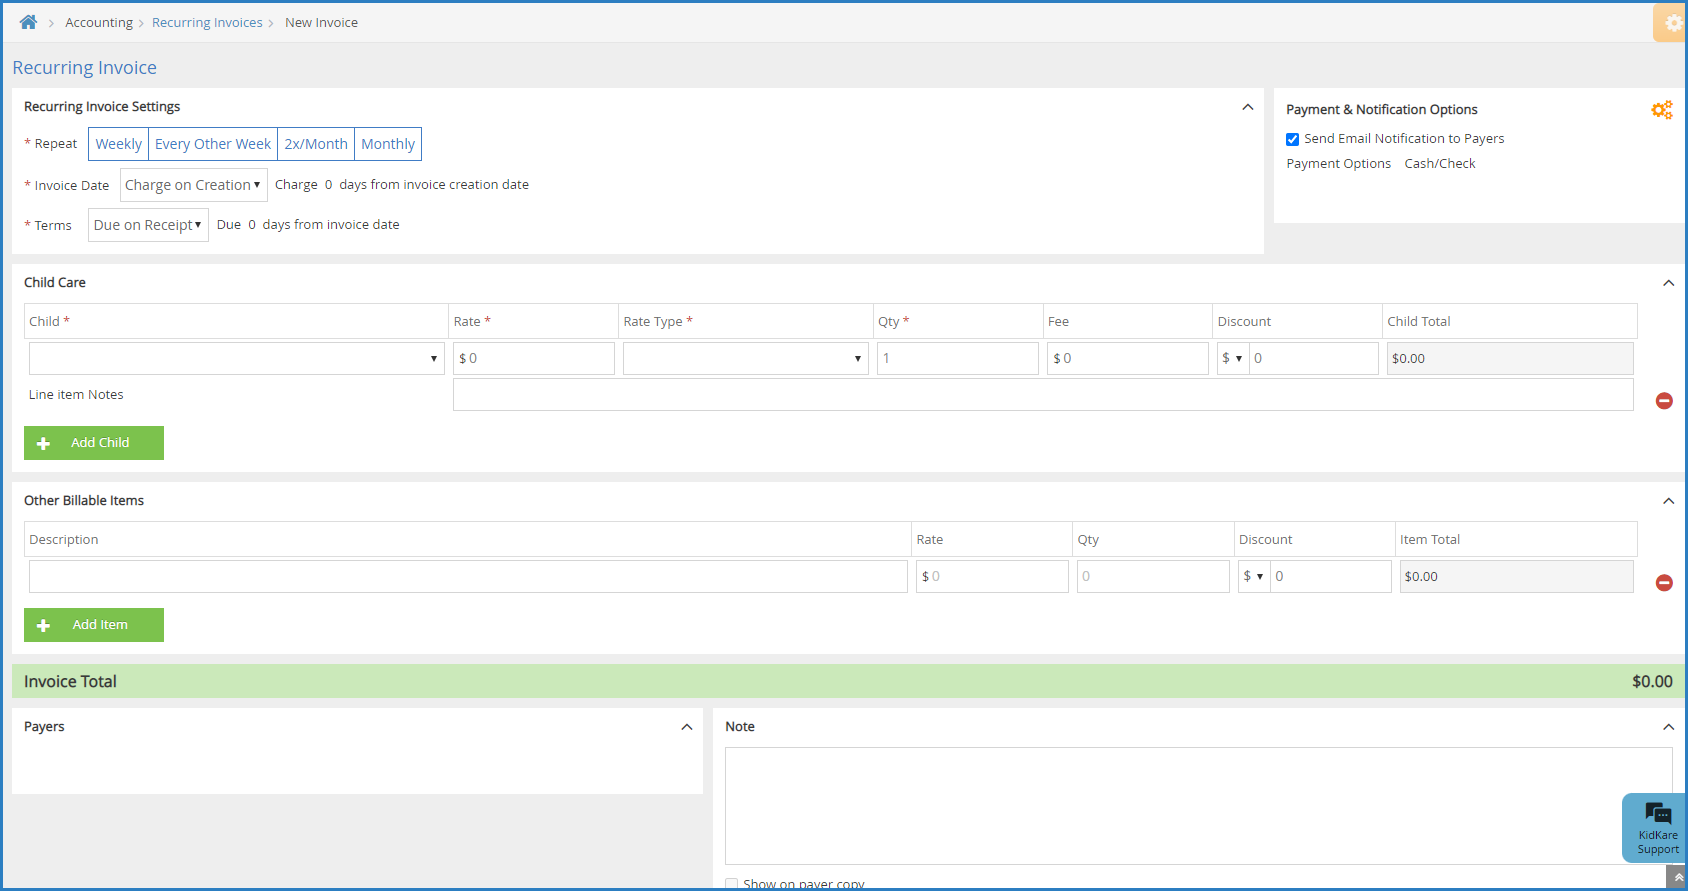
- In the Recurring Invoice Settings section:
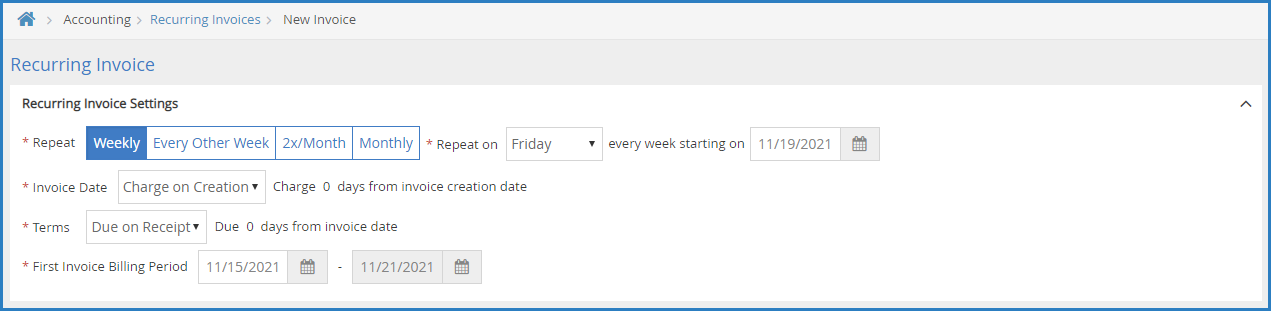
- Select the repeat schedule for this invoice. You can choose from the following:
- Weekly
- Every Other Week
- 2x/Month
- Monthly
- Click the Repeat On drop-down menu(s) and specify when this invoice should repeat. For example, if you selected Weekly in Step 6a, you would select the day on which to generate this invoice for the week.
- Click the First Invoice Billing Period box and select the start date for the first recurring invoice's billing period. The end date populates according to your selection in Step 6a.
- Click the Terms drop-down menu and choose from the following:
- Due on Receipt
- Due in 7 Days
- Due in 15 Days
- Due in 30 Days
- Custom
- If you selected Custom in Step 5d, click the Due box and enter the number of days from the invoice date that this invoice is due. The Due Date field to the right updates automatically.
- Select the repeat schedule for this invoice. You can choose from the following:
- In the Payment & Notification Options section:
- Click
 . The Payment Options dialog box opens.
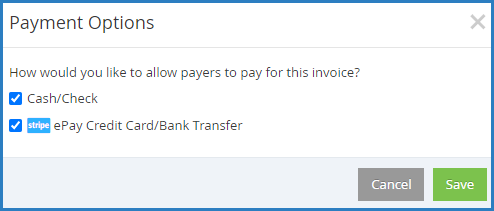
- Check the box next to each payment method to allow for this invoice.
- Click Save. The Payment Options dialog box closes.
- Check the Send Email Notification to Payers box to send an email to payers once this invoice is completed.
- Click
- In the Participant Care section:
- Click the Participant drop-down menu and select the participant to add to this invoice. If there is a default rate set on the participant's account, the Rate and Rate Type boxes populate automatically.
Note: If you need to create an invoice a Pending participant, click Filters to the top-right, and select Pending. This will include Pending participants in the Participant drop-down menu.
- Click the Rate box and enter the base rate to charge for this participant.
- Click the Rate Type drop-down menu and choose from the following:
- Hour
- Half Day
- Day
- Week
- Two Weeks
- Month
- Attendance
- Click the Qty box and enter the number of units charged. For example, if you selected Day in Step 6c, this would be the number of days for which you are charging.
- Click the Fee box and enter any additional fees charged.
- Click the Discount box and enter any discounts that apply. This can be a dollar amount or percentage. To change it, click the $ drop-down menu and select %.
- Click the Line Item Notes box and enter any notes about the charges.
- To add another participant to the invoice, click Add Participant and repeat Steps 6a-6g. Participants must be set up as siblings before you can add them to the same invoice.
- Click the Participant drop-down menu and select the participant to add to this invoice. If there is a default rate set on the participant's account, the Rate and Rate Type boxes populate automatically.
- In the Other Billable Items section:
- Click Description box and enter a description of the billable item. For example, you may be charging for diapers.
- Click the Rate box and enter the rate charged for this time.
- Click the Qty box and enter the amount of this item to bill.
- Click the Discount box and enter any discounts that apply. This can be a dollar amount or percentage. To change it, click the $ drop-down menu and select %.
- Click Add Item and repeat Steps 8a - 8d for each billable item to add.
- In the Payers section:
- Check the box next to each payer who should receive this invoice.
- Click the Pay boxes and adjust the amount for which the selected payers are responsible.
- Click the Note box and enter any notes about this invoice. To show this note on the payer's copy, check the Show on Payer Copy box.
- Click Create. The invoice is created and the Recurring Invoices page opens again.
Create Recurring Invoices from the Invoice Details Page
You can make past invoices recurring invoices from the Invoice Details page, if needed. This means you do not have to set up all invoice details—just the recurring invoice schedule.
- From the menu to the left, click Accounting.
- Select Income.
- Enter your Accounting PIN and click Go.
- Locate the invoice to make recurring.
- Click the invoice to update. The Invoice Details page opens.
- Click the Invoice Actions drop-down menu and select Make Recurring. The Edit Invoice page opens.

- In the Recurring Invoices section:
- Select the repeat schedule for this invoice. You can choose from the following:
- Weekly
- Every Other Week
- 2x/Month
- Monthly
- Click the Repeat On drop-down menu(s) and specify when this invoice should repeat. For example, if you selected Weekly in Step 9a, you would select the day on which to generate this invoice for the week.
- Select the repeat schedule for this invoice. You can choose from the following:
- Review the invoice details and make changes, as needed.
- Click Create.
View the Recurring Invoices List
- From the menu to the left, click Accounting.
- Click Income.
- Enter your Accounting PIN and click Go.
- Click
 and select Recurring Invoices.
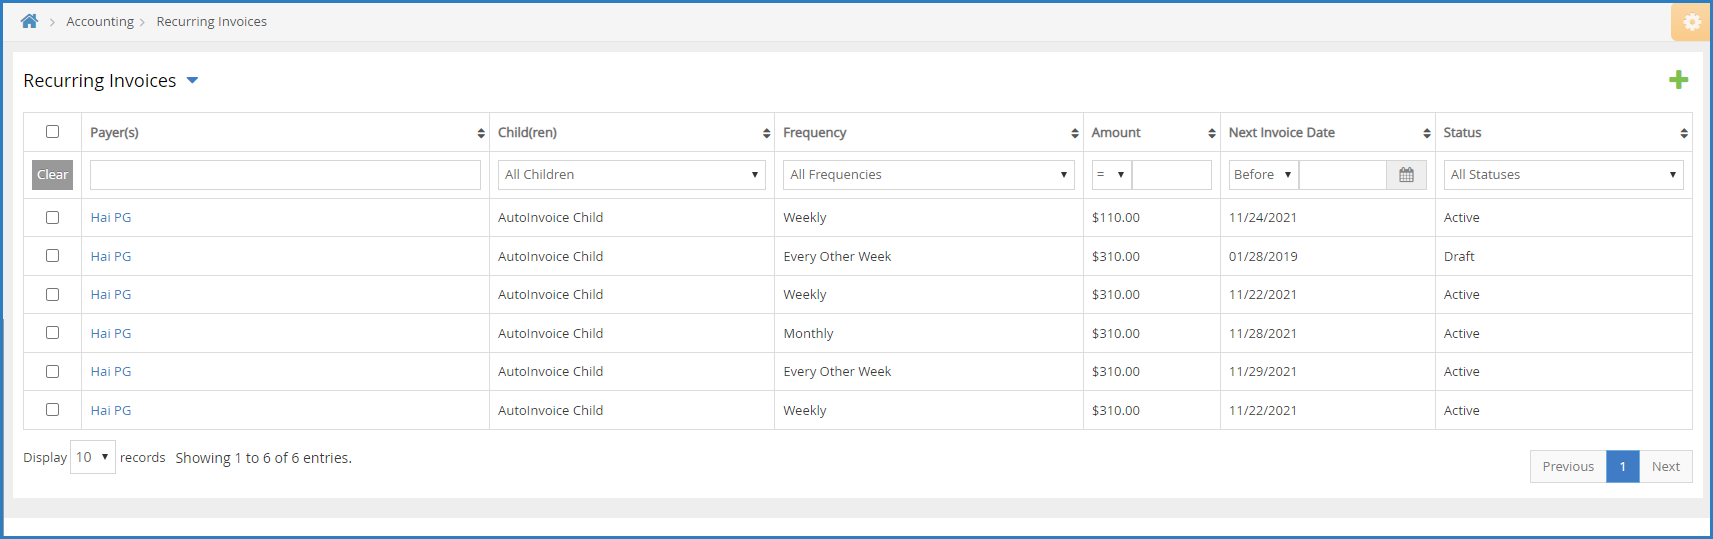 The following information displays for each invoice:
- Payer(s): These are the payers associated with the invoice.
- Participant(s): These are the participants included on the invoice.
- Frequency: This is the frequency with which the invoice is generated. For example, this column would show Weekly for invoices that run each week.
- Amount: This is the total amount billed.
- Next Invoice Date: This is the next date on which this invoice will run.
- Status: This is the status of the recurring invoice. This can be Draft, Active, or Deleted.
- Use the boxes and menus at the top of the table to filter the invoices that display.
- Click each column header to sort invoices in ascending or descending order.
- Click an invoice to view invoice details.
Edit Recurring Invoices
You can edit recurring invoices regardless of status.
- From the menu to the left, click Accounting.
- Click Income.
- Enter your Accounting PIN and click Go.
Note: If you do not have an Accounting PIN set, you are prompted to set one.
- Click
 and select Recurring Invoices. The Recurring Invoices page opens.
 - Click the recurring invoice to update. The Edit Invoice page opens.
- Make changes, as needed. For more information, see Create Recurring Invoices above.
- Click Update.
If the recurring invoice you changed is at Draft status, click Create. This saves your changes and moves the recurring invoice to Active status.
Delete Recurring Invoices
Delete Recurring Invoices from the Recurring Invoices Page
-
From the menu to the left, click Accounting.
-
Click Income.
-
Click
 and select Recurring Invoices. The Recurring Invoices page opens.
 -
Check the box next to the invoices to delete.
-
Click
 .
. -
At the Are You Sure prompt, click Delete. The invoices you selected are moved to Deleted status.
Delete Recurring Invoices from the Edit Invoices Page
-
From the menu to the left, click Accounting.
-
Click Income.
-
Click
 and select Recurring Invoices. The Recurring Invoices page opens.
 -
Click the recurring invoice to delete. The Edit Invoice page pens.
-
Click Delete at the bottom of the page. The recurring invoice is deleted.
Restore a Deleted Recurring Invoice
- From the menu to the left, click Accounting.
- Click Income.
- Enter your Accounting PIN and click Go.
Note: If you do not have an Accounting PIN set, you are prompted to set one.
- Click
 and select Recurring Invoices. The Recurring Invoices page opens.
 - Click the Status drop-down menu and select Deleted. Only deleted invoices display.
- Click the invoice to restore.
- At the Are You Sure prompt, click Restore. The recurring invoice is restored to its original status.