---
title: Manage Users
description: From the menu to the left, click Administration. Click User Permissions. The User Permissions page opens. Click Add User. The Add User pop-up opens. Enter the user's first name, last name, and emai
---
[Skip to content](https://knowledge.kidkare.com/independent-center/user-permissions#main-content)
English
Show submenu for translations
![KK Icon.png\]](https://knowledge.kidkare.com/hs-fs/hubfs/KK%20Icon.png?width=40&height=40&name=KK%20Icon.png)
- [Customer Portal](https://support.kidkare.com/_hcms/mem/login)
- [Access KidKare](https://app.kidkare.com/)
- [Support & Releases](https://knowledge.kidkare.com/support-releases)
- [Contact KidKare Support](https://knowledge.kidkare.com/support-releases/contact-our-support-team)
Open main navigation
Close main navigation
- [Customer Portal](https://support.kidkare.com/_hcms/mem/login)
- [Access KidKare](https://app.kidkare.com/)
- [Support & Releases](https://knowledge.kidkare.com/support-releases)
- [Contact KidKare Support](https://knowledge.kidkare.com/support-releases/contact-our-support-team)
- English
Show submenu for translations
- Go to kidkare.com
Go to kidkare.com
Hello. How can we help you?
- There are no suggestions because the search field is empty.
1. [Independent Centers](https://knowledge.kidkare.com/independent-center?hsLang=en)
2. [Administration](https://knowledge.kidkare.com/independent-center/administration?hsLang=en)
# Manage Users
Table of Contents
## In This Article
### Add Users
1. From the menu to the left, click **Administration.**
2. Click **User Permissions**. The User Permissions page opens.
3. Click **Add User**. The Add User pop-up opens.
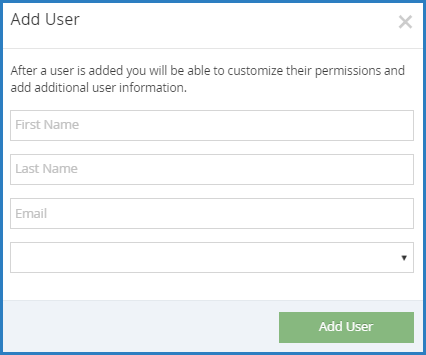
4. Enter the user's **first name**, **last name**, and **email address**. The email address is optional.
5. Select a role for the user.
6. Click **Add User.** The User Added message displays.
7. Set a password for the user.
- If you provided an email address, click **Email User Instructions** to send the user an email containing instructions for accessing their account.
- If you did not provide an email address, enter a password for the user and click **Set Password**.
---
### Set User Permissions
User permissions and user roles allow you to control who on your staff can access certain information. KidKare comes with a standard set of user roles that include the following:
- - Director
- Administrator
- Teacher
- Nutrition
Each user role is a combination of certain permissions settings that you can customize. If you customize one of the existing user roles, the word -Custom is added to the end of the role to designate that you have edited the permissions for that role. For example, if you customize the permissions for the Teacher role, the role becomes Teacher - Custom. You can also add new user roles that you can then assign to new and existing users.
#### Adding New User Roles
1. From the menu to the left, click **Administration.**
2. Click **User Permissions.** The User Permissions page opens.
3. Click **Add Role** in the top right corner.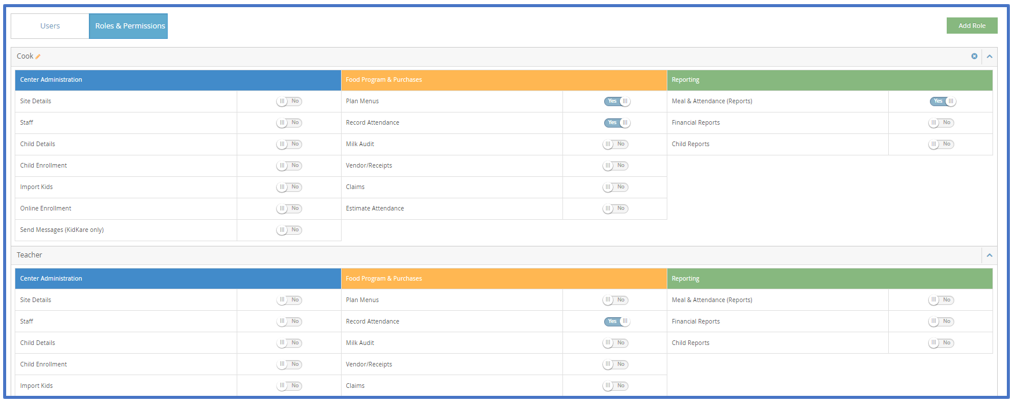
4. Click the **Role Name** box and enter the name of the role you are adding.
5. Click **Save.** The role is added to the displayed table. All permissions for the new role are set to No by default.
You can edit the role name at any time. To do so, click the **pencil icon** next to the role to change.
#### Edit Roles
1. From the menu to the left, click **Administration**.
2. Select **User Permissions**.
3. Click the **Roles & Permissions** tab.
4. Scroll down to find the role you need to edit permissions for. Click the  on the right side to expand the permission settings for the role.
5. Make adjustments to the role permissions by toggling permissions to **Yes or No** based on the changes needed.
6. Once adjustments have been made, they will automatically save for all **future** center staff that get assigned this role.
7. In order to apply the permissions updated to all staff that are **currently** assigned this role, click the  button the the right of the **User Roles** drop down.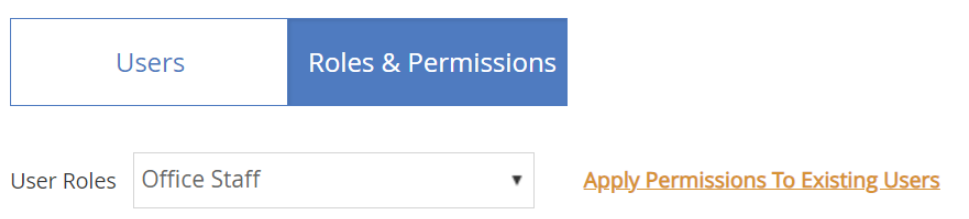
8. A confirmation pop up appears. Click **Yes.**
#### Customizing User Roles
1. From the menu to the left, click **Administration.**
2. Click **User Permissions.** The User Permissions page opens.
3. Click the **Roles & Permissions** tab. The standard roles and their permissions display. All roles are expanded by default, but you can click **Collapse (v)** to collapse them and click **Expand (^)** to expand them again.
- Each set of permissions is divided into the following categories:
- Center Administration
- Food Program & Purchases
- Reporting
4. Click the **Switch** next to each permission to enable or disable in each category. Your changes are saved automatically.
---
### Updating User Information
Once you add users, edit their profiles to change or customize their user permissions, enter contact information, enter demographic information, and so on.
1. From the menu to the left, click **Administration.**
2. Click **User Permissions**. The User Permissions page opens to the **Users** tab by default.
3. Locate the user to change. Click **Filters** to the top-left to filter the user list by status and sort by first or last name.
4. Click  next to the user to edit. The User Details page opens.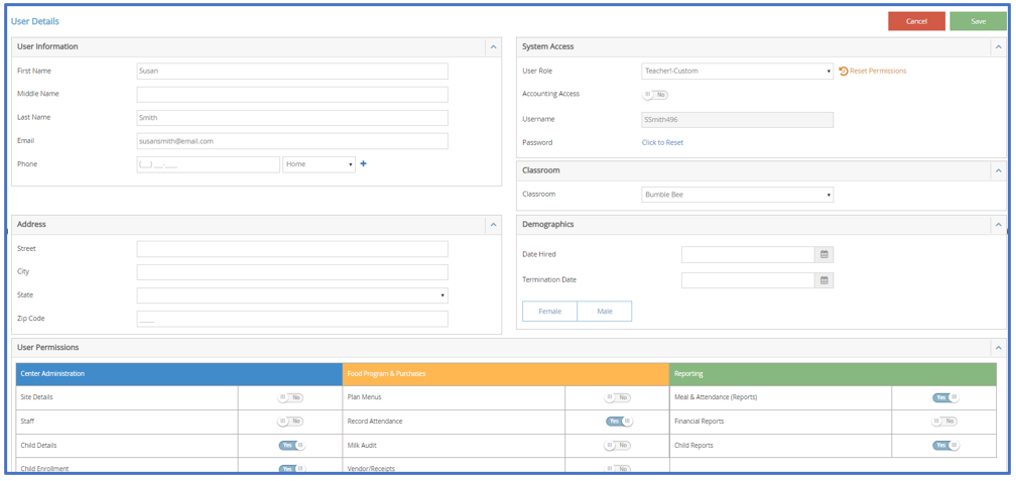
5. Click each box and enter new information over the existing information.
6. In the **User Permissions** section, use the **sliders** to add and remove permissions. You can also click **Reset Permissions** in the **System Access** section to set the user's permissions to the default for their assigned role.
7. When finished, click **Save**.
---
### Removing Users
To remove a user, you must set a termination date on the User Details page. Once this date is reached, the user account is automatically disabled. Disabled accounts are prevented from logging in to KidKare.
1. In the **Users** tab, click  next to the user to remove. The User Details page opens.
2. In the **Demographics** section, click the **Termination Date** box and enter the date of termination.
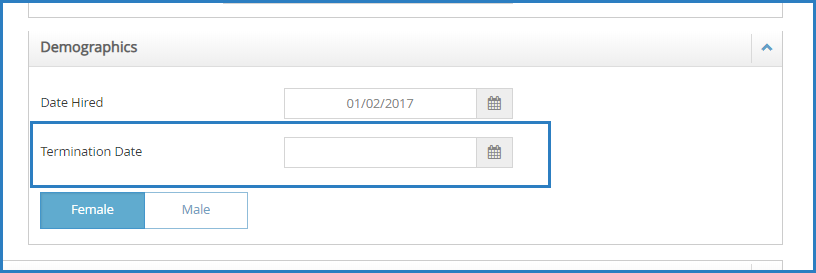
3. Click **Save**.
To reinstate user accounts, return to the user profile and clear the **Termination Date** box.
---
### Reset User Passwords
While you can reset user passwords, you cannot see any permanent passwords. Instead, you can either send a system-generated email to the user's email address, or you can set a temporary password and provide it to the user.
1. From the menu to the left, click **Administration.**
2. Click **User Permissions.**The User Permissions page opens to the Users tab by default.
3. Click  nextto the user to edit.
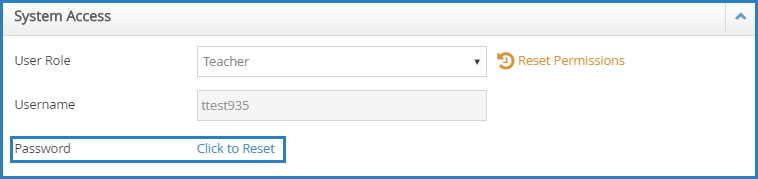
4. In the **System Access** section, click **Click to Reset.**
- If there is an email address saved to the user profile, an automated email containing instructions on resetting their password is sent to the user.
- If there is no email saved to the user profile, enter a temporary password for the user. Then, click **Save (checkmark icon)**. You must provide the password to the user. It can only be used once, so the user must reset their password upon login.
---
### What it looks like when a new user login
Once you create a new user with a role or permissions, they have the ability to login on their own, create a password, and view areas you have given access to.
- [Home Page & Settings](https://knowledge.kidkare.com/independent-center/home-page-settings?hsLang=en)
- [Children](https://knowledge.kidkare.com/independent-center/children?hsLang=en)
- [eForms](https://knowledge.kidkare.com/independent-center/eforms?hsLang=en)
- [Menus & Attendance](https://knowledge.kidkare.com/independent-center/menus-attendance?hsLang=en)
- [Calendar](https://knowledge.kidkare.com/independent-center/calendar?hsLang=en)
- [Claims](https://knowledge.kidkare.com/independent-center/claims?hsLang=en)
- [Parachute](https://knowledge.kidkare.com/independent-center/parachute?hsLang=en)
- [Expenses](https://knowledge.kidkare.com/independent-center/expenses?hsLang=en)
- [Reports](https://knowledge.kidkare.com/independent-center/reports?hsLang=en)
- [Administration](https://knowledge.kidkare.com/independent-center/administration?hsLang=en)
- [Messages](https://knowledge.kidkare.com/independent-center/messages?hsLang=en)
- [Get Help/Support](https://knowledge.kidkare.com/independent-center/get-help-support?hsLang=en)
- [KidKare Guardian Portal](https://knowledge.kidkare.com/independent-center/kidkare-guardian-portal?hsLang=en)
- [KidKare Academy](https://knowledge.kidkare.com/independent-center/kidkare-academy?hsLang=en)
# KidKare
Support Hours M-F 9am-5pm CST
Copyright © 2026, KidKare