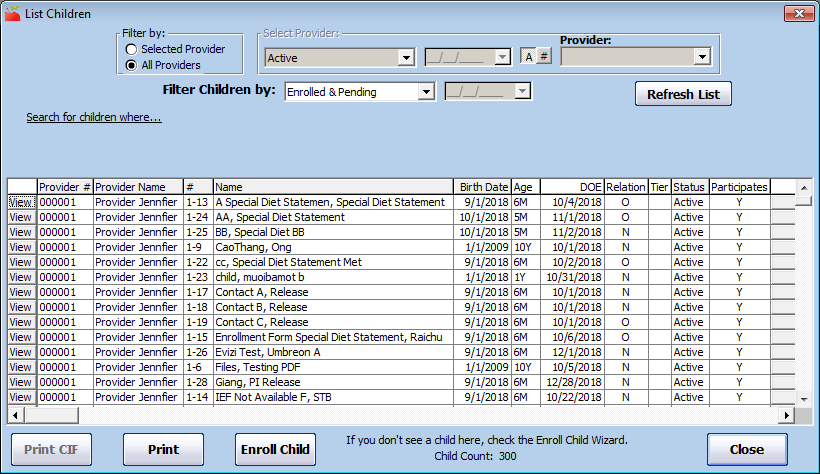
List Children
The List Child window displays children alphabetically by name and, if your agency uses them, by child number.
-
Click the Providers menu and select List Children. The List Children window opens.
-
Click the Filter Providers By drop-down menu and choose from the following:
-
Active: List providers who are currently enrolled and claiming with your sponsorship. Providers set to Hold status also appear in the resulting list.
-
Active and Withdrawn After: List active providers and those who have been withdrawn after a certain date. If you select this option, click the corresponding Date box and enter the date (MM/DD/YYYY). This option also adds a Removal Date column to the resulting provider list.
-
All: List all providers, regardless of status. If you select this option, a Removal Date column is added to the resulting provider list.
-
Hold: List only those providers whose current status is Hold.
-
Withdrawn Before: List only providers who have been withdrawn before a certain date. If you select this option, click the corresponding Date box and enter the date (MM/DD/YYYY). This option also adds a Removal Date column to the resulting provider list.
-
-
Click the Filter Children By drop-down menu and select the child status by which to filter. You can choose from the following:
-
Enrolled: List children who are enrolled and active (ready to be claimed).
-
Enrolled & Pending: List children who are enrolled or pending (this means that the child list will include children who are not activated).
-
Pending: List only children who have not yet been activated.
-
All: List all children, regardless of status.
-
Withdrawn Before: List only children withdrawn as of the date you specify. If you select this option, click the corresponding Date box and enter the date (MM/DD/YYYY).
-
-
Click Search For Children Where to set additional filters. Click each box and enter the information by which to limit. Click Search Tips for helpful information about using these search options. Click
 to clear the text you've input in these boxes.
 -
Click Refresh List. The children most closely matching the criteria you specified displays.
-
Click each column to sort the displayed information in ascending or descending order.
-
You can do the following in this window:
-
Click Print to generate and print the List Children report.
-
Click Print CIF to print a CIF for the selected provider for the current claim month. The CIF prints all children enrolled during the month, so this list may include withdrawn children that may not display in the child list (according to the filters you set). You can only access this button if you have filtered to a specific provider.
-
Click View to open the Child Information window for a specific child.
-
Click Activate to activate a pending child.
-
Click Withdraw/Reactivate to withdraw/re-activate a child a child.
-
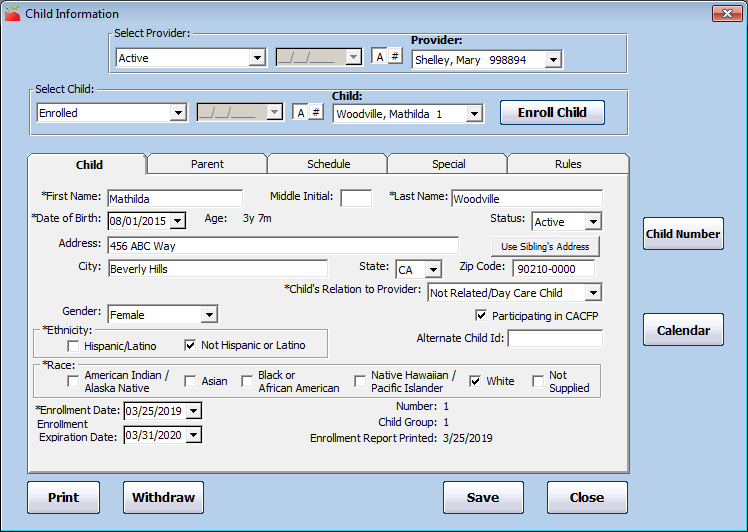
Update Child Information
Once you enroll children, you can update them at any time in the Child Information window.
-
Click the Providers menu and select Child Information. The Child Information window opens.
-
Click the Provider drop-down menu and select the provider.
-
Click the Child drop-down menu and select the Child to change. The child's information displays.
-
Click each box to change and enter new information over the existing information. You can change information in each tab.
-
When finished, click Save.
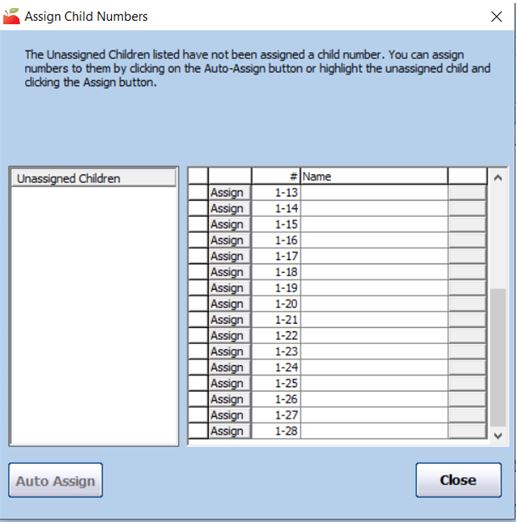
Manage Child Numbers
If you currently use or plan to use scannable forms, you must assign a child number to each enrolled child. You can assign children a number from 1 to 28. These numbers correspond to the bubbles available for use on scannable forms. For more information about assigning child numbers, see Assign Child Numbers.
To ensure that no problems arise when providers enroll and withdraw children over time, Minute Menu HX examines enrollment and withdrawal dates for each child to determine which child belongs to a specific number. When a child is enrolled and assigned to a number, the number assigned to that child is locked down effective the first of the month of that child's enrollment. This number is locked and unavailable through the last date of the month of withdrawal. For example, Lisa is assigned to #2. The provider withdraws Lisa in February. In May, Brett is enrolled and assigned to #2. Minute Menu HX notes that as of May, Brett is #2, because this is past Lisa's withdrawal date.
Some children may be listed with a WD in front of their names. This indicates that the child occupying that number was withdrawn, but the old child's withdrawal date is later than the current child's DOE, so that withdrawn child was activate at some point with the currently enrolled child.
We absolutely do not recommend that you change a child's number once they are enrolled. The only situation in which this might be needed is when a provider enrolls a child initially, and they assigned the number to this child in error. Even so, it is best to minimize child number changes to minimize confusion for your provider and for any follow-up audits that must be completed.
To change a child number:
-
Click the Providers menu and select Child Information. The Child Information window opens.
-
Click the Provider drop-down menu and select the provider.
-
Click the Child drop-down menu and select the child to change.
-
Click Child Number (to the right). The Assign Child Numbers window opens.
-
Click Delete next to the child to change. The child is moved to the Unassigned Children box to the left.
-
Click Assign next to the new open number to which to assign the child.
-
Click Close.
-
Click Save.
The system will cross-check the child's date of enrollment here and all existing enrollments on-file. If the child number to which you are assigning the child was in-use at some point in the past, and the child's given date of enrollment indicates that there would be an overlap, the system prevents you from assigning that child number.
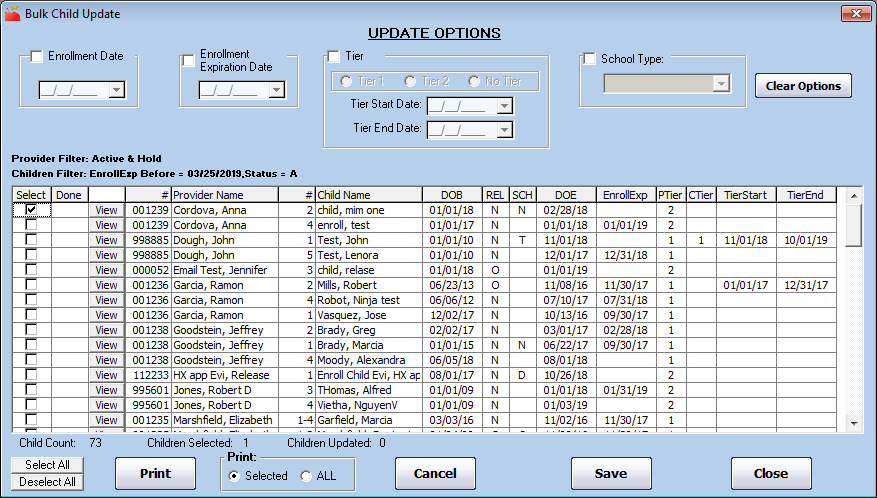
Update Multiple Children at Once
You can use the Bulk Update Child function to update child information for multiple children at the same time. This function allows you to update enrollment dates, enrollment expiration dates, tiering dates, and school-type information.
-
Click the Administration menu and select Bulk Child Update. The Provider Filter window opens.
-
Set filters for the providers to include in the change. Check the Choose Providers From List box to select specific providers from a list.
-
Click Continue. If you did not check the Choose Providers From List box, the Bulk Provider Update window opens. Go to Step 5.
-
If you choose to select providers in Step 2, the Choose Providers dialog box opens. Check the box next to each provider and click Continue. The Child Filter Dialog window opens.
-
Check the box next to each filter criteria to use, and then select the filter. For example, you can check the Enrollment Expiration Date box and then set a specific date to include.
-
Click Continue. The Bulk Child Update box opens and displays those children that meet the limits you set.
-
In the Update Options section, select the information to update. You can update the following:
-
Enrollment Date
-
Enrollment Expiration Date
-
Tier
-
School Type
-
-
Set new dates, as needed.
-
Check the box next to each child to which to apply these changes. You can also click Select All to select all displayed children.
-
Before saving your changes, click Print to print a report that lists the children you are updating and their current information. Review this report carefully and confirm that you have selected the correct children. You cannot reverse this process once its completed.
-
Click Save.
Manage Pending Children
When a child remains in Pending status, providers cannot withdraw that child. This means that Pending children remain in the list of children providers can choose to serve, even if they are no longer in care, until you activate them. If you never received a signed enrollment form for a pending child, that child could effectively remain in the system forever.
We recommend that you periodically withdraw children that were enrolled via KidKare, but for whom you never received signed enrollment forms. If you and your providers use eForms, you can log in to KidKare and access the View Status page to see which forms you have not received.
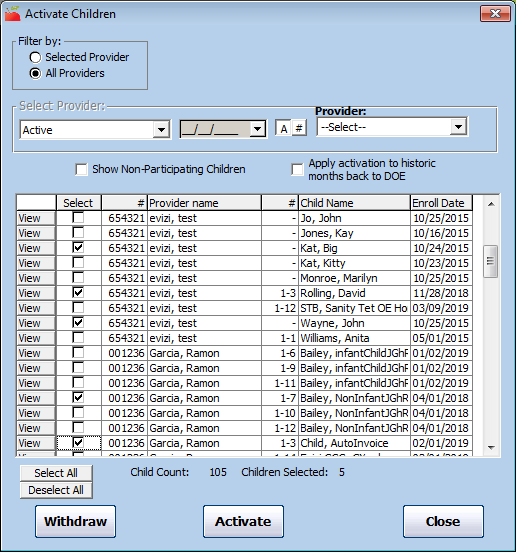
As a sponsor, you can withdraw pending children in the Activate Children window. To do so:
-
Click the Providers menu and select Activate New Children. The Activate Children window opens.
Note: You can also access this window from the Provider Information window. To do so, click Activate Children (to the right).
-
In the Filter By section, select Selected Provider or All Providers. If you select All Providers, go to Step 4.
-
Click the Provider drop-down menu and select the provider for whom to activate children.
-
Check the box next to each child to withdraw.
-
Click Withdraw. The children are withdrawn and automatically assigned a withdrawn date that is one day before their date of enrollment. This ensures that child information is kept in the system.
Non-Participating Pending Children
Providers who use KidKare to record claim information online may also enroll children before the child is actually supposed to be in care. Typically this is because the provider uses KidKare to document children on a waiting list. In other cases, providers may have some children that, for whatever reason, they do not want to claim on the Food Program but do want to track in KidKare.
In this case, providers may enroll those children in KidKare, but must clear the Participates in CACFP box when enrolling children to indicate that these are non-participating children.
Non-participating children do display in Minute Menu HX, but they are filtered out of the Activate New Children window by default. To include them in this list, check the Show Non-Participating Children box.
Withdraw Children
When you withdraw a child, the child remains in your Minute Menu HX database for auditing purposes. You can also re-activate withdrawn children at a later date, if needed. Deleting children, however, completely removes the record from your database. We strongly recommend that you only delete children who were enrolled in error, enrolled twice, and for other data-entry related reasons. Otherwise, withdraw children who are no longer in care.
-
Click the Providers menu and select Child Information. The Child Information window opens.
-
Click the Provider drop-down menu and select the provider.
-
Click the Child drop-down menu and select the child to withdraw.
-
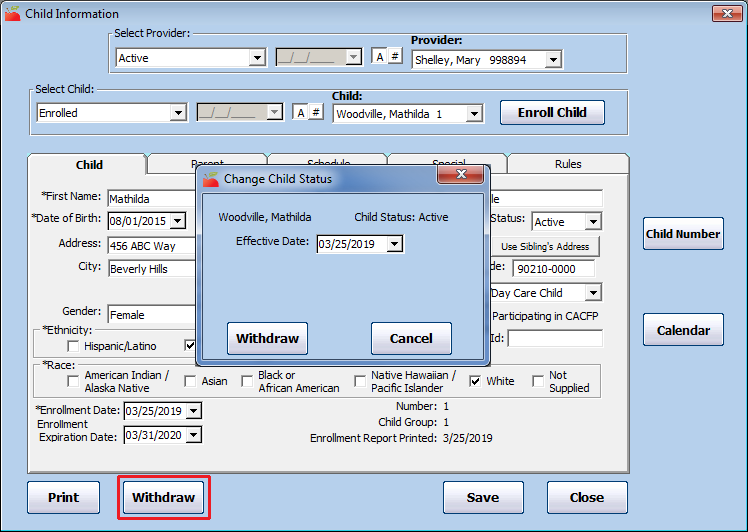
Click Withdraw (bottom of the window). The Change Child Status dialog box opens.
-
Click the Effective Date box and enter the child's effective date of withdrawal.
-
Click Withdraw.
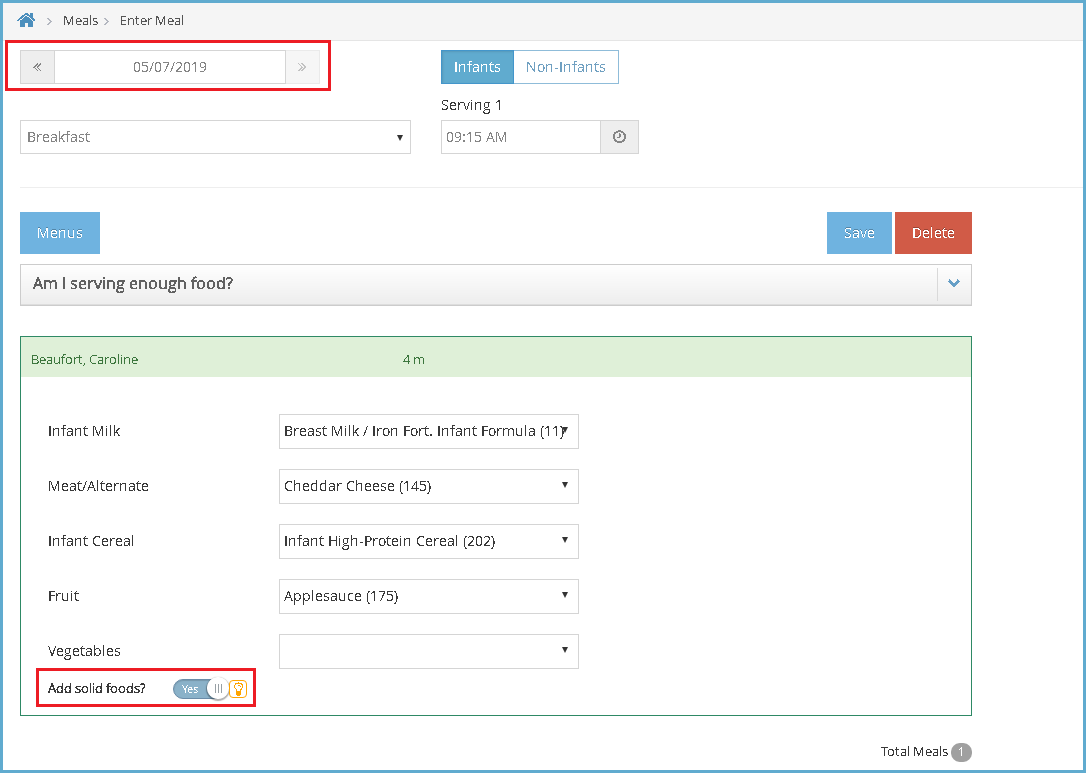
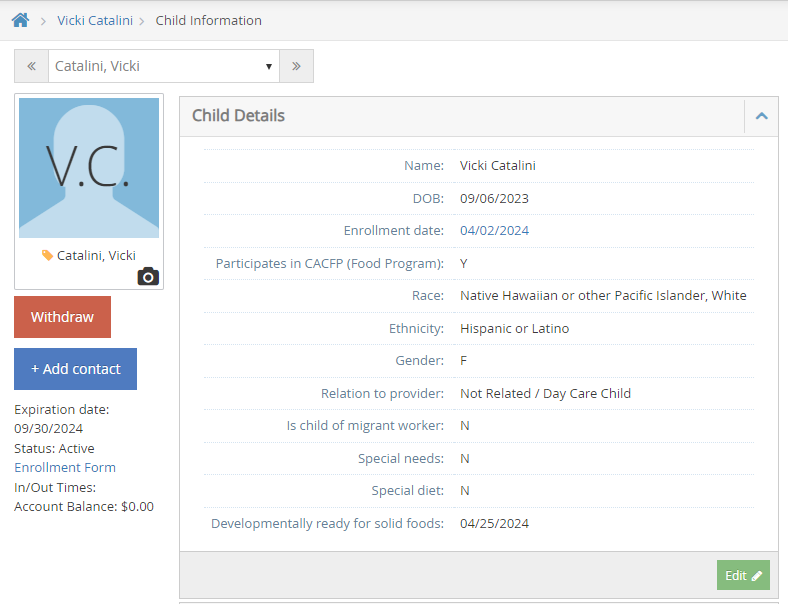
Mark Infants as Developmentally Ready
For example, if the provider sets the Add Solid Foods slider to Yes and records solid foods for an infant on May 7, 2019, 05/07/2019 is written to the Developmentally Ready box in Minute Menu HX. See the figures below.
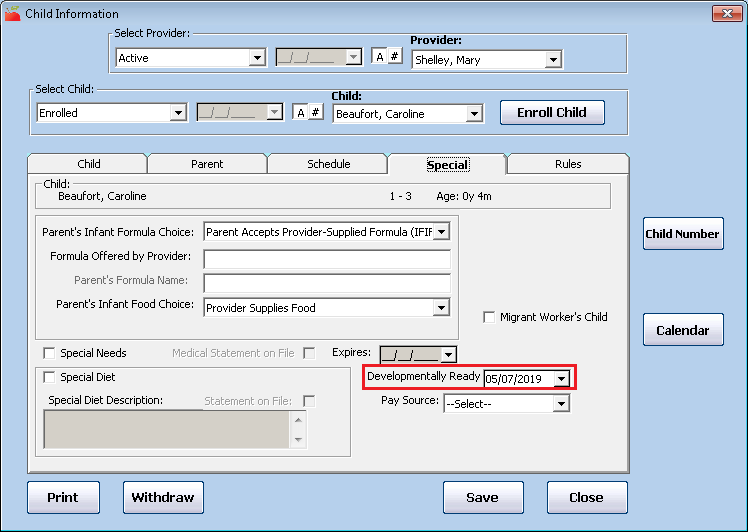
The Developmentally Ready date can also be entered when enrolling new children, or from the edit child screen.

Sponsor Preferences for Developmentally Ready Foods
Preference Q.010 can be set to Ignore, Warn or Disallow
When set to Warn, an infant who was marked developmentally ready was not served solid foods, Error 189 appears on the Office Error report. Meals are checked starting from the first day the infant was marked developmentally ready at a meal in KidKare. This error is a warning only
When set to Disallow, an infant who was marked developmentally ready was not served solid foods, Error 192 appears on the Office Error report. Meals are checked starting from the first day the infant was marked developmentally ready at a meal in KidKare. This error will disallow meals by child based on the criteria below:
-
If a child is marked as developmentally ready and they are under 6 months, the sponsor will receive a warning on the claim if the child is not served 2 components of solid food for each meal.
-
If a child is marked as developmentally ready and they are 6 months or older, the sponsor will see a disallow error on the claim if the child is not served the required 3 components based on the USDA meal patterns.