Add Reviews Manually
You can manually add reviews to a provider's record outside of KidKare, or the Admin Review site. This is especially useful if you do all review work manually.
-
Click the Providers menu and select Provider Reviews. The List Reviews window opens.
-
In the Filter By section, select All Providers or Selected Providers. If you choose Selected Providers, click the Provider drop-down menu and select the provider.
-
Click Refresh List.
-
To add a review:
-
If you filtered to All Providers in Step 2, click Add next to the provider for whom to add a review. The Add New Review window opens.
-
If you filtered to a specific provider in Step 2, click Add Review in the bottom-left corner of the window. The Add New Review window opens.
-
-
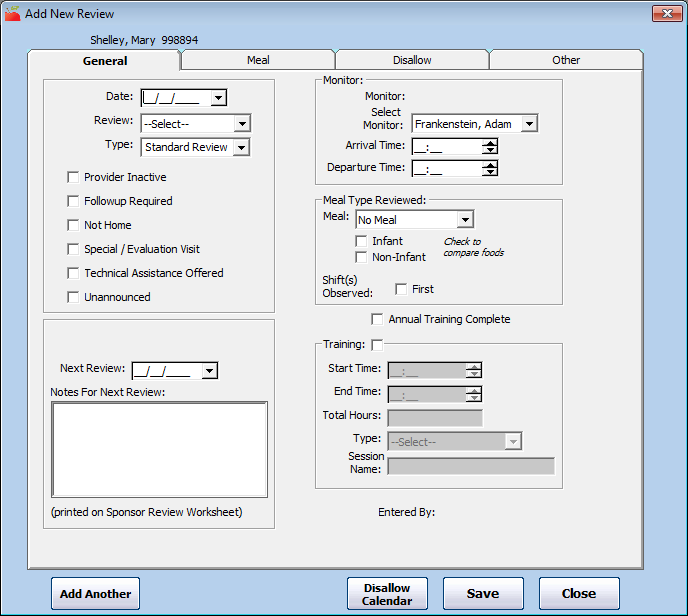
In the General Tab:
-
Click the Date box and enter the date of the review.
-
Click the Review drop-down menu and select the classification of this review. This impacts the date set in the Next Review box. You can choose from the following:
-
1st - 4th Review
-
Follow-up Review
-
Pre-approval Review
-
28 Day/30 Day/ 4 Week Review
-
Special/Eval
Note: If you select Special/Eval, the next review due date is not set, and this review does not affect the provider's review schedule.
-
-
Click the Type drop-down menu and select the type of the review. Some review types can be automatically set by other fields in the software. For example, weekend reviews are determined by the review date.
-
Check the box next to any of the following options that apply:
-
Provider Inactive
-
Follow-up Required
-
Not Home
-
Special/Evaluation Visit
-
Technical Assistance Offered
-
Unannounced
-
-
Click the Notes for Next Review box and enter any notes for the next review. The information entered in this box prints on the Sponsor Review Worksheet in the Review History section.
Note: Even though the Next Review Date box defaults to a certain value based on the review type, you can change it, if needed.
-
In the Monitor section, select the Monitor, their arrival time, and their departure time.
-
In the Meal Type Reviewed section, select the meal type and age groups reviewed. Your selection here affects the available options in the Meal tab. Note that if you select No Meal, the Meal tab is not available.
-
Check the Annual Training Complete box if the Monitor recorded an annual training with the provider during this review. If you check this box, the system assumes that training occurred and you can supply any other relevant training information.
-
Check the Training box if any other training was completed with this provider. Then, enter the training details: Start/End Time, Total Hours, Type, and Session Name.
-
-
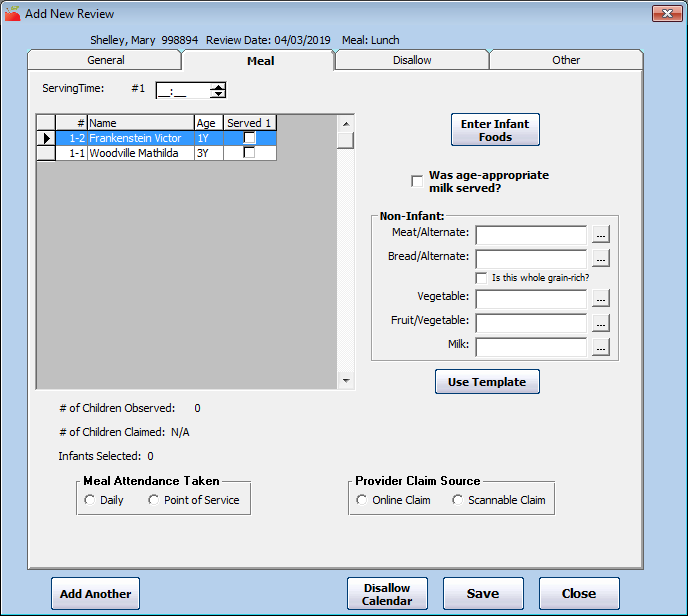
Click the Meal tab and enter the information below. If you selected No Meal in Step 5g, go to Step 7.
-
Check the box next to each child in attendance for the meal. If this provider is set up for multiple servings, and you indicated that the Monitor observed both servings in the General tab, check the box next to the serving at which the child was present.
-
Enter the foods served. Click Enter Infant Foods to enter any infant foods, if needed. You can leave meal information blank, but if you do supply foods/attendance, the system cross-checks this information when the claim is processed. Any discrepancy between what you note here and what the provider has claimed causes an error when the claim is processed.
-
-
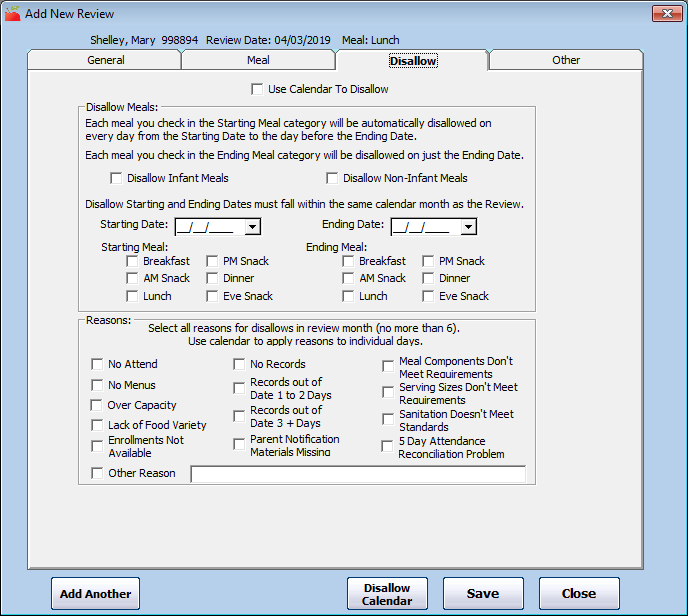
Click the Disallow tab. Use this tab to disallow meals based on information observed during the review. Only use this tab if the Monitor noticed a situation during the review that required a certain meal or set of meals to be disallowed.
-
Click the Disallow Infant Meals or the Disallow Non-Infant Meals box to disallow meals for a specific age group. Checking neither box has the same effect as checking both boxes when you specify a date and meal range.
-
Click the Disallow Starting Date and Ending Date boxes and enter the first date and last date to be disallowed. To disallow meals for one day only, enter the same date in these boxes.
-
In the Starting Meal section, check the box next to each meal to disallow from the starting date through (but not including) the ending date.
-
In the Ending Meal section, check the box next to each meal to disallow on the ending date.
-
In the Reasons section, check the box next to each reason to apply to the disallowances.
Note: You can also disallow meals with the Disallow Calendar. To do so, check the Use Calendar to Disallow box and then click Disallow Calendar. For more information see, Disallow Meals with the Disallow Calendar. You must select reasons and save your progress before opening the calendar.
-
-
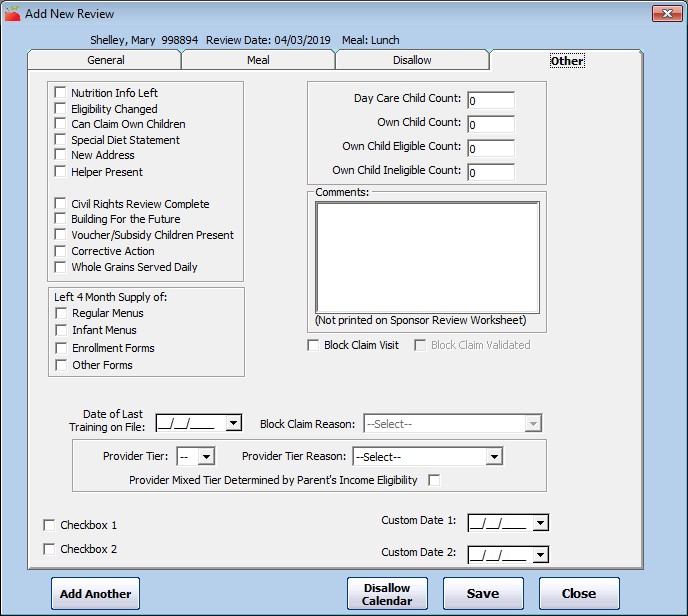
Click the Other tab. Use this tab to record additional information about the review. None of the information in this tab is required, and it is not checked when processing claims. You can reference this information in certain reports.
-
When finished, click Save.
-
Click OK at the confirmation prompt. At this point, you can click Add Another to add another review, or click Close to close the window.
Fill Out Scannable Review Forms
If you do not record reviews online, Monitors use a physical review form during on-site visits to provider homes. Monitors record everything observed during a review on these forms. They consist of the following sections:
-
Top Section: This section is for recording basic information related to meal servings, as observed during the review. This information can be cross-checked against the records reported by the provider during that month. Some of the information in this section is required. This portion of the form is scannable.
-
Bottom Section: This section is more open-ended. Your Monitors can use it to record any additional information relevant to the review.
Scan review forms before processing a provider's claim. Minute Menu HX automatically saves all information recorded in the top section of the form in the Minute Menu HX database. Then, during processing, this review information is cross-checked when the provider's meals are analyzed, and any action required is automatically taken by the Minute Menu HX processor.
When filling out forms, observe the following guidelines:
-
Use a #2 pencil.
-
To erase a mark, use a pink eraser.
-
Never fold or staple your forms.
-
The Monitor and the Provider must both sign and date the form.
Filling Out the Top Section of the Form
-
Write the provider's six-digit number in the Provider Number boxes, and mark the bubble for the corresponding number next to each box. This fields is required.
-
Bubble-in the class and type in the two rows of bubbles in the middle of the top section. The Class and Type header section looks something like this:
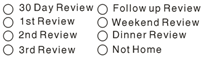
For most Review Forms, you can mark one and only one bubble in the left column. You can mark as many bubbles as you like in the right column. However, you must mark only one Class. You can mark as many other choices in the header as you like. The following Class options are available
-
30 Day Review / 28 Day Review / 4 Week Review: This is the first review being done for this provider.
-
Pre-Approval Review: The provider has not started to claim.
-
1st Review: The first review conducted in the fiscal year.
-
2nd Review/3rd Review/4th Review: The second through fourth reviews (if you conduct four reviews in a year).
-
Follow-up Review: This review is a follow-up to a previously attempted review.
-
-
Mark your Monitor Number as assigned by your office. This must be marked on every review form to keep track of who perform each review.
-
Bubble-in the circle for the Meal Observed. You must mark at least one meal, or mark that no meal was observed.
-
Bubble-in the Month, Day, and Year in which the review was completed. When entering the year, you only need to supply the last two digits.
-
If the provider you are reviewing serves meals in split shifts, bubble-in the Split Serving option if you are observing the second serving of a particular meal.
-
Fill out the Menus for both infant and non-infant children according to the food you observe as served. Use your agency's Food Chart when marking foods served, and use the provider's CIF or the Review Worksheet to mark the relevant child numbers in the Attendance section. The resulting recorded menus should match the provider's non-infant and/or infant menu that they have already filled-out. If you wish to write on a provider's regular or infant menu form, use a highlighter only to mark the meal observed. Any other mark causes an error when scanning the provider's form. This is optional.
-
On certain review forms, mark meals that should be disallowed. You mark disallowances on the review form the same way you mark disallowances when entering a review into HX manually. If you indicate that a disallowance should occur, you must supply a starting and ending disallowance date. Mark all disallowed meals for the Starting date through (but not including) the Ending date. Then, mark all disallowed meals for the Ending date itself. Leave this part of the form blank if you do not determine any disallowances are needed.
-
Many review forms have a bubble to indicate that you completed Annual Training or Training Offered (or a variation) during the review. Minute Menu HX can be configured to interpret any of these training bubbles as one of two things:
-
Training was actually offered during the review: When this review form is scanned, a provider training record is created with the review. This review is created as an Annual Training type. If the form also has arrival and departure times for the Monitor, these times are automatically applied to the provider training record, as well.
-
The Monitor checked the provider's records to confirm that the provider had completed the required training: No provider training record is created, but the fact that training is complete is documented with the review.
-
-
You can mark Other Information in the top section of certain review forms. This information includes indications of whether forms were left, manual child head counts, and more. These fields are optional.
Filling Out the Bottom Section of the Review Form
The bottom section of the review form allows your field staff to record a variety of miscellaneous information about their visit. This information is not scanned into the computer, so you can make as many notes on that section of the form as you like: answer questions as listed or write additional notes, if needed. Make sure that no stray marks or lines go into the top section of the review form, since these marks may cause scanning errors.