Understand Claims with Multiple Claim Records
When you create a claim in Minute Menu HX, a single claim record is created in the database. When you then mark that claim as submitted, the claim record is locked, and you can no longer make changes to it. However, you may still need to change the claim counts associated with that claim.
Per Food Program guidelines, you can make upward adjustments for any claim that is less than 90 days old. You can make downward revisions at any time. When you make such adjustments, a new adjustment claim is created in Minute Menu HX.
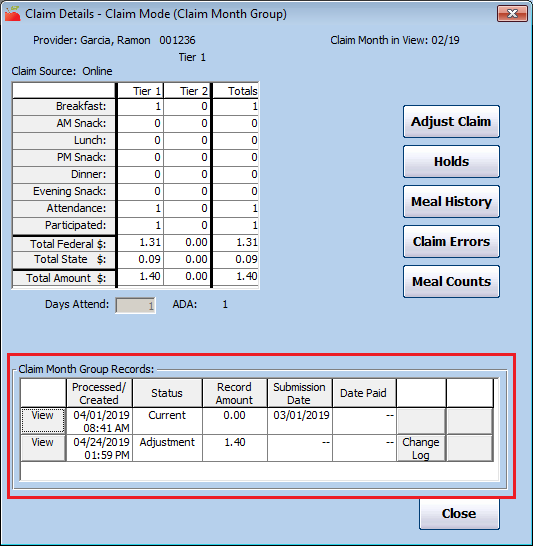
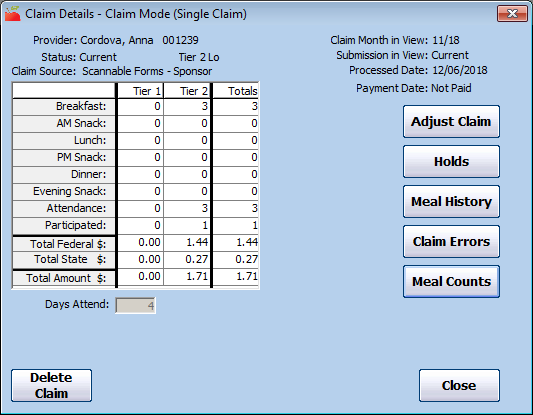
If the claim has already been submitted, these new records display in the Claim Month Group Records section of the Claim Details window. The new information here allows you to review the exact history of this provider's claim, such as when the claim revisions were submitted to the state and when they were paid.
When you view a claim that has more than one claim record, the meal count information includes totals for the entire month by default. The Tier indicated at the top of the window is the final-determined Claim Tier after accounting for all adjustments. The Claim Status, Submission in View, Processed Date, and Payment date fields are all suppressed when viewing the provider's full-month claim information, as those items are specific to individual records that make up the provider's claim.
Also, you cannot print a check stub here, as there may be a different check stub specific to individual claim records that make up the provider's claim.
View Claims
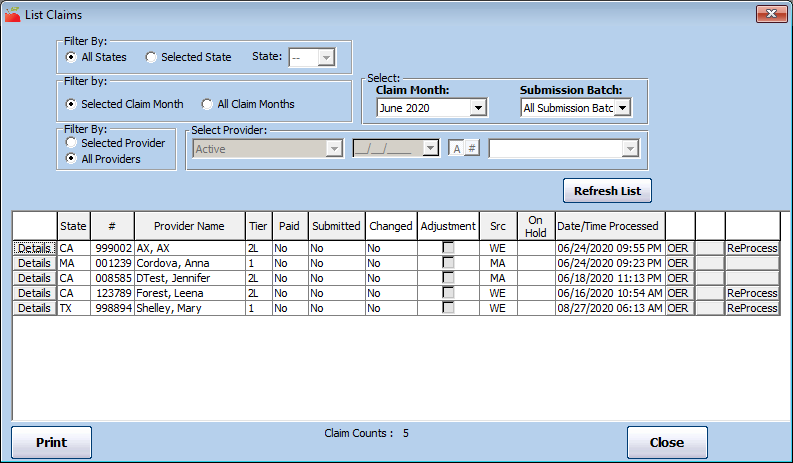
Once you have created claims in Minute Menu HX via the Process Claims function or by manually entering claims, they are added to the List Claims window. Access this window to review, manage, and update claims as needed. You can also re-process claims from this window.
-
Click the Claims menu and select List Claims. The List Claims window opens.
-
In the first Filter By section, select Selected Claim Month or All Claim Months. If you select All Claim Months, go to Step 5.
-
Click the Claim Month drop-down menu and select the claim month.
-
In the second Filter By section, select Selected Provider or All Providers. If you select All Providers, go to Step 6.
-
Click the Select drop-down menu and select the provider to view.
-
Click Refresh List. Providers and claims meeting the limits you set display.
-
Click each column to sort the displayed information in ascending or descending order. Note that some columns may or may not display according to the selections you made when filtering the list.
-
You can do the following in this window:
-
Click Print to print the Provider Claim Totals report for the selected month. If you did not select a month when filtering the claim list, you are prompted to select a month for the report.
-
Click Details next to a claim to view the claim details.
-
Click OER to print the Office Error report for that claim.
-
Click ReProcess (if available) to re-process the listed claim.
-
Click Stub to print a check stub or direct deposit voucher. This option is only available once the claim has been marked as paid (via Issue Payments).
-
Specific Columns in the List Claims Window
Tier
The Tier column displays the claim's tier. This can be any of the following:
-
Tier 1
-
Tier 2
-
Tier 2 Hi
-
Tier 2 Lo
-
Tier 2 Mixed
Paid
The Paid column indicates whether the listed claim has been paid. If an adjustment exists for the claim and the original claim was paid, but the adjustment has not, the claim's paid status is Partially.
Submitted
The Submitted column indicates whether the claim has been marked as submitted. If an adjustment exists for the claim and the original claim was submitted, but the adjustment has not, the claim's submitted status is Partially.
Changed
The Changed column indicates whether an unsubmitted claim has been changed. If a claim has already been marked as submitted, -- (dash dash) displays in this column. If the claim has not been submitted and has been modified, Yes displays.
Src
The Src column shows the claim source. This can be one of the following:
-
WE: Web-based KidKare Claim
-
SF-BM: Scannable Form — Full Bubble Menu
-
SF-AM: Scannable Form — Attendance Menu
-
SF-FM: Direct Entry Claim
-
MA: Manual
Verify Claims Accuracy
When Minute Menu HX processes a claim, the system applies up to approximately 160 rules to every child, day, meal, and menu that is part of the claim. Therefore, any quality assurance process must ensure that Minute Menu HX is accurately processing claims, regardless of claiming method, as well as ensure that any method of data collection used is performed accurately.
Claims Processing Quality Checks
The best way to ensure that Minute Menu HX is processing claims accurately is to compare its automated claims processing with claims that are processed by hand. We recommend you complete this procedure at least twice a year. Each time, pick an arbitrary claim month and a small number of claims to analyze (typically no more than five). These claims should represent the broadest corss-section of claiming scenarios: different license types, tiering situations, foster care, and so on.
-
Print the Claimed Food & Attendance report for the claim. Use the information in this report and refer to information on-file for the affected provider and their children and process the claim manually.
-
Compare the results with those sown on the Office Error report. There should be no discrepancies.
-
If there are discrepancies, identify the source and take appropriate action, which could include changes to data entry procedures, claim review changes, and/or Minute Menu HX configuration changes.
-
When diagnosing claims in detail, we recommend you also print the following reports:
-
Meal Totals Report
-
Claimed Attendance Summary
-
Claimed Foods & Attendance by Tier Report
-
KidKare Quality Checks
Confirm that the information your providers recorded is what they are actually using to process the claim. We recommend you complete this procedure at least twice a year. Coordinate with a provider before they submit their claim to ensure that they send in their claim data. Typically, you only need to check about three providers.
-
Have the provider print the Claimed Foods & Attendance Report in KidKare immediately before submitting their claims to you. The provider should send you this report.
-
Print the Claimed Foods & Attendance report for the provider out of Minute Menu HX.
-
Compare the two reports and ensure that they are identical. If you find any discrepancies, contact Minute Menu HX support to resolve the discrepancy.
Scannable Forms Quality Checks
When checking scannable forms, ensure that the information added to Minute Menu HX is the same as that which was marked on the form. The best way to ensure that Minute Menu HX is reading forms properly is to compare what is filled-out on a form with what Minute Menu HX interpreted for that form. We recommend you complete this procedure at least twice a year. Each time, pick an arbitrary claim month and a small number of claims to analyze (typically no more than three). These claims should be of differing form types.
Full Bubble Menus
Look at a single provider's forms (both Infant and Regular Menus) and compare them after scanning and validation with the Claimed Foods & Attendance report. The foods and children listed on the report should match the children marked on the form exactly. If you find any discrepancies, take appropriate action, which could include cleaning or re-calibrating your scanner, updating errors in your food chart or planned menus, or otherwise contacting Minute Menu HX Support or your scanner manufacturer's support team.
Attendance Menus
Examine the Office Error report and ensure that any meal marked as disallowed because of bad foods is also disallowed on the claim.
Direct Entry Quality Checks
Ensure that the information your data entry staff entered matches the information providers supplied on their manual forms. We recommend that you complete this procedure at least four times a year. Each time, pick two or three claims entered by each staff member responsible for data entry.
- Print the Claimed Attendance Detail report and compare it with the information providers submitted on their meal count forms.
- Review the Office Error report for one of these claims and ensure that any meals that should have been disallowed were actually disallowed, since these disallowances were entered manually.
- If you find any discrepancies, resolve the issue with the data entry staff, or contact Minute Menu HX support if the issue was not caused by human error.
Analyze Claim Capacity
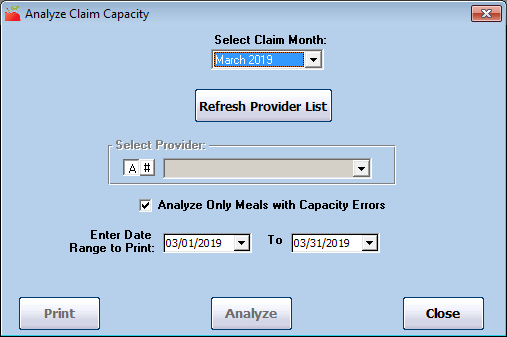
When you receive Over Capacity error messages on the Office Error report, use the Analyze Claim Capacity function to generate a report that provides specific guidance as to why a particular was over capacity.
-
Click the Claims menu and select Analyze Claim Capacity. The Analyze Claim Capacity window opens.
-
Click the Select Claim Month drop-down menu and select the claim month to analyze.
-
Click Refresh Provider List.
-
Click the Select Provider drop-down menu and select the provider to analyze.
-
In the Enter Date Range to Print section, select the date range to analyze. Reference the Office Error report for this date range.
-
Click Analyze.
If capacity errors are found, you are prompted to print the Claim Capacity Analysis report. This report lists each day, meal, and serving where an over-capacity error was generated. It notes the counts of children allowed (by age group, if relevant to your state) and the counts of children who were actually present in these categories. It also includes special information that may be specific to your state.
We also recommend that you print a CIF and the Claimed Foods & Attendance report for the day in question.
Place Claims on Hold
You can place both providers and claims on hold independently of each other. For more information about provider holds, see Provider Hold. If you place a claim on hold, that claim cannot be paid and is excluded from all sate claim reports/automated state claim transfer files.
If the provider is on hold and you process a KidKare or Scannable claim for that provider, the claim is automatically placed on hold. When manually entering claims, you can choose to place the claim on hold.
To place claims on hold:
-
Click the Claims menu and select List Claims. The List Claims window opens.
-
Filter to the claim to select. For instructions, see List Claims.
-
Click Details next to the claim to place on hold. The Claim Details window opens.
-
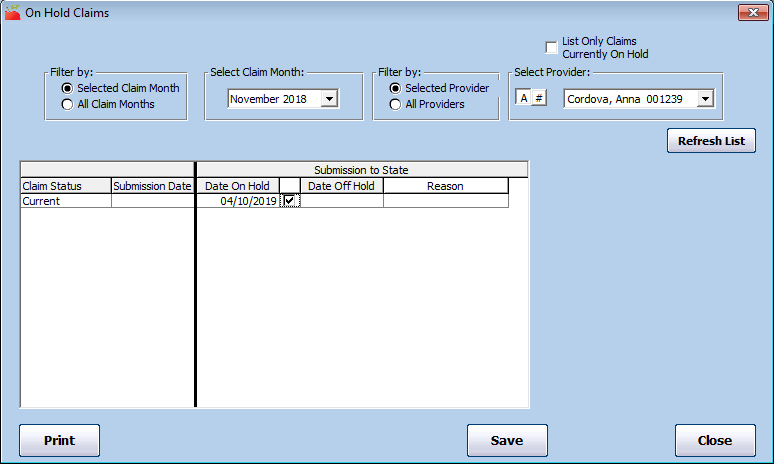
Click Holds (to the right). The On Hold Claims window opens.
Note: You can also access this window from the Claims menu. To do so, click the Claims menu and select On-Hold Claims. The On Hold Claims window opens. You must then filter to the claims to place on/remove from hold.
-
In the Submission to State section, check the box next to the Date on Hold box. The claim is placed on hold, a date populates the Date on Hold box, and the Put Provider On Hold dialog box opens.
-
Click Yes to place the provider on hold as well, or click No to just place the claim on hold.
-
Click the Reason drop-down menu and select the hold reason. You create hold reasons in the Hold Reasons window. For more information, see Add/Edit Claim Hold Reasons below.
-
Click Save.
To remove claims from hold:
-
In the On Hold Claims window, clear the box next to the Date On Hold box. The claim is removed from hold, and the current date populates the Date Off Hold box.
-
Click Save.
Add/Edit Claim Hold Reasons
When you place a claim on hold, you can set a reason for the hold for your reference (if you have configured Minute Menu HX to use hold reasons).
Adding Claim Hold Reasons
-
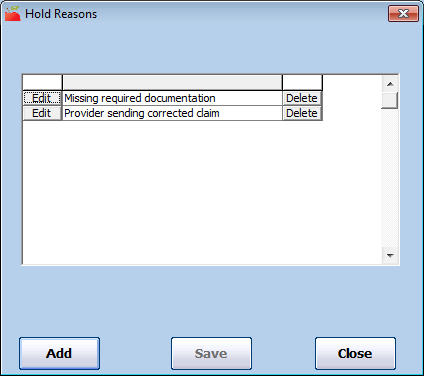
Click the Claims menu and select Edit Hold Reasons. The Hold Reasons window opens.
-
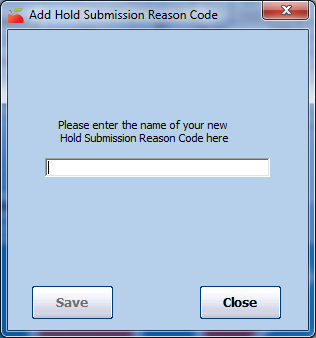
Click Add. The Add Hold Submission Reason Code dialog box opens.
-
Click the text box and enter the hold reason.
-
Click Save.
Editing Claim Hold Reasons
-
In the Hold Reasons window, click Edit next to the reason to change. The Edit box displays.
-
Click the Edit box and enter new information over the existing information.
-
Click Save.
Deleting Claim Hold Reasons
-
In the Hold Reasons window, click Delete next to the reason to remove.
-
Click Yes at the Are You Sure prompt. The reason is deleted and a confirmation prompt displays.
Change/Adjust Claims
If you process claims and find that the claim counts determined when this claim was created are inaccurate, you may need to adjust them. Do not re-process claims changed with the Adjust claims feature. If you re-process, the manual change is overwritten, as Minute Menu HX attempts to re-determined the claimed meal counts based on the underlying meals and attendance.
When you make changes to claim counts, you either create an adjustment claim or a claim change.
-
Adjustment Claims: Submitted/paid claims are locked and you can no longer make changes to them. If you change the meal counts for one of these claims, a new claim record with the updated claim counts is created for this provider. This is an adjustment claim.
-
Claim Changes: If you change counts before the claim is submitted/paid, the changes you make to the claim counts are applied directly to the original claim record. This is a claim change.
Minute Menu HX manages the above situations automatically, so our state claim and check register reports are completely consistent, even after you make adjustments to the claim.
To change or adjust a provider's claim count:
-
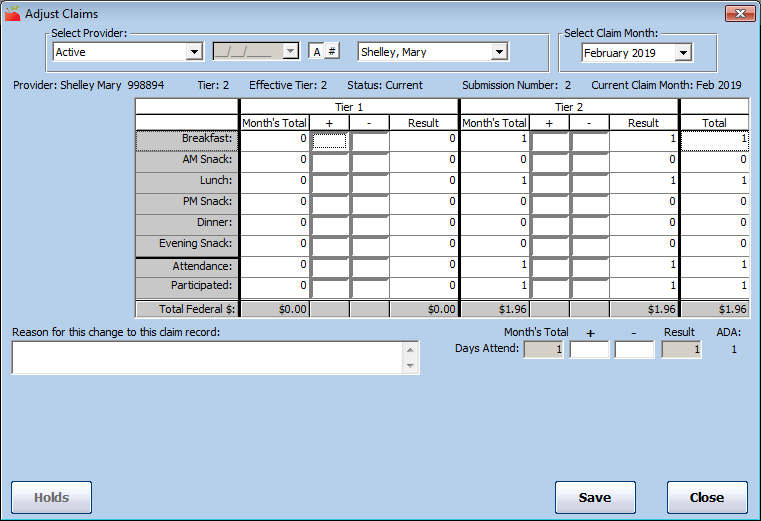
Click the Claims menu and select Adjust Claims. The Adjust Claims window opens.
-
Click the Select Provider drop-down menu and select the provider for whom to adjust claim counts. The provider's most recent claim displays by default.
-
Click the Select Claim Month drop-down menu and select the claim month, if needed. You can also access this window from the Claim Details window. To do so, click Adjust Claim (to the right).
-
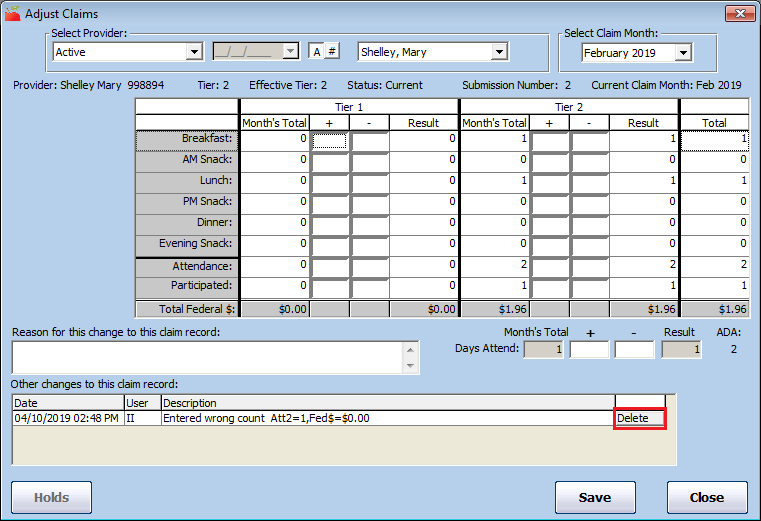
In the appropriate Tier section (Tier 1 or Tier 2), update the claim counts. To add to a count, enter a value in the + (plus) column To subtract from a count, enter a value in the - (minus) column. Keep the following information in mind as you work:
-
The provider's Effective Tier displays at the top of this window. If you make a change to meal counts in a Tier other than the Effective Tier, the Effective Tier field will update accordingly. For example, if Provider A is Effective Tier 2 and you enter meal counts in both the Tier 1 and Tier 2 sections, the Effective Tier changes to Tier 2 Mixed. Ensure that you are entering meal counts for the correct Tier.
A provider's Effective Tier is determined by examining the Tier starting and ending date in the provider's file. For example, if a provider is indicated as Tier 1 and their eligibility dates don't cover this claim month, the Effective Tier will be Tier 2. When you save a change or adjustment to a claim, the claim tier is re-determined by looking at the Effective Tier and the claim's overall meal counts. For example, if the provider's Effective Tier is 2 and your changes include both Tier 1 and Tier 2 meal counts, the claim tier becomes Tier 2 Mixed.
-
After you make adjustments, Attendance must be greater than or equal to the highest meal count in the given Tier. For example, if you add a large number of meals to a Tier, you probably must also add to the attendance count for that Tier as well.
-
If changes have already been made to this claim, they display in the Other Changes box. Review this information to ensure that you are not making the same change twice.
-
-
Click the Reason for this Change to This Claim Record box and enter a reason for the adjustment. This reason appears on the Provider Error Letter. You must enter a reason for every change/adjustment.
-
To void this claim, click Void Claim (if available). This is the same as entering negative meal counts equal to the amount of meals currently in the claim and brings the claim's new totals down to zero.
-
Click Save. The system verifies that the claim information you are saving is appropriate based on the information on-file for this provider. It cross-checks the meal, attendance, and participation counts with the number of days claimed with the number of days claimed and the number of enrolled Tier 1 or Tier 2 children. If any of these checks fail, you are prompted to make the appropriate corrections before saving.
Delete Claim Adjustments
You may need to delete an adjustment you created in Adjust Provider Claims. The same rules as regular claims apply: If you have not submitted/paid the claim, you can delete the adjustment. If you have submitted/paid on the adjustment, follow the instructions in Delete Submitted/Paid Claims below to remove the adjustment.
To delete an adjustment:
-
Click the Claims menu and select Adjust Provider Claims. The Adjust Claims window opens.
-
Click the Select Provider drop-down menu and select the affected provider. Claim adjustments that have not been submitted/paid display.
-
In the Other Changes to This Record section, click Delete next to the adjustment to remove.
-
Click Yes at the Are You Sure prompt.
Delete Unsubmitted/Unpaid Claims
You can only delete claims that have not been submitted to the state. If a claim has been submitted to the state, you must zero the claim out rather than deleting it. If this is the case, see Delete Submitted/Paid Claims below for more information.
Typically, you should only delete claims that are the result of a data entry error.
-
Click the Claims menu and select List Claims. The List Claims window opens.
-
Set filters and click Refresh List. For more information about filtering the List Claims window, see List Claims.
-
Click Details next to the claim to delete. The Claim Details window opens.
-
Click Delete Claim (bottom-left corner).
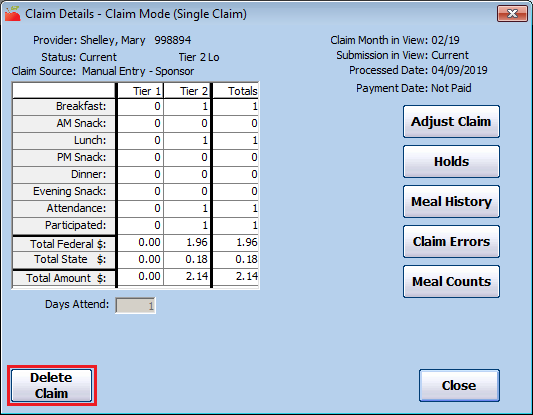
Note: If the Delete Claim option is not present, the claim has already been submitted/paid. Go to Delete Submitted/Paid Claims to delete this claim.
-
At the confirmation prompt, choose from the following:
-
Click Yes to delete the claim AND meal records.
-
Click No to delete the claim only.
-
Click Cancel to cancel the procedure.
-
Delete Submitted/Paid Claims
You can only delete claims that have not been submitted to the state. If a claim has been submitted to the state, you must zero the claim out rather than deleting it. If you are dealing with a claim that has not yet been submitted, see Delete Unsubmitted/Unpaid Claims above for more information.
-
Click the Claims menu and select List Claims. The List Claims window opens.
-
Set filters and click Refresh List. For more information about filtering the List Claims window, see List Claims.
-
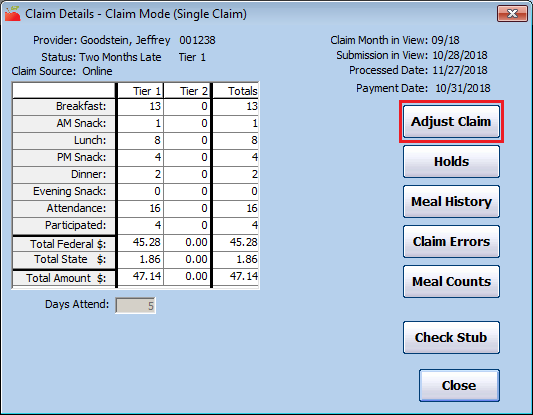
Click Details next to the claim to delete. The Claim Details window opens.
-
Click Adjust Claim (to the right). The Adjust Claims window opens.
-
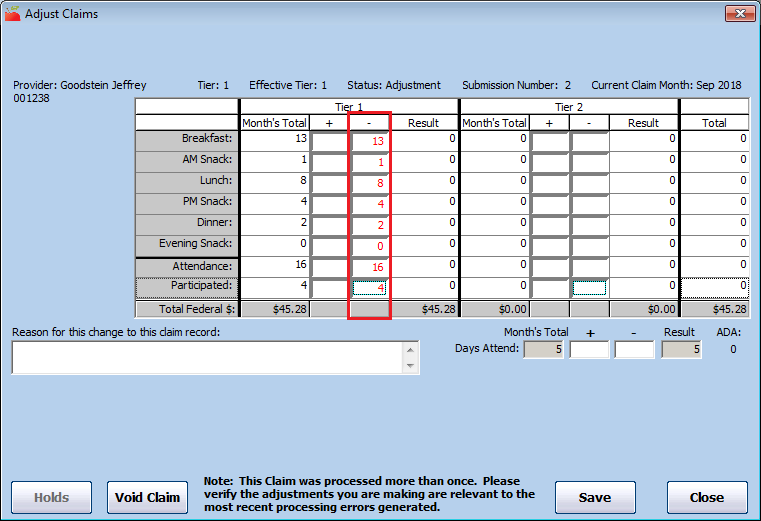
Click the - (minus) box for each meal count, attendance count, participated count, and days claimed and enter a number that reduces the claims total counts to zero for all claimed components. For example, if the Month's Total for Breakfast was 13, you would enter 13 in the - (minus) box.
-
Click the Reason for This Change to This Claim Record box and enter a reason for the adjustment.
-
Click Save. This reduces the claim's count to zero, which effectively eliminates the provider's claim, but retains a paper trail for auditing purposes.
If you have not already paid this provider for this claim, the claim is effectively cleared out of the system the next time you issue payments for this claim month. If you have already paid this provider for this claim, the system allows you to factor a negative adjustment for this claim in the next check you cut for the provider.