Record Invoice Payments
When a Payer makes a cash or check payment, record it as a payment on unpaid or partially paid invoices. If your Payer has account credits, you can also apply the credit toward the invoice payment.
- From the menu to the left, click Accounting.
- Click Income.
- Enter your accounting PIN and click Go.
Note: If you do not have an account PIN set, you are prompted to set one. - Locate the invoice for which to record payment. Filter suggestions are below.
- Click the Status drop-down and select Unpaid and/or Partial to view only those invoices that have not been paid or have been partially paid.
- Click the Participant(s) drop-down menu and select the participant(s) to view.
- If you know the invoice number, click the Invoice # box and type it.
- Click the row for the invoice to pay. The View Invoice page opens.
- Click
 . The Payment for Invoice pop-up opens.
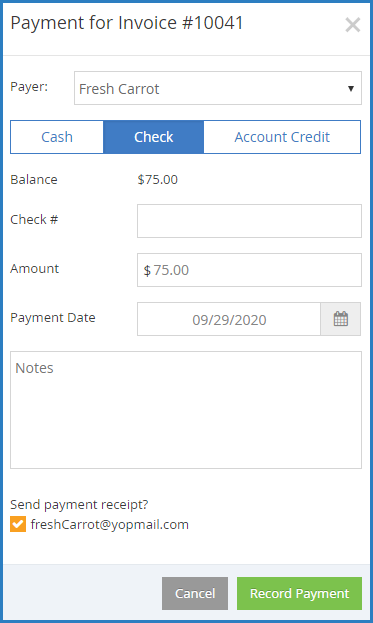
- Click the Payer drop-down menu and select the person who is making a payment.
- Select Cash, Check, or Account Credit.
Note: The Account Credit option displays only if there is an existing account credit on the participant account. - Click the Amount box and enter the payment amount. This defaults to the invoice total. If you selected Check in Step 8, you can also enter the check number in the Check Number box.
- Click the Payment Date and select the date on which you received payment. This defaults to today's date.
- Click the Notes box and enter any notes about this payment.
- In the Send Payment Receipt section, check the box next to the payer email address to which to email a receipt. This option is not available when recording payments made with account credit.
- When finished, click Record Payment. If payment was made in-full, the invoice is moved to Paid status. If a partial payment was made, the invoice moves to Partial status.
Apply Credits to New Invoices
If a guardian has a credit on their account, you can apply it to a new invoice as you create it.
- From the menu to the left, click Accounting.
- Click Income. The invoices page opens.
- Enter your Accounting PIN and click Go.
Note: If you do not have an Accounting PIN set, you are prompted to set one.
- Click New Invoice.
- Begin setting up the invoice as you normally would. For more information, see Creating an Invoice or Create a Recurring Invoice.
- Select the child from the drop-down under Child.
- If there is a credit on the payer's account, the credit will display in the lower left corner under Payers. The credit is applied by default. If you do not want to apply the credit to this invoice, you must click
 to remove it.
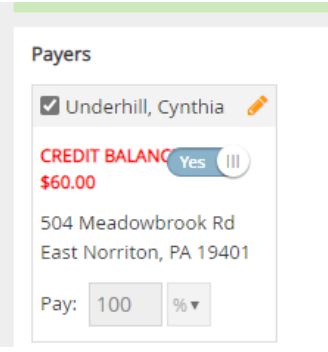
Note: If you apply a credit to a new recurring invoice, any credits on the parent account will always be automatically applied to the next invoice.
- When finished building the invoice, click Preview.
- Click Create or Create and Send.
If you apply a credit to a new invoice, it is created as a Partially Paid invoice, instead of as an Unpaid invoice. On the Invoices page, make sure you set the Status filter to include invoices that are at the Partially Paid status.
Manage Account Credits
When a contact or agency overpays an invoice, a credit is added to their account. You may also have issued a refund in the form of account credit. This page also lists any credits used towards invoice payments. You can view and manage these credits from the Participant Account Details page.
- From the menu to the left, click Accounting.
- Click Accounts. The Participant Account Details page opens and displays information for the last participant you viewed.
- Click the drop-down menu at the top of the page and select the participant to update.
- Select a contact from the Contacts section or an agency from the Agencies section.
- Scroll to the Credits Of section (to the right). If this section does not display, click
 to expand it.
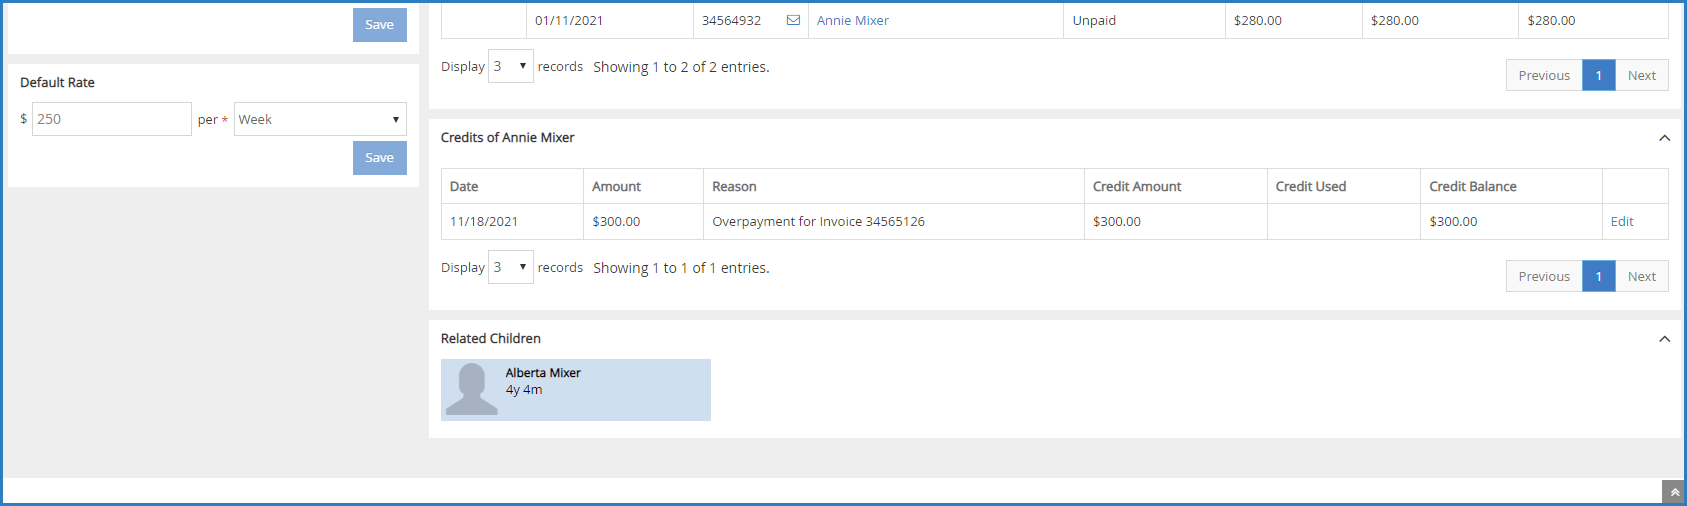 The following details for each credit displays:
- Date: This is the date the credit was issued or used.
- Amount: This is the total amount of the credit issued or used.
- Reason: This is the reason the credit was issued or used. For example, if the credit was issued for overpayment, this column would state Overpayment for Invoice #### (where #### is the affected invoice number). If it was used as a payment, this column would say Credit Used for Invoice #### (where #### is the affected invoice number).
- Credit Amount: This is the total credit amount issued. This column is blank for credits used as payment.
- Credit Used: This is the amount of account credit this contact/agency used to pay an invoice.
- Balance: This is the remaining credit balance for the contact/agency.
- To update a credit:
Note: You can only edit credits issued—not credits used.
- Click Edit on the credit row to change. The Edit Credit Account Transaction pop-up opens.
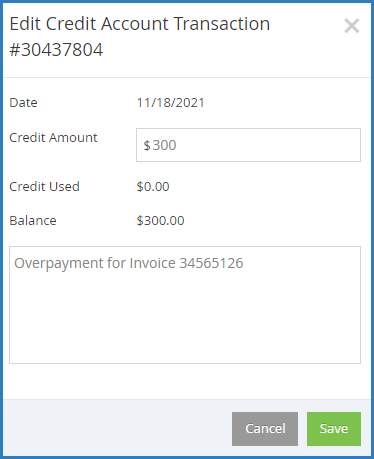
- Click the Credit Amount box and enter a new amount.
- Click the Notes box and enter additional notes, as needed.
- When finished, click Save.
- Click Edit on the credit row to change. The Edit Credit Account Transaction pop-up opens.
Record Refunds
With KidKare Accounting, you can issue refunds to payers. Refunds can be issued as cash, checks, or account credits. Refunded credit card payments must be issued as one of the aforementioned methods of payment, as Stripe does not issue refunds. Watch the quick video below or scroll down for step-by-step instructions to learn more.
- From the menu to the left, click Accounting.
- Click Income.
- Enter your Accounting PIN and click Go.
Note: If you do not have an Accounting PIN set, you are prompted to set one. - Locate the invoice for which to record a refund. Filter suggestions are below.
- Click the Status drop-down and select Paid and/or Partial to view only those invoices that are paid or partially paid.
- Click the Participant(s) drop-down menu and select the participant(s) to view.
- If you know the invoice number, click the Invoice # box and type it.
- Click the row for the invoice to refund. The View Invoice page opens.
- Click the Invoice Actions drop-down menu and select Record Refund. The Refund for Invoice pop-up opens.
- Click the Payer drop-down menu and select the payer to which you are issuing a refund.
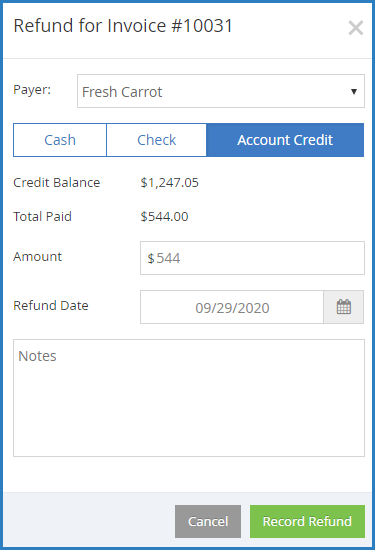
- Select Cash, Check, or Account Credit.
- Click the Amount box and enter the amount you are refunding. This defaults to the total amount paid on the invoice. If you selected Check in Step 7, you can also enter the check number in the Check Number box.
- Click the Refund Date box and enter the date the refund was issued. This defaults to today's date.
- Click the Notes box and enter any comments about this refund.
- Click Record Refund. The invoice status moves back to Unpaid or Partial.