Understand Payment Management in HX
Minute Menu HX creates payment transactions—either checks or direct deposits—for all issued payments. Even if you do not print checks with HX, use it to manage individual provider transactions to ensure that you accurately manage your claim funds. All payments are issued based on payment components.
Payment Components
There are two types of components for which payment can be issued: Claims and Non-Claim Adjustments.
Every provider who has a Claim can receive payment. When you create a payment, you can specify which claims you are paying. This is important, because it is possible to have more than one claim record for a provider for a given claim month.
Non-Claim Payment Adjustments are specific dollar amounts that you can add or remove from a provider's payment. These are unrelated to specific claim meal counts and should not be confused with Claim Adjustments. For example, suppose you offer a provider insurance program. You deduct money for this program from a provider's payment. This would be a Non-Claim Payment Adjustment. If a Non-Claim Payment Adjustment exists for a provider, you can choose whether to include it in any payment you issue.
Negative Payments
In some cases, the claim records you mark for payment for a provider may create a payment with a negative amount. If you issue such a payment to a provider, Minute Menu HX creates a zero-dollar payment for that provider and automatically creates a Non-Claim Payment Adjustment with the negative payment amount.
The next time you issue payments, you could automatically include this Non-Claim Payment Adjustment so the negative amount is automatically deducted from the next issued check.
Clearing Claims Out
Claims and Non-Claim Payment Adjustments remain in the system until you are ready to pay on them. For accounting consistency, you can issue zero-dollar checks to clear out Claim records from your pending payment component list. This is especially the case if you have a claim that you marked as submitted to the state and later made an adjustment that zeroed-out the claim.
Set Up Direct Deposit
Direct deposit is a fast, electronic method of payment that ensures providers still receive payment in a timely manner. If you do not currently offer direct deposit but would like to, contact your bank/credit union and ensure that they can accept upload files for direct deposit. Minute Menu HX uses the nationally accepted ACH file format NACHA.
To set up direct deposit:
- Enter your bank account information into HX.
- Click the Administration menu and select ACH Settings. The ACH Settings dialog box opens.
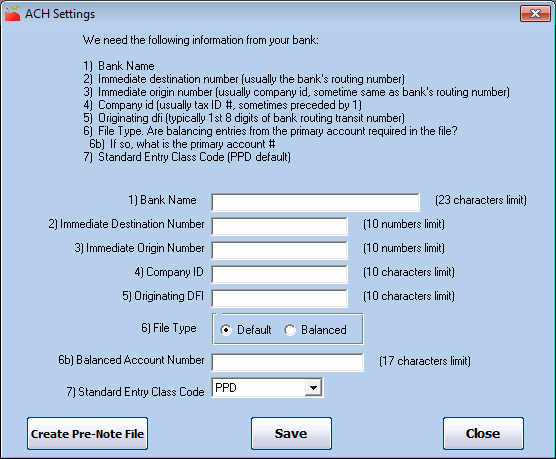
- Complete each field. Contact your bank for this information.
- When finished, click Save.
- Click the Administration menu and select ACH Settings. The ACH Settings dialog box opens.
- Next, enter bank account information for each provider.
- Click the Providers menu and select Provider Information. The Provider Information window opens.
- Click the Provider drop-down menu and select the provider to change.
- Click the Other tab.
- Check the Uses Direct Deposit box.
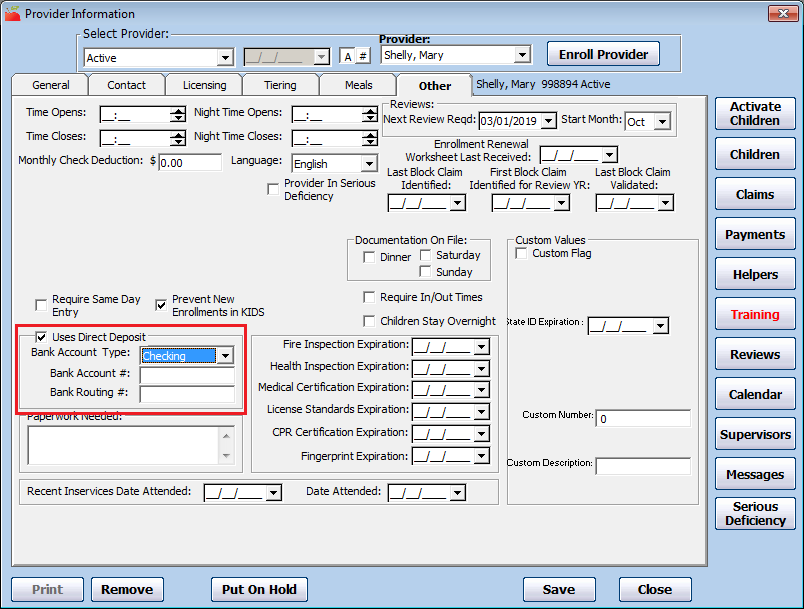
- Click the Bank Account Type drop-down menu and select Checking, Money Market, or Savings.
- Enter the bank account and routing numbers in the Bank Account Number and Bank Routing Number boxes.
- Click Save.
- Repeat Steps 2b - 2g for each provider for whom to set up direct deposit.
- Send the Pre-Note file to your bank to test the direct deposit.
- Contact your bank to determine where and how to upload the file to the bank's website.
- If the file is rejected, find out why, fix the error, generate a new file, and try uploading again.
- If the file goes through, and you confirm that there were no issues, the ACH file has been set up successfully, and you are ready to use Minute Menu HX to generate ACH files for direct deposit.
If you re-use this Pre-Note file prior to each batch of direct deposits you run, you automatically check the validity of each provider's bank account and routing number, so you can be assured that all claims that you pay via direct deposit actually go to a valid bank account.
Locate Providers Receiving Paper Checks
Use the Provider List Export File to quickly locate providers who are still receiving paper checks as payment. You can then use the resulting list to contact providers and transfer them to direct deposit. Direct deposit is a fast, electronic method of payment that ensures providers still receive payment in a timely manner.
To do so:
-
First, generate the report:
-
Click the Reports menu, select Providers, and click Provider List Export File. The Select Report Definition to Use dialog box opens.
-
Click Continue without selecting a report definition. The Provider Filter opens.
-
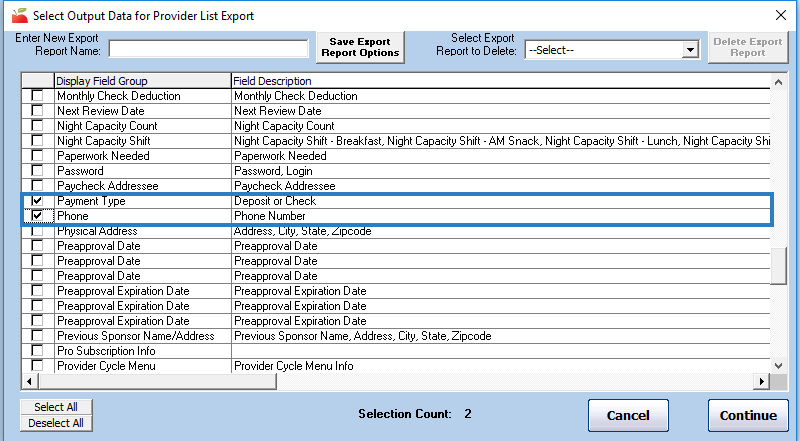
Accept the default Status filters (Active and Hold), and click Continue. The Select Output Data for Provider List Export window opens.
-
Scroll down and check the Payment Type and Phone boxes.
-
Click Continue.
-
Browse to the location on your computer in which to save the file.
-
Click Save. The file opens automatically in your default spreadsheet program.
-
-
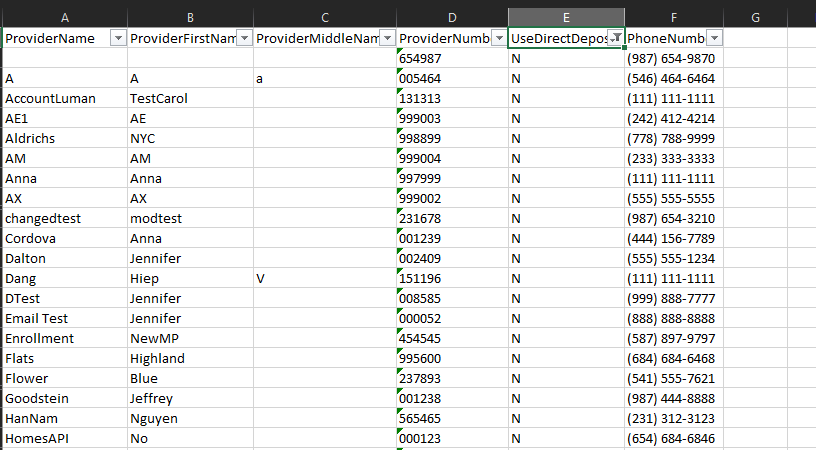
Filter the resulting spreadsheet to show providers who don't currently use direct deposit.
-
Click the first row of the UseDirectDeposit column.
-
Click Sort & Filter in the top-right corner of the Home tab and select Filter. The first row of each column in the spreadsheet is now a drop-down menu you can use to filter.
-
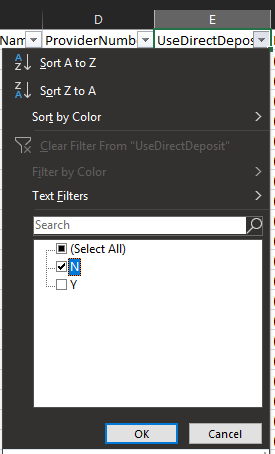
Click the UseDirectDeposit drop-down menu and clear the Select All box.
-
Check the N box.
-
Click OK. You now have a list of providers who receive paper checks, as well as a list of their phone numbers.
-
-
Contact the providers on your list to set them up on direct deposit instead. Update their payment preferences in Minute Menu HX. For more information about doing this, see Set Up Direct Deposit in the article above.
Format Checks
Format your checks to ensure they print properly on your check printer. Once you've formatted checks in HX, you should only need to change these settings if you get a new check or a new printer.
-
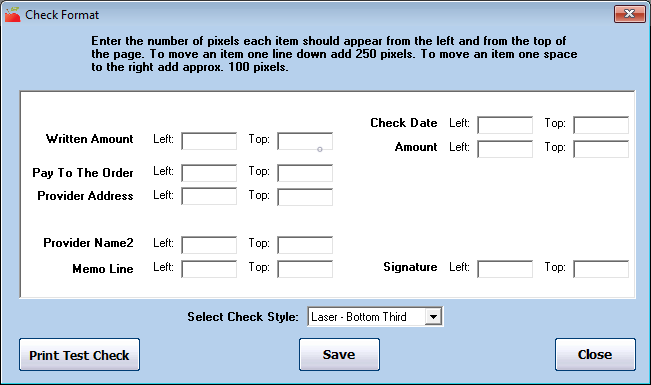
Click the Administration menu and select Check Format. The Check Format window opens.
-
Click the Select Check Style drop-down menu and select the check style you are using. This should be indicated on your check forms. It is important that this is set properly so the actual check prints in the correct position.
-
Use the boxes for each item to adjust that item's positioning. Follow these guidelines:
-
Add 250 pixels to move an item down one line.
-
Add approximately 100 pixels to move an item once space to the right.
-
-
When finished making adjustments, click Print Test Check to print a test check on plain white paper.
-
Compare your test check to an actual check to see if the positioning is close.
-
Repeat Steps 2-4 to make adjustments and test again.
-
When finished, click Save.
Adding Check Signatures
Minute Menu HX can automatically print a signature on your checks.
To configure this:
-
Obtain a copy of the signature.
-
Save the signature to your computer as a .GIF file and name it signature. The complete file name should be signature.gif.
-
Save the signature file in the following folder: C:\MMHX\Sponsor\CheckSig.
Note: For some older installations of Minute Menu HX, the file path might be C:\Program Files\MMHX\Sponsor\CheckSig instead.
-
Close and re-open Minute Menu HX.
-
Click the Administration menu and select Check Format. The Check Format window opens.
-
Click Print Test Check.
-
Ensure the signature prints in the correct place. Make adjustments in the Check Format window, if needed. If you see settings of Left 15000 and Top 0, the check has never been formatted for a signature. Try the following adjustments first, and adjust as needed: Left 3200 and Top 7500.
Direct Deposit
Some sponsors print checks on white paper as vouchers for direct deposit. Check signatures do not print on vouchers printed through Issue Payments. Also, you can set preference O.007 to Y to print Not a Check on direct deposit vouchers.
Move Your Check Signature to a New Computer
To move the signature from one computer to another:
-
Save the check signature on each computer you use to print checks.
-
Copy the existing signature.gif file and paste it to the C:\MMHX\Sponsor\CheckSig folder.
-
Close and re-open HX.
-
Follow Steps 4-7, above, to print a test check and make any necessary adjustments.
Issue Payments
Use the Issue Payments function to issue checks and direct deposits. You can also use this function to obtain an export file of all checks/direct deposits for use in your own accounting system. Even if you do not pay your providers in Minute Menu HX, use this function to organize and track provider payments.
-
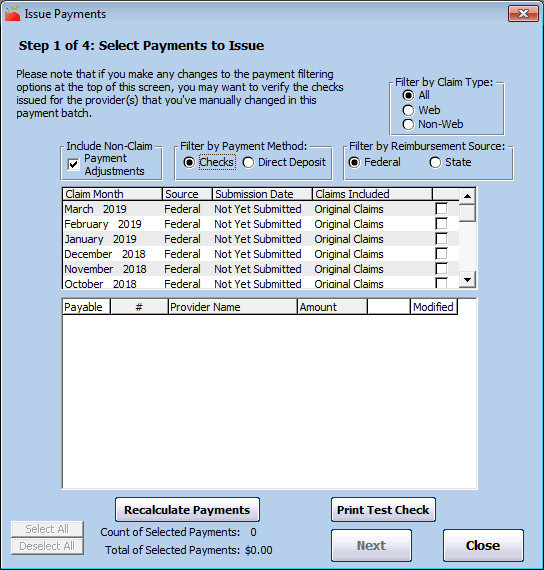
Click the Checkbook menu and select Issue Payments. The Issue Payments window opens.
-
Filter to the providers to claim.
-
Filter to the claims to pay. You can set the following filters:
-
Claim Type: Select All, Web, or Non-Web.
-
Include Non-Claim Payment Adjustments: Check this box to include non-claim payment adjustments in the list. For more information about these adjustments, see Understand Payment Management at the top of this page. This option is checked by default. Clear it if your agency keeps strict separation of claim months and requires providers to re-pay funds when negative adjustments are made.
-
Filter By Payment Method: Select Checks or Direct Deposit. Providers assigned to the payment method you select display. You set providers up for direct deposit in the Provider Information Other tab. If providers are not specifically set up for Direct Deposit, they receive checks. See Set Up Direct Deposit above for more information.
-
Filter by Reimbursement Source: If your state offers additional reimbursement funds over and beyond the level provided federally by the CACFP and you split your State and Federal provider payments, select the appropriate source here. This option only displays if your state offers supplemental funds and you pay providers separate checks for state and federal funds.
-
-
Check the box next to a claim batch to pay. The claim batches listed in this box are split up to show the claim months for which claims are awaiting payment, as well as a further breakdown by the date those claims were submitted to the state for reimbursement. You can also see whether a listed claim batch includes original claims and those that include positive vs negative adjustments. This allows you to select exactly which claims you wish to pay.
-
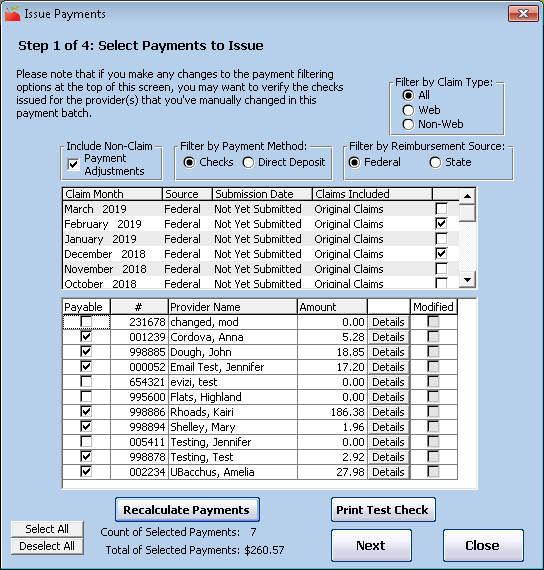
Click Recalculate Payments. The system compiles all claims for payment based on your filtering criteria. This process can take some time. Once it's finished, a list of provider payments displays. The Payable box is checked next to each provider you can pay.
-
Review the total amount of selected payments that displays at the bottom of the window. Clear the box next to any payment you do not need to issue.
-
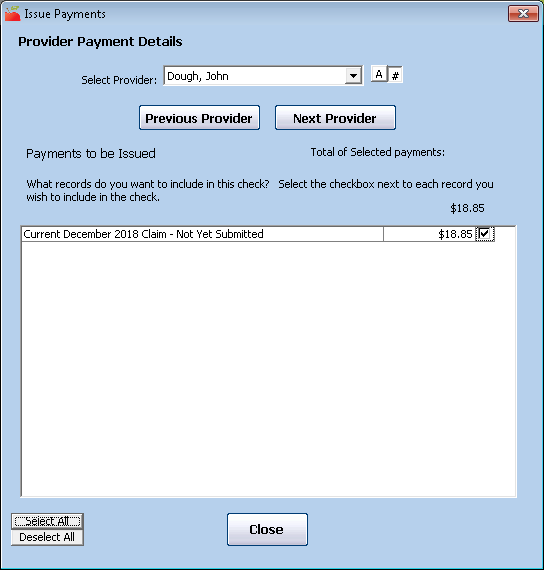
To view/change change payment details,
-
Click Details. The Provider Payment Details window opens and displays each payment component that can be paid and each component that will be paid. For example, if you set filters to exclude non-claim payment adjustments in the Issue Payments window, the box next to such payments is not checked in here.
-
Check the box next to each additional payment component to include in this check/deposit. Clear the box to remove it.
-
When finished, click Close. If you made change in this window, the Modified box is checked in the Issue Payments window.
-
-
Click Next. The Print Checks window opens.

-
Review the payment information listed at the top of the window.
-
Click the First Check Number box and enter the first number to assigned to the payments you are issuing (whether direct deposit or checks). You must still enter a number here even if you are only exporting payment information. If you are issuing direct deposits, you may not have an actual check number, so supply any number here. We recommend that you choose a unique check number range. For example, you could start at 1000, and the next time you issue payments, start at 1100.
-
Click the Check Print Batch Limit box and enter the maximum number of checks included in one print job. Minute Menu HX uses the Windows Spool Manager to combine a number of individual checks into one print job. This speeds up the printing process and helps minimize the possibility of another print job interrupting your check run. This box defaults to 1000. It does not affect the number of checks printed—just the number sent together as one batch.
-
Click the Check Date box and enter the provider payment dates. If you are issuing payments in advance, use the date closest to when you expect to send payments to your providers. Once you save the payments in the database, KidKare providers will see that claims were paid once the date you enter here is reached.
-
Click Pre-Print Register to to print an itemized register of all of the payments you're about to issue. Use the last page of this register to ensure that your incoming funds match your outgoing funds with this batch.
Note: The Pre-Printed Check Register notes the details of checks that may be created automatically as part of this check run. For example, manual adjustments are noted here if you use the Monthly Check Deduction feature. Also, if you have chosen to pay a provider who would have otherwise received a negative check, a manual dollar adjustment that brings the check up to zero dollars (and any other offsetting non-claim payment adjustments) displays.
-
In the Print Order section, select Provider ID or Provider Last Name. This is the order in which checks or printed or providers are listed in the export file.
-
In the Print Destination section, specify where to print checks/send the file.You can select Printer, Export File, or Both. If you are printing checks in Minute Menu HX, you must select Printer or Both. If you do export a file, you can change the file name, if needed. Direct deposit and checks print in the same way when sent to the printer. The only difference is that you should print direct deposits on regular white paper and you should print checks on blank checks. Sending direct deposits to the printer provides you with paper records of the direct deposits.
-
Click the Check Message box and enter a message to include on the checks or payment vouchers.
-
If you are printing checks, click Print Test Check to ensure that the alignment matches up properly. If they do not, contact Minute Menu HX Support for assistance.
-
If you are issuing direct deposits, check the ACH File box. This will generate the ACH file while you run this print batch. Make note of the file name and location so you can retrieve the file later and upload it to your bank.
-
When you are ready, click Print. The system begins creating payment transactions. If you sent your payments to the print, then checks/direct deposit receipts print. If you only created an export file, go to Step 22.
-
The Verify Successful Print Job window opens.
-
Review the printed checks. If they did not print properly, you can re-print them.
-
Click the Last Successfully Printed Check box and enter the check number of the last successfully printed check.
-
Click the Restarting Check Number box and enter the first check number to use for the re-printed checks. This should be the number immediately after the last successfully printed check number.
-
Click Reprint.
Note: Before you continue pat this step, be absolutely certain that your checks printed properly. There is no other way to re-print check batches in Minute Menu HX. If you skip this step and discover that a large number of your checks did not print correctly, you must re-print these checks individually.
-
-
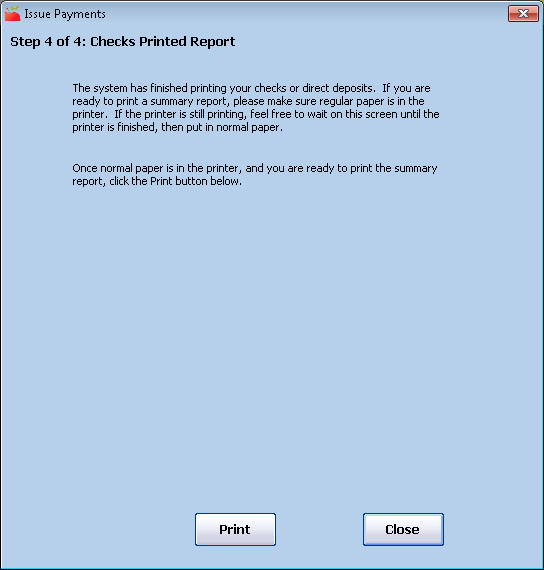
If your checks printed successfully, click Checks Printed Successfully. The Checks Printed Report window opens.
-
Click Print Check Register to generate the check register. You can also print a physical copy.
-
When finished, click Close. The payment process is complete.
Export Transactions to Third-Party Accounting Software
If you use a third-party accounting system, you must get your payment data from Minute Menu HX and into the accounting system you use. You can enter this data into your third-party software by hand, or you can export a file and import it into your third-party software. This function creates a delaminated text file of payment information in Minute Menu HX's default transaction export file format.
To generate the file:
- Click the Checkbook menu and select Generate Check Transaction File. The Check Filter dialog box opens.
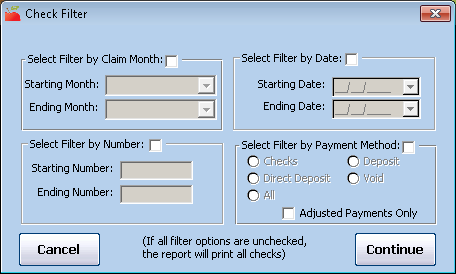
- Set filters for the checks to include. To print all checks, leave all of the filters blank.
- Filter by Claim Month: Check this box, click the Starting Month and Ending Month drop-down menus, and select starting and ending months for the report. Note that if a check was issued and included payment for more than one claim month it is included if any of the claims paid by the check are included in the selected claim months.
- Filter by Date: Check this box, click the Starting Date and Ending Date boxes, and set a starting and ending date for the report.
- Filter by Number: Check this box, click the Starting Number and Ending Number boxes, and set a date range for the report.
- Filter by Payment Method: Check this box and then select Checks, Direct Deposit, Deposit, Void, or All. Check the Adjusted Payments Only to include only those payments you've adjusted.
- Click Continue. The Select Mode dialog box opens.
- Select Transaction or Payment Adjustments.
- Click Continue. The Save As window opens.
- Browse to the location in which to save the export file.
- Click Save.
Minute Menu HX also generates this same transaction export file if you export a file while issuing payments.
Adjust Payments
You can add or deduct specific dollar amounts from payments, even when such additions/deductions have nothing to do with specific claim counts. For example, if a special IRS withholding situation occurs, you may need to deduct a certain amount of money from a provider's payment each time you issue it.
Do not confuse these non-claim payment adjustments with adjustments made to specific claims. For more information about claim adjustments, see Change/Adjust Claims.
To create a non-claim payment adjustment:
-
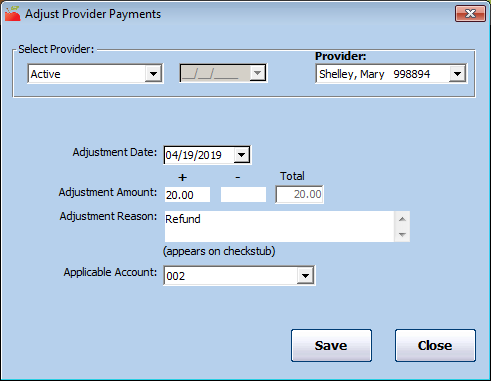
Click the Checkbook menu and select Adjust Provider Payments. The Adjust Provider Payments window opens.
-
Click the Provider drop-down menu and select the provider for whom to adjust payments.
-
Click the Adjustment Date box and enter the effective date of this adjustment. This box defaults to today's date.
-
Enter the adjustment amount in the + (plus) or - (minus) boxes. The Total box updates automatically.
-
Click the Adjustment Reason box and enter the reason for this adjustment. This prints on the provider's check/payment voucher.
-
Click the Applicable Account drop-down menu and select the adjustment account code. This code impacts transaction export files. This field only displays if you are required to select an adjustment account code.
-
Click Save.
The next time you issue payments, be sure to check the Include Non-Claim Payment Adjustments box so this adjustment is automatically included in the provider's next payment. For more information, see Issue Payments.
Void Payments
If you void a real check or direct deposit and do not re-issue a new check/deposit for the same amount, you should also void the payment in Minute Menu HX. When you do so, the claim and/or non-claim payment adjustment records are un-marked as paid so you can re-issue payment, if needed. A record of the void remains in the system for your records.
You can void individual payments, or you can void a range of payments. See each heading below.
Voiding Individual Payments
To void a single payment:
-
Click the Checkbook menu and select List Payment History. The List Payment History window opens.
-
Set filters for the payment you need to void. For more information, see View Payment History.
-
Click Refresh List. Payments meeting the limits you set display.
-
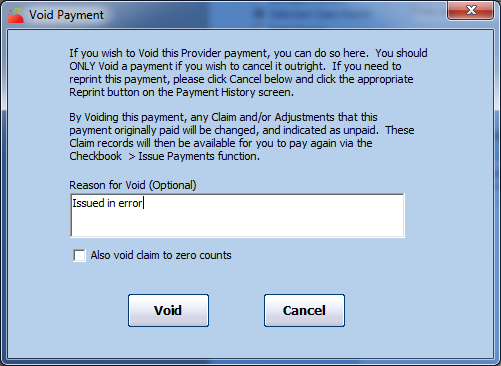
Click Void next to the payment to void. The Void Payment dialog box opens.
-
Click the Reason for Void box and enter a reason for voiding this payment. This step is optional.
-
Check the Also Void Claim to Zero Counts box to create a claim adjustment that sets the claim counts to zero in addition to voiding this payment, if needed. This makes the provider a zero-dollar claimer and prevents you from having to take extra steps to void the claim.
-
Click Void. The payment is now voided. You must re-issue payment for the affected claim or non-claim payment adjustment.
Voiding a Range of Payments
To void a range of payments:
-
Click the Checkbook menu and select List Payment History. The List Payment History window opens.
-
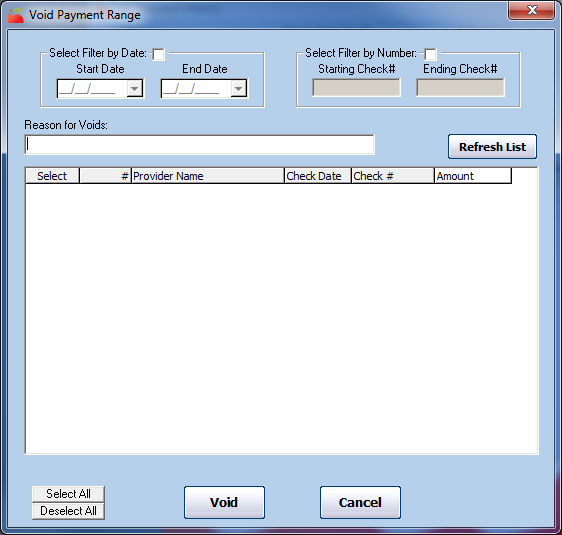
Click Void Range. The Void Payment Range window opens.
-
Set filters for the checks to void:
-
Filter by Date: Check this box, click the Start Date and End Date boxes, and enter a date range to void.
-
Filter by Number: Check this box, click the Starting Check # and Ending Check # boxes and enter a check number range to void.
-
-
Click Refresh List. Payments meeting the limits you set display.
-
Check the Select box next to each payment to void.
-
Click the Reason for Voids box and enter a void reason.
-
Click Void.
-
At the Are You Sure prompt, click Yes. The payments are now voided. You must re-issue payment for the affected claims or non-claim payment adjustments.
Re-Print Checks
If a check is lost in the mail (or otherwise gone), you can re-print it, rather than voiding and reissuing payment. When you re-print a check, the original check is automatically voided, and a new payment transaction record is created.
- Click the Checkbook menu and select List Payment History. The List Payment History window opens.
- Set filters for the check(s) to re-print. For more information, see View Payment History.
- Click Refresh List. Payments meeting the limits you set display.
- Click Re-Print next to the check to re-print. The Re-Print Payment window opens.
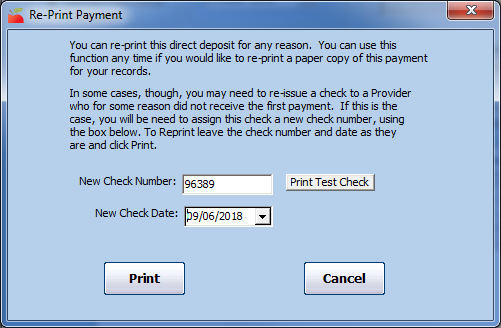
- To assign a new check number for this payment, click the New Check Number box and enter a new number. If you change this field, a record of the voided transaction is kept on-file.
- To set a new check date for this payment, click the New Check Date box and enter the new date.
- Click Print.
Receive Money from Providers
In some situations, it may be necessary for you to demand providers to return payment. For example, suppose a provider dropped off your program and you already sent them payment for their last claim. The claim later required a negative adjustment. Since you are not issuing another payment to this provider, the provider must re-pay you for the negative amount. You may also require re-payment for all negative claim adjustments.
You can track these received payments in Minute Menu HX. To do so:
-
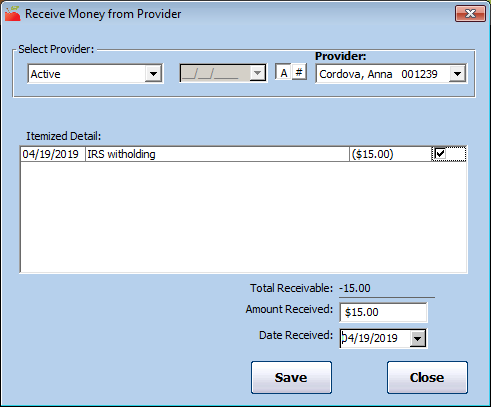
Click the Checkbook menu and select Receive Money from Provider. The Receive Money from Provider window opens.
-
Click the Provider drop-down menu and select the provider from whom you received payment. Negative non-claim payment adjustments for the selected provider displays in the Itemized Detail box.
-
Check the box next to the amount to pay.
-
Click the Amount Received box and enter the amount of the payment you received from the provider.
-
Click the Date Received box and enter the date you received the payment.
-
Click Save.
Handle Lingering Payment Batches
Every claim record in the system must be paid and can only be paid once. Once you pay a claim with the Issue Payments function, the Minute Menu HX database is updated to account for that payment. This means that any claim months present in the Issue Payments window indicates that there is at least one claim in that claim month that hasn't been paid.
If prior claim months are listed in Issue Payments and you know that all claims within that month have already been paid, take note. To determine why these claims are still listed, isolate the earlier months in the Payable Claim Batches List and click Recalculate Payments. For more information, see Issue Payments.
There are a few reasons why provider claims may still be listed as awaiting payment:
Negative Payments
If you pay a provider and then later adjust their claim to remove meals, a negative adjustment is created. This negative adjustment claim must be accounted for on a payment, just like all other claims. Minute Menu HX does not issue negative payments by themselves by default. This means that Minute Menu HX does not account for this claim as having been paid until the provider has another claim with a total amount greater than the negative adjustment. This could cause claims to remain unapid. If you never have another claim for this provider, you could use the Receive Money From Provider function to clear out the negative adjustment. For more information, see Receive Money from Providers.
Zero Dollar Claims
You may periodically have a zero dollar claim in your system. As stated above, Issue Payments does not pay providers unless they have a positive dollar amount for their check. Zero dollar claims may linger in the database until you take action clear them out.
-
Click the Checkbook menu and select Issue Payments. The Issue Payments window opens.
-
Set filters, as needed. For details, see Issue Payments.
-
Click Recalculate Payments. Payments display.
-
Click Deselect All.
-
Check the Payable box next to each zero-dollar claim.

-
Click Details next to each zero-dollar claim and confirm that the total is truly zero.
-
Click Next. The Print Checks window opens.
-
Click the First Check Number box and enter an arbitrary starting check number.
-
In the Print Destination section, select Export File.
-
Select a sort order.
-
Click Print. The process runs and the zero-dollar payments are now marked as Paid. The old claim month batches should not continue to show in the Issue Payments window going forward.
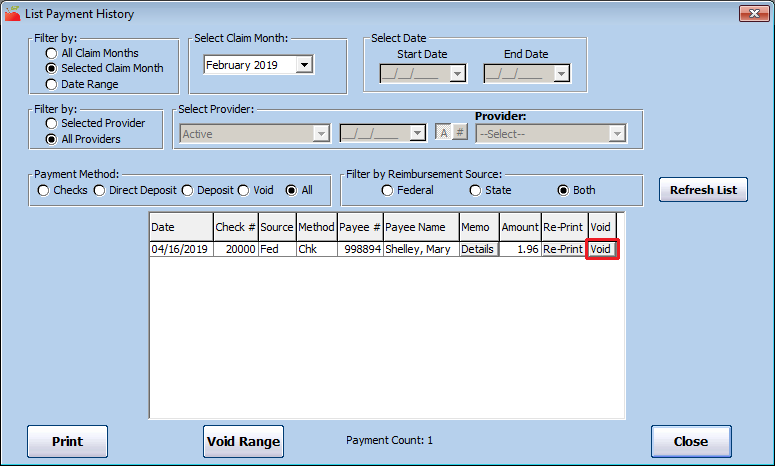
View Payment History
You can use the View Payment History function to review payments you have made.
-
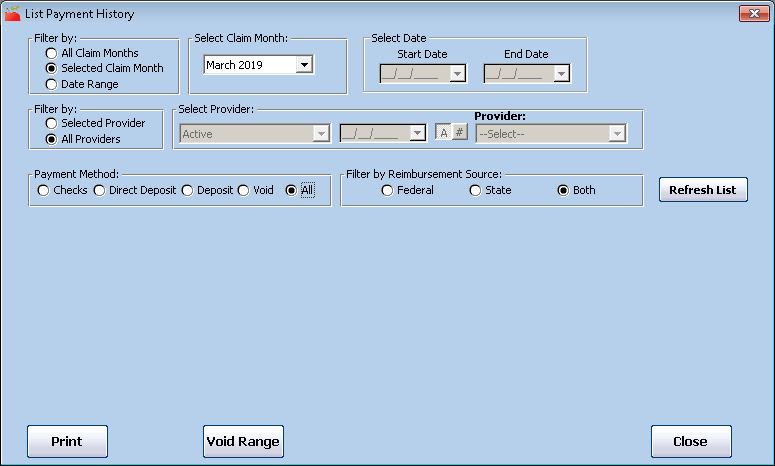
Click the Checkbook menu and select List Payment History. The List Payment History window opens.
-
Filter to the information you need to view.
-
Filter By Period: Select All Claim Months, Selected Claim Months, or Date Range. If you choose All Claim Months, you are forced to filter by a specific provider. Also, since payment transactions can possibly include payment for claims from different months, the payments you review when filtering by a specific claim month may include money for other claim months.
-
Filter by Provider: Select All Providers or Selected Provider. If you choose Selected Provider, click the Provider drop-down menu and select the provider to view.
-
Payment Method: Select Checks, Direct Deposit, Deposit (money received from providers), Void, or All.
-
Reimbursement Source: If your state offers additional reimbursement funds over and beyond the level provided federally by the CACFP and you split your State and Federal provider payments, select the appropriate source here. This option only displays if your state offers supplemental funds and you pay providers separate checks for state and federal funds.
-
-
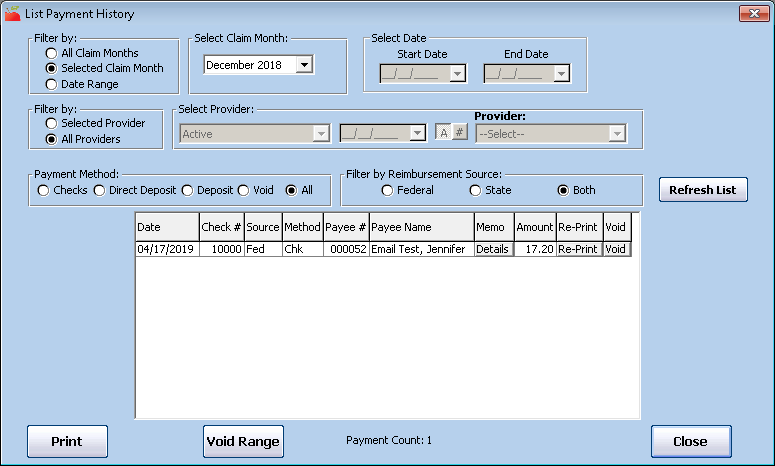
Click Refresh List. Payments matching the filters you set display.
-
Click Details in the Memo column for a payment to view more information about it. The claim moth, Tier 1 and 2 meal counts, and any non-claim payment adjustments display. This information is identical to the information printed check stubs/direct deposit vouchers.
-
Click Print to print the Check Register report.