You must be the Administrator or the administrator must give you permissions access the Food List page.
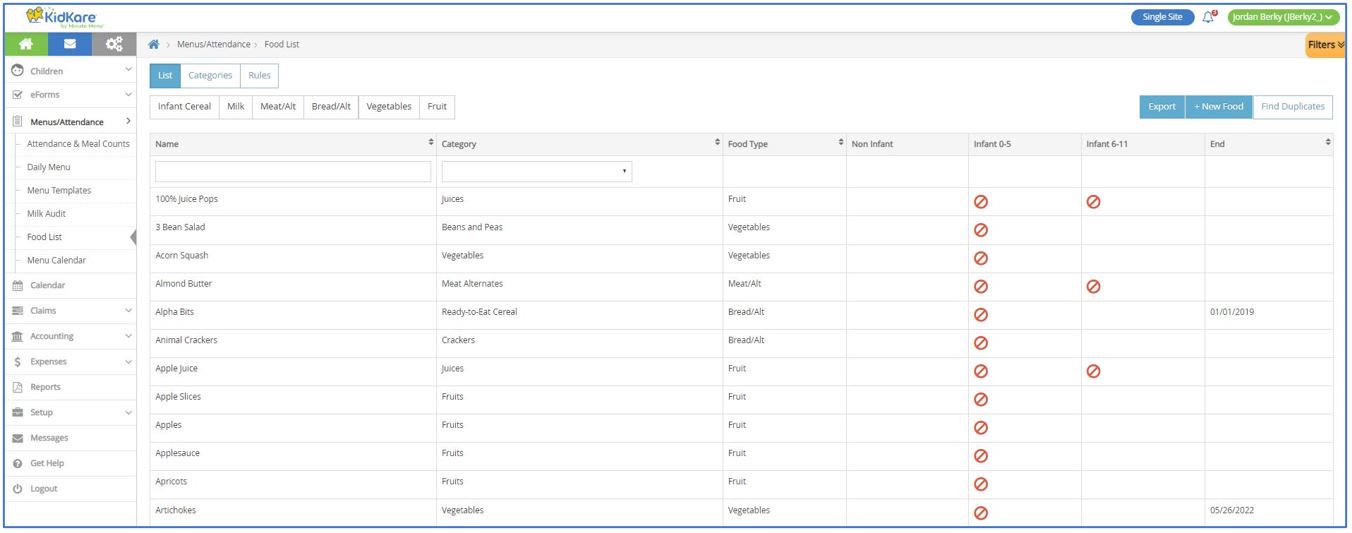
The Food List page allows you to input certain approved foods for your center. This gives you control over what foods your staff can serve. The Food List page displays all of your foods and their settings in a table. You can see at a glance what foods are allowed (blank), disallowed ( ![]() ), or warned(
), or warned( ![]() ) for each age group, as well as any start or end dates. The food name, number, category, and type also display.
) for each age group, as well as any start or end dates. The food name, number, category, and type also display.
Add Foods
To add foods:
-
From the menu to the left, click Menus/Attendance.
-
Click Food List. The Food List page opens.
-
Click New Food.
-
Select the Category to which this food belongs.
-
Enter a name and a Spanish name (optional) for this food.
-
Select the Food Type.
-
If you select Vegetables or Fruit in the Food Type drop-down menu, the Juice flag displays. If this food item is a vegetable or fruit juice, click the slider to set the Juice flag to Yes.
-
-
In the Nutritional Information section, click the slider next to each flag that applies to this item.
-
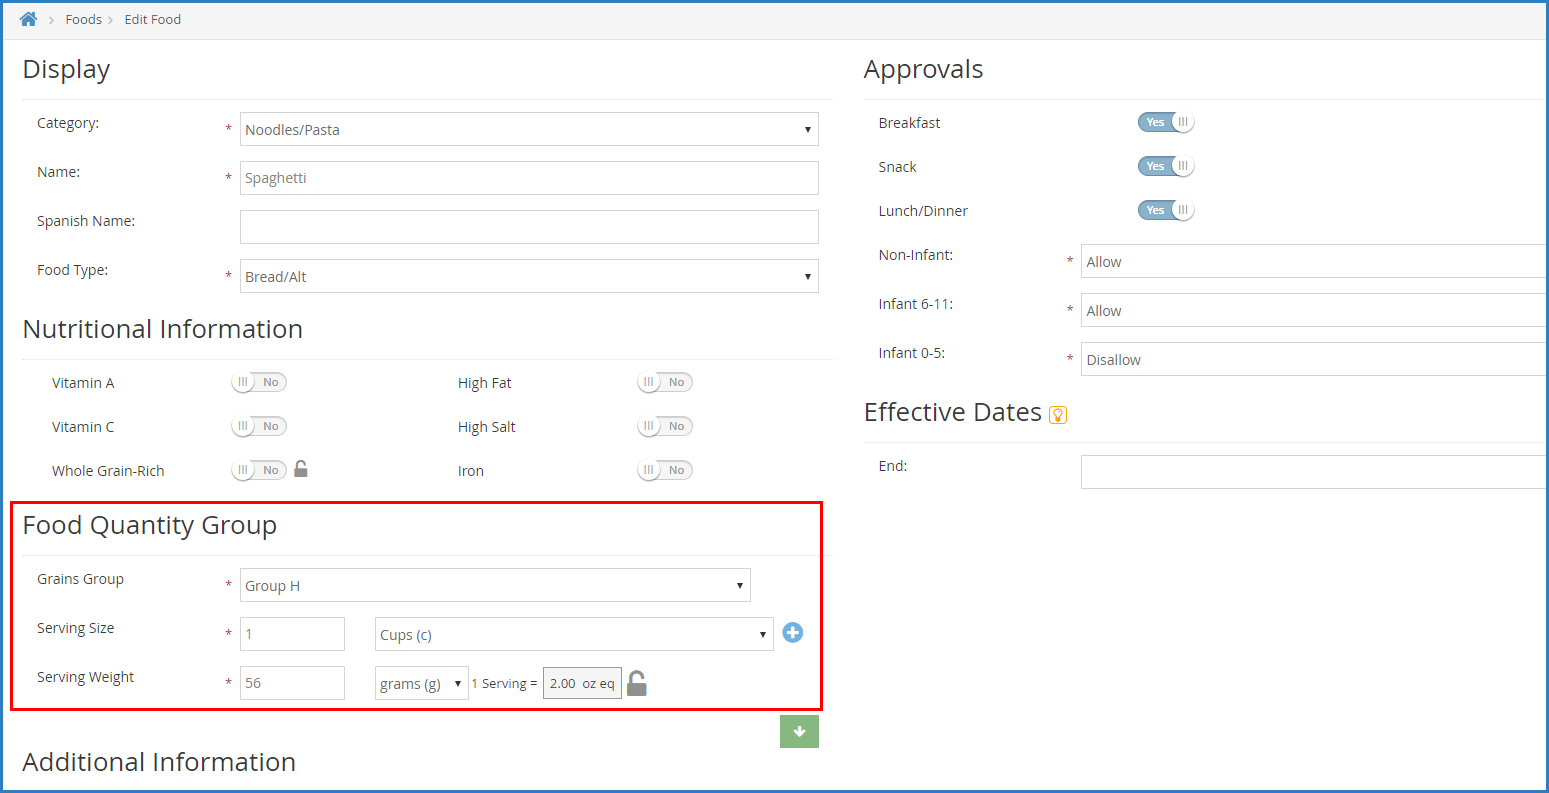
In the Food Quantity Group section:
-
If you are entering a Bread/Alt or Infant Cereal:
-
Click the Grains Group drop-down menu and select the Exhibit A grains group to which this item belongs. You can view Exhibit A here. Note that if you are updating an Infant Cereal, this drop-down menu is locked to Group I (ready-to-eat cereals).
-
Click the Serving Size box and enter the standard serving size for this item. For example, if you are updating Brand B bread and the nutrition label says that one serving is one slice, you would type 1 in this box.
-
Click the corresponding drop-down menu and select the serving unit. Following our example, you would select slice. You can also click
 and enter a custom unit.
 -
Click the Serving Weight box and enter the serving weight from the nutrition label in grams or ounces. Then, click the corresponding drop-down menu and select grams (g) or ounces (oz). In our example, a serving of Bread A weighs 45g, so we enter 45 and select grams (g). Once you enter this information, the 1 Serving = box displays and shows the amount of ounce equivalents in one serving of this item.
-
Click
 to lock this calculation and prevent staff from overriding it on the Daily Menu page, if needed. Click
  to lock it again.
-
-
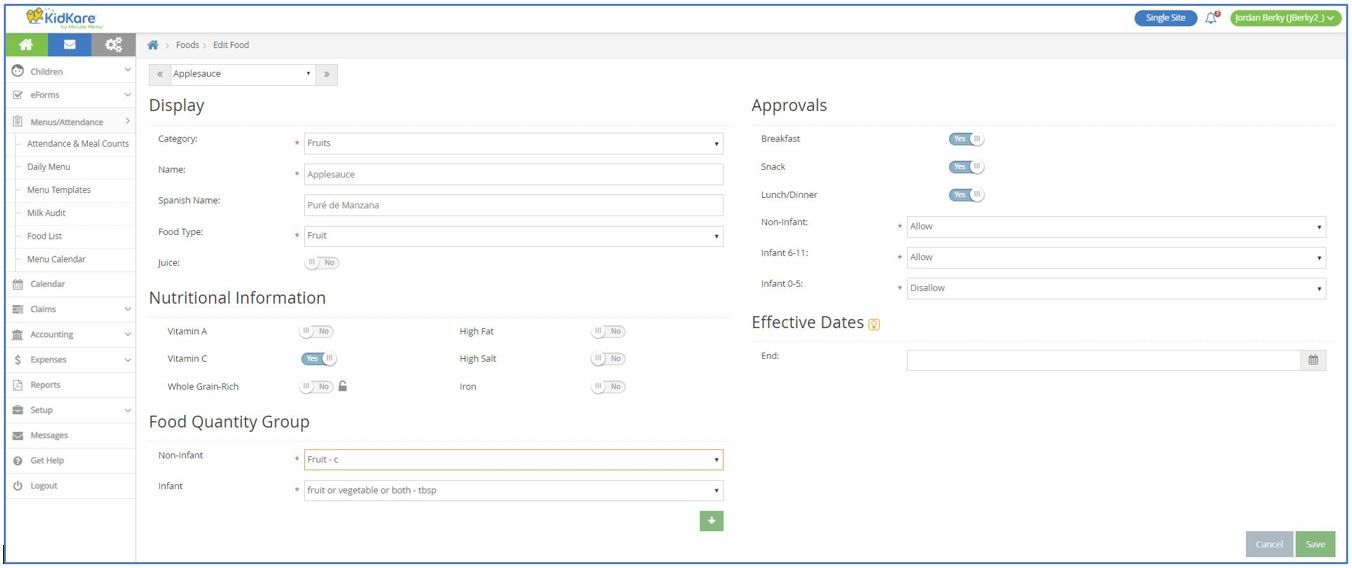
If you are entering any other component: Click each drop-down menu and specify how the food should be measured for Non-Infants and Infants. You can also click
 to view measurements by age group. Your selection in this box affects the unit of measure used on the Menu Production Record when calculating the quantities needed. For more information about the Menu Production Record, see Menu Production Record.
Note: For any foods that are considered raw leafy greens, select the Raw Leafy Greens - c food quantity to ensure the proper amount is calculated since you are required to serve double the amount when serving raw leafy greens.
-
-
In the Approvals section, specify the meals and children for which this food is approved.
-
In the Effective Dates section, set an End Date for this food, if needed. If you enter an end date, this food will not be available once the end date is reached.
-
When finished, click Save.
Edit Foods
To edit foods:
-
On the Food List page, click the row for the food to change. The Edit Food page opens.
-
Update the information, as needed.
-
When finished, click Save.
-
Use the drop-down menu at the top of the page to select a new food to edit, or click Cancel to return to the Food List page.
Remove Foods
While you cannot delete foods from your food lists, you can set end dates for foods that should no longer be available for meals. Once a food reaches the End date to which it is assigned, that food is no longer available when setting up meals. This is also useful for managing duplicate foods on your food list.
-
From the menu to the left, click Menus/Attendance.
-
Click Food List. The Food List page opens.
-
Click the row for the food to change. The Edit Food page opens.
-
In the Effective Dates section, click the End box and enter an end date for this food. You can also click
 to select the date from a calendar. Once this date is reached, the food is no longer available for meals.
-
When finished, click Save.
-
Use the drop-down menu at the top of the page to select a new food to remove, or click Cancel to return to the Food List page.
Export Your Food List
You can export your food list to an Excel® spreadsheet (.XLSX).
-
From the menu to the left, click Menus/Attendance.
-
Click Food List. The Food List page opens.
-
Select the Food Types to include in the export at the top of the page.
-
Click
 in the top-right corner to specify whether to view expired foods and include them in the exported list.
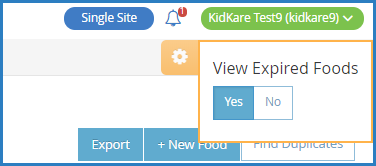
-
Click Export.
Depending on your browser settings, the file downloads automatically, or you are prompted to select the location in which to save the file.
Manage Food Rules
Food rules allow you to limit the number of times a food can be served during a certain time period (frequency rules) or the foods that can be served together (combination rules). This gives you greater control over what your staff is serving each day. Click a link below to jump to a specific food rule type.
Add Food Frequency Rules
Setting food frequency rules allows you to limit the number of times a food can be served during a certain time period. For example, you can limit pudding to once a week.
-
From the menu to the left, click Menus/Attendance.
-
Click Food List. The Food List page opens.
-
Click the Food Rules tab. The Food Rules page opens.
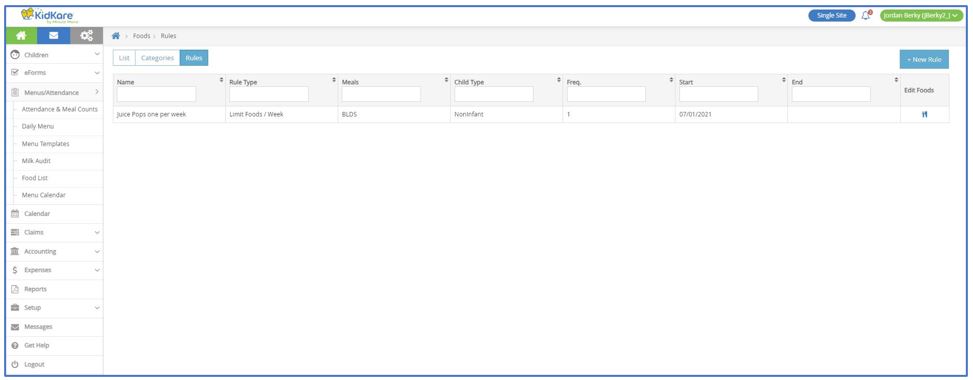
-
Click New Rule and choose from the following:
-
Limit Foods/Day
-
Limit Foods/Week
-
Limit Foods/Month
-
-
In the Display section, enter a rule name, description, Spanish name, and Spanish description.
-
In the Apply To section:
-
Select Infants or Non-Infants.
-
Select Meal or Participant.
According to your display settings, the Participant option may be something different, such as Child. For more information, see Update Center Settings.
-
Select the meal(s) to which this rule applies.
-
Click the Serving Limit box and enter the maximum serving limit per day/week/month.
-
-
In the Action section, select Warn or Disallow.
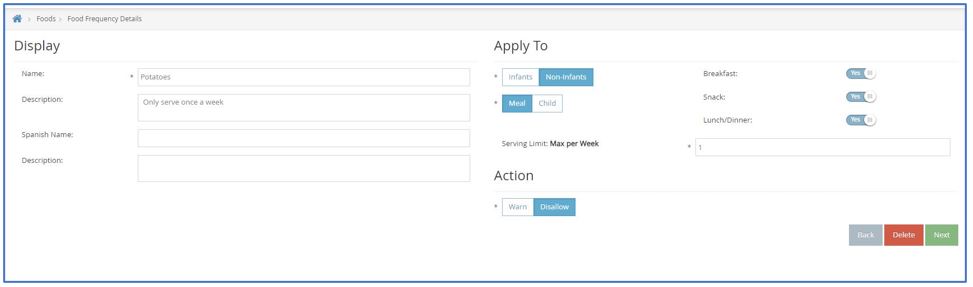
-
Click Next. The Select Food Restriction page opens.
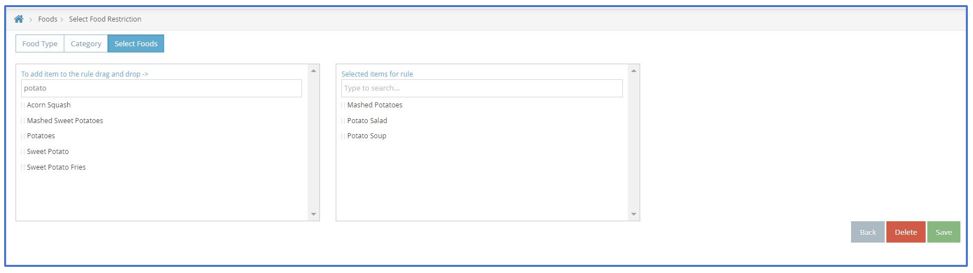
-
Select a food type, category, or food to restrict.
-
To restrict a food type:
-
Click Food Type.
-
Select the type.

-
-
To restrict a food category:
-
Select Category.
-
Click the category in the first box and drag and drop it into the Selected Items for Rule box. You can click the Type to Search box and enter the category name to filter the categories that display.

-
-
To restrict a specific food:
-
Click Select Foods.
-
Click the food in the first box and drag and drop it into the Selected Items for Rule box. You can click the Type to Search box and enter the food name to filter the foods that display.
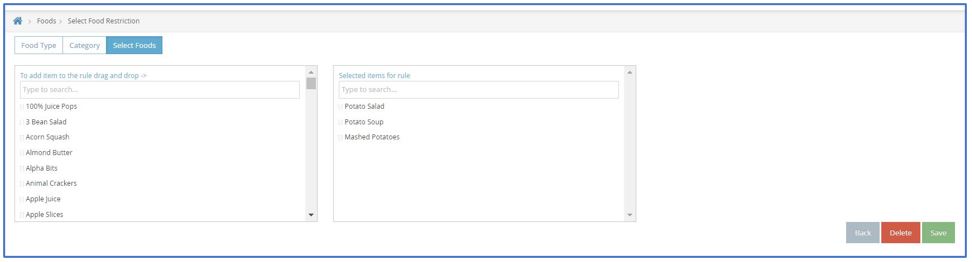
-
-
-
Click Save.
Add Food Combination Rules
Setting food combination rules allows you to automatically warn or disallow certain food combinations. For example, you may set a combination of mashed potatoes and French fries to be automatically disallowed.
-
From the menu to the left, click Menus/Attendance.
-
Click Food List. The Food List page opens.
-
Click the Food Rules tab. The Food Rules page opens.
-
Click New Rule and choose from the following:
-
Any 2 Foods: The rule applies to two specific foods served together, such as french-fries and mashed potatoes.
-
All Foods: The rule applies to all foods assigned to the rule, such as combination meals.
-
-
In the Display section, enter a rule name, description, Spanish name, and Spanish description.
-
In the Effective Dates section, set a start and end date, if needed.
-
In the Apply To section, select the meal(s) to which this rule applies.
-
In the Action section, select Warn or Disallow.
-
Click Next. The Select Food Restriction page opens.
-
Select a food type, category, or food to restrict.
-
To restrict a food type:
-
Click Food Type.
-
Select the type.
-
-
To restrict a food category:
-
Select Category.
-
Click the category in the first box and drag and drop it into the Selected Items for Rule box. You can click the Type to Search box and enter the category name to filter the categories that display.
-
-
To restrict a specific food:
-
Click Select Foods.
-
Click the food in the first box and drag and drop it into the Selected Items for Rule box. You can click the Type to Search box and enter the food name to filter the foods that display.
-
-
-
Click Save.
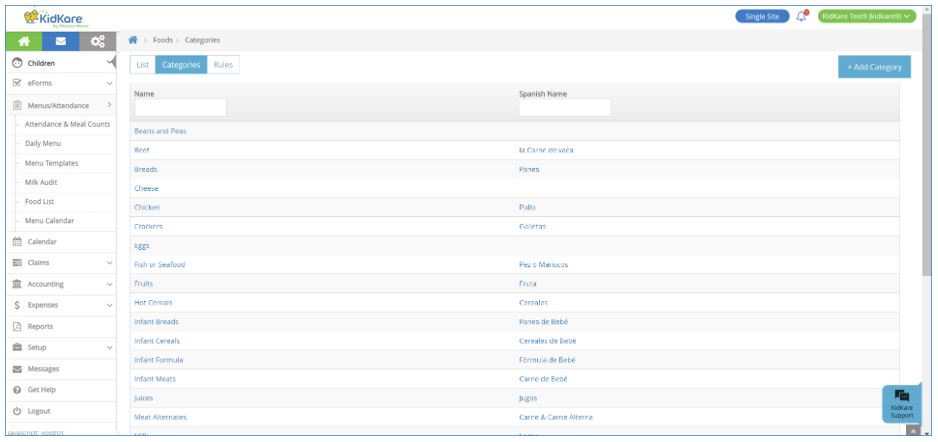
Manage Food Categories
Add Food Categories
Set up food categories on the Food Categories page. You can then assign foods you create/edit on the Food List page to these categories.
To add a food category:
-
From the menu to the left, click Menus/Attendance.
-
Click Food List. The Food List page opens.
-
Click the Food Categories tab. The Food Categories page opens.
-
Click Add a Category. A pop-up opens.

-
Click the Name box and enter a name for this category. This box is required.
-
Click the Spanish Name box and enter the Spanish name for this category. This box is optional.
-
Click Save.
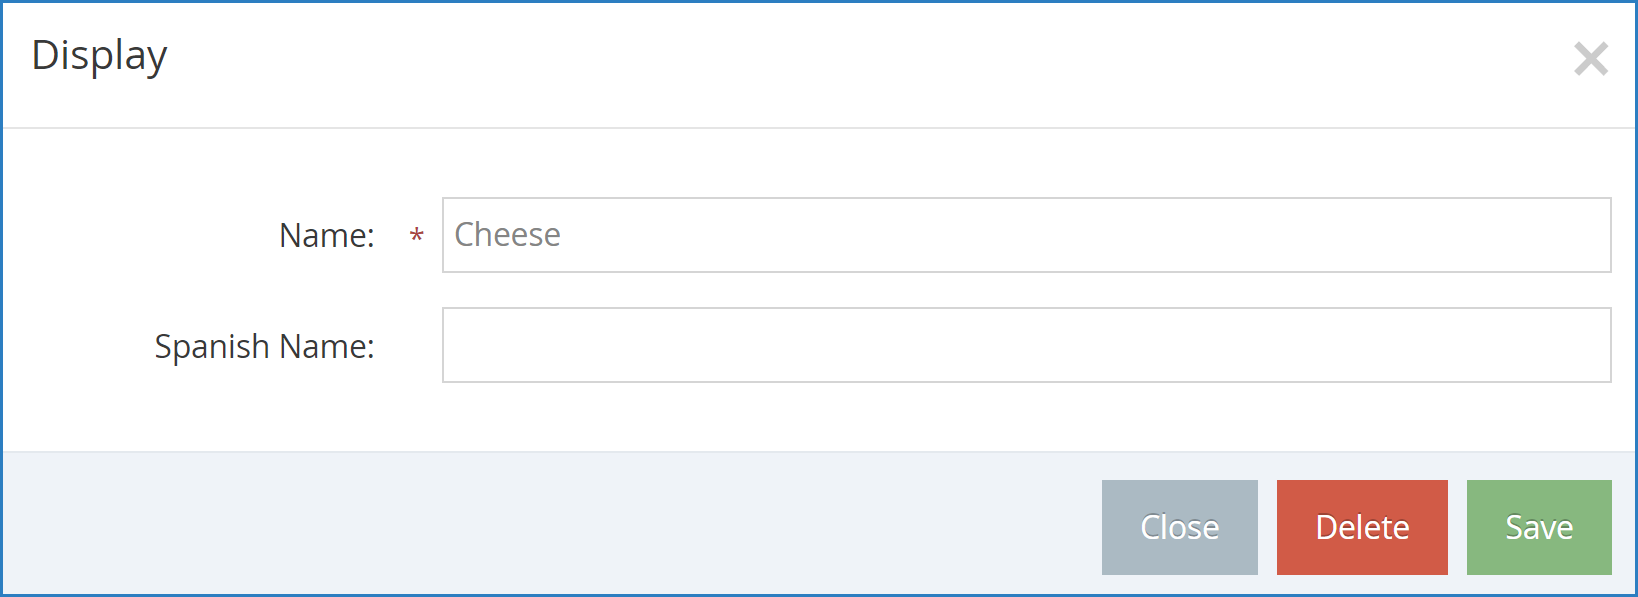
Edit Food Categories
To edit a food category:
-
On the Food Categories page, click the category name to change. A pop-up opens.
-
Click each box and enter new information over the existing information.
-
When finished, click Save.
Delete Food Categories
To delete a food category:
-
On the Food Categories page, click the category to remove. A pop-up opens.
-
Click Delete.
-
At the Are You Sure prompt, click Delete.
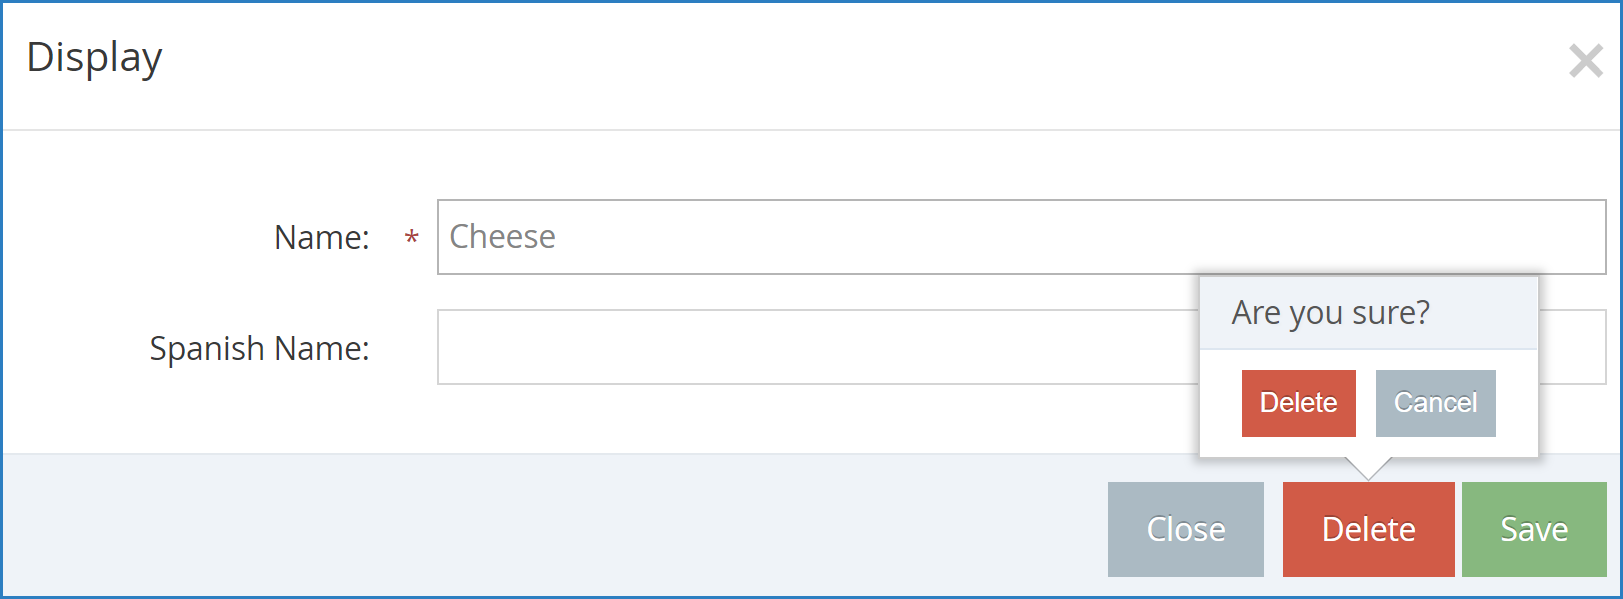
You must remove all foods from a category before you can delete it.