The View Status page provides a central place for you to view enrollment status for all participants at your center. You can quickly see who has started their forms, completed their forms, what forms are ready for approval, and so on. You can also take action on invitations, such as re-sending them, opening forms for onsite completion, cancelling invitations, and marking invitations as manually completed.
View Status Page
-
From the menu to the left, click eForms.
-
Click View Status. The View Status page opens.

-
Use the From and To boxes to select a date range to view.
-
To view forms from a specific date to the current date, select a date in the From box and leave the To box blank.
-
To view forms up to a specific date, leave the From box blank and select a date in the To box.
-
To view forms for a single day, select the same date in the From and To boxes.
-
-
Click the Filter drop-down menu and select the form status to view. You can select multiple statuses, if needed.
-
To filter to a specific participant, click the Participant Name box, and begin typing the participant's name.
-
You can sort information in ascending or descending order by the following columns:
-
Participant ID
-
Participant Name
-
Participant Status
-
Invitation Status
-
Invitation Sent Date
-
Last Updated
-
Some of the columns listed above may not display. To customize which columns display, click Filters in the top-right corner, and click each column to select it. You can also change the default sort options.
Invitation Status Definitions
|
Status |
Definition |
|---|---|
|
Not Started |
The guardian has not started filling out the form yet. |
|
In Progress |
The guardian has started filling out the form, but has not yet finished. |
|
Submitted (Parent) |
The guardian has completed and submitted the form. It is now ready for approval. |
|
Manually Completed |
The guardian completed a paper form, and you flagged the record accordingly (pencil icon). |
|
Sponsor Approved |
You have approved the form. |
|
Renewed |
You have updated the system with the new enrollment date. |
|
Canceled |
The invitation was canceled. |
Resend Invitations
If a guardian advises they did not receive their eForms invitations, resend them from the View Status page. You may also consider confirming and updating the guardian's email address. See Update Guardian Email Addresses for more information.
-
From the menu to the left, click eForms.
-
Click View Status.
-
To resend invitations individually, click
 on the row for the appropriate participant.
 -
To resend invitations in bulk:
-
Click Resend Invitations.
-
Click Yes at the confirmation prompt. All invitations at Not Started or In Progress status are sent out again.
-
Cancel Invitations
You can cancel enrollment invitations from the View Status page.
You must have the eForms permission enabled on your account to use the eForms feature.
-
From the menu to the left, click eForms.
-
Click View Status.
-
Locate the participant for whom to cancel an invitation.
-
Click
 in the column to the far right.
 -
Click Delete at the confirmation prompt.
Complete eForms Onsite
If a guardian advises they do not have access to the Internet, their own device, or email address to complete enrollment forms, you can open the forms for them to complete on-site.
-
From the menu to the left, click eForms.
-
Click View Status.
-
In the Show Records For section, set filters, if needed.
-
Use the From and To boxes to set a date range to view.
-
Click the Filter drop-down menu and select the status to view.
-
-
Click
 . The form opens.
 -
Have the guardian use the computer/device to complete the forms, beginning with the participant's date of birth.
-
Once the guardian has completed each page of the form, you are returned to the eForms page. The completed form has a status of Submitted (Parent). You can now Approve and Renew the form.
Mark Forms as Manually Completed
Some guardians may have completed their forms on paper. You can mark these forms as complete in KidKare.
-
From the menu to the left, click eForms.
-
Click View Status.
-
Locate the participant to update.
-
Click
 in the column to the far right.
 -
Respond to the confirmation prompt.
eForms Status Video
The video below explains all action items on the View Status page.
Update Guardian Email Address
Participant records that do not have an associated email address are indicated by on ![]() icon on the View Status page. You can quickly add an email address to these records without leaving this page.
icon on the View Status page. You can quickly add an email address to these records without leaving this page.
-
From the menu to the left, click eForms.
-
Click View Status.
-
Click the participant's name next to the
 icon in the Participant Name column. A pop-up opens and displays the guardian's contact information.
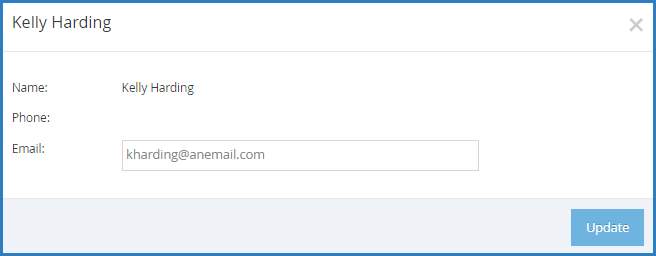
-
Click the Email box and enter a valid email address.
-
Click Update.
-
Once the email address is updated, the invitation can be resent by clicking the checkbox by the forms, and then click on
 .
.