Understand Provider IDs
When you enroll new providers, the lowest unassigned provider number available in your system displays next to the Provider ID box. You do not have to use this number. It is only meant to be a helpful tool.
You can enter up to six numbers in the Provider ID box (this may be set lower for some sponsors). You cannot use letters or special characters. Many sponsors use the provider's state-assigned license ID or Food Program contract number here, assuming that ID is numeric and consists of six digits or less. If you enter a provider ID that is already in-use, you are prompted to enter a new one when you attempt to move to the next tab.
Even if you cannot use a state-assigned license ID or Food Program contract number, you can store these identification numbers elsewhere in the provider's file.
We strongly recommend that you do not change the provider ID once you finish setting up the provider. This is to ensure that your historic reports remain consistent. However, if you should need to change the ID for any reason, you can do so in the Provider Information window. Note that changing the provider's ID will also change their login ID. Contact Minute Menu HX Support, as we will need to reset the provider's KidKare account.
Enroll Providers
You enroll providers with the Enroll Provider Wizard. This wizard walks you through the process of adding a provider. It also checks some of the data you enter to ensure that it is logically correct. For example, it ensures that any start dates you enter come before any end dates.
Required boxes are marked with asterisks (*). However, we recommend you enter as much information for your providers as possible. This ensures that claim reimbursements are accurate.
If you leave the Enroll Provider Wizard before completing a provider's enrollment, you can access their enrollment again. To do so, click Providers, select Enroll Provider Wizard, and select the provider from the list that displays. You can have up to nine (9) unfinished enrollments at any time.
You may not see all of the options mentioned below. If you need to include a specific box, check your sponsor preferences. For more information, see Set Preferences.
-
Click the Providers menu, select Enroll Provider Wizard, and click New Provider. The Enroll Provider Wizard opens.
-
Click Start. The General tab opens.
-
In the General tab:
-
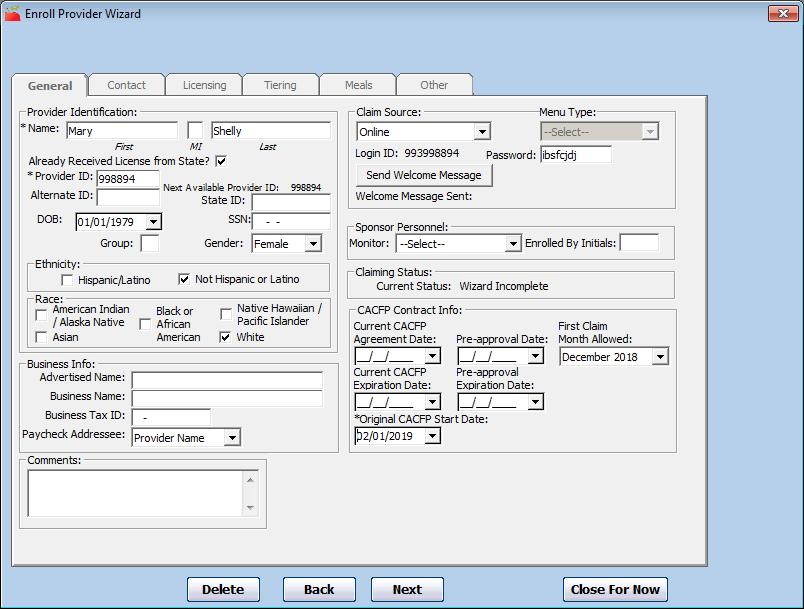
Click the Name boxes and enter the provider's full name as you would like it to appear on their paperwork.
-
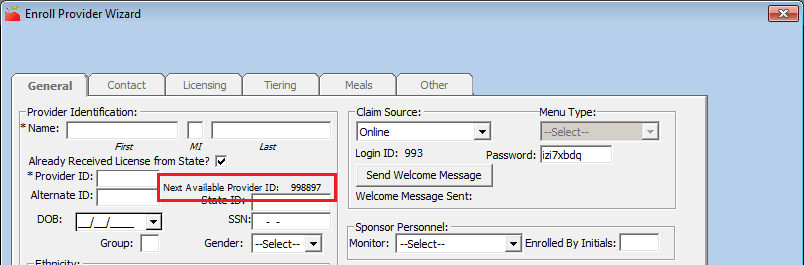
Click the Provider ID box and enter the provider's primary identification number. This will be their ID for the remainder of their enrollment at your sponsorship. They use this ID when filling out forms. They also use a variation of this ID number to log in to KidKare for online claiming. It appears on all provider reports. For more information, see About Provider IDs.
Note: The next available provider number displays to the right of the Provider ID box.
-
Click the Alternate ID box and enter the provider's alternate ID, if needed. If your sponsorship is not a Sole Source agency and you have a different identification number assigned to your providers for other programs, you can record that number here. Some agencies also use this as a vendor number (if it is required by their accounting software). You can enter letters, numbers, and special characters (such as a dash) in this box.
-
Click the State ID box and enter state identification number for this provider, if needed. This box is only applicable if your State Agency providers an identification number for home care providers that differs from the provider's license number. You can enter letters, numbers, and special characters (such as a dash) in this box.
-
Enter the provider's date of birth (DOB), social security number (SSN), and select their gender (Gender).
-
Click the Group box and enter a group number, if needed. If you assign this provider to a group, they will be associated with a group in the Users/Monitors window. For more information, see Provider Access Groups.
-
In the Business Info section, enter the provider's Advertised Name (if different from their own name, and the provider isn't incorporated) or Business Name (if the provider operates their business as a distinct corporation). If you enter a business name, click the Business Tax ID box and enter the tax ID for the provider's business.
Note: For some states (including Illinois), entering a Business Tax ID prevents providers from claiming their own children, even if the Provider is Tier 1 by Income. This is based on an interpretation of the federal regulations in those states.
-
In the Claim Source section, select the primary method that the provider will use to submit their claim information to you for processing.
Note: The provider does not have to use the same method every time they submit claim information to you. The claim source you select here does not impact their ability to send claim information in an alternate format. This is primarily used to help you keep track of incoming claim paperwork (with the Track Received Claims function) and as a way to filter reports. Monitors may also use this information so they know what type of forms to bring to the provider's home during a review.
You can choose from the following:
-
Online: Select this option if the provider will use KidKare to submit their claim information to you. This activates the Password box. The system randomly generates a password, but you can change it, if needed. Click Reset to generate a new password, or click the Password box and enter a password for the provider. The Login ID was generated when you entered the provider ID in Step 3b. It consists of your three-digit Minute Menu client number, followed by the provider ID.
Note: After you have completed the wizard, return to the General tab and click Send Welcome Message to send an email containing the provider's login ID and password to the provider. The Welcome Message Sent field displays the date you sent the welcome message.
-
Manual Entry - Sponsor: Select this option if the provider will submit their claim to you in a format you specify. For example, you may read and compute the claim totals manually and then enter those reimbursable meal totals in to Minute Menu HX. You may also use the Record Full Month Attendance function as part of the Direct Entry process on these claims.
-
-
In the Sponsor Personnel section, click the Monitor drop-down monitor and select a monitor to assign to this provider. Assigning a monitor to this provider allows you to filter by monitor when generating certain provider reports.
-
In the CACFP Contract Info section, enter any dates that apply:
-
Current CACFP Agreement Date: Use this date if you renew your provider enrollments each year or periodically. This is the effective ending date for the current renewal period.
-
Current CACFP Expiration Date: Use this date if you renew your provider enrollments each year or periodically. This is the effective ending date of the current renewal period.
-
Original CACFP Start Date: This is the effective date of the provider's original contract with your agency. No days can be claimed before this date. This box is referenced by the Providers Added report.
-
Pre-Approval Date: This is the date you conducted your pre-approval visit to the provider's home. This visit is not the initial Monitoring visit (conducted one month after the provider begins claiming). This visit should be completed before you allow any claims. It is typically done when the provider signs the original contract.
-
Pre-Approval Expiration Date: Use this date to help schedule when pre-approval dates should be conducted. This is the date by which the pre-approval visit should have been conducted.
-
First Claim Month Allowed: This is the first claim month in which your provider can submit a reimbursable claim.
-
-
-
Click Next. The Contact tab opens.
-
In the Contact tab:
-
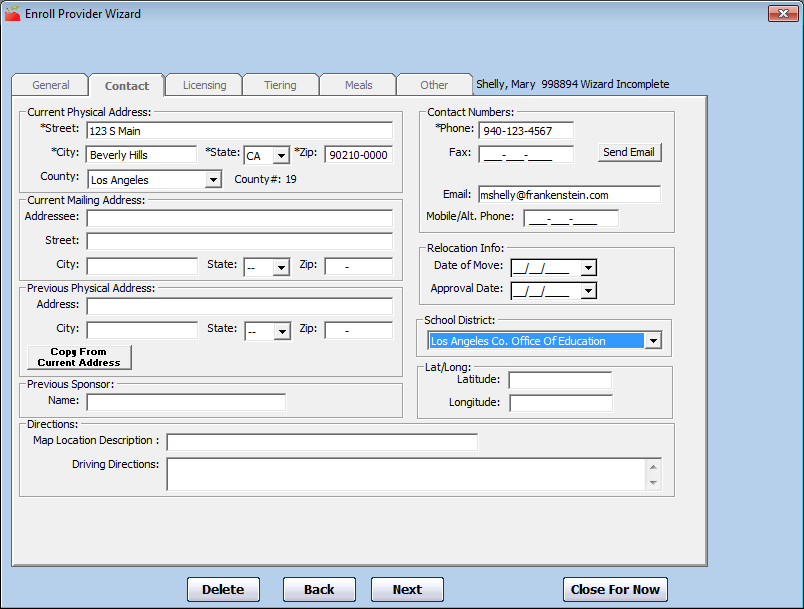
Enter the provider's physical street address.
-
Enter the provider's mailing address (if different from the street address). Enter a name in the Addressee box only if it is different from the provider's name. You must enter information in all four boxes for the mailing address to be referenced in reports or on printed checks.
-
Click the Previous Sponsor Name box, and enter the name of the provider's previous Sponsoring Agency, if known. For agencies in California, entering a previous sponsor denotes the provider as an Add Transfer provider for the Change Request.
-
In the Directions section, enter a map location description and driving directions, if needed. The information you enter here prints on the Review Worksheet to help Monitors locate the provider.
-
In the Contact Numbers section, enter the provider's phone/fax/mobile number(s) and email address. You must enter an email address if you plan to send a welcome message to this provider.
-
Click the School District drop-down menu and select the school district in which the provider resides. Selecting a school district for the provider associates all children enrolled in the provider's home with that school district, unless you explicitly assign children to a different school district. This can make it easier for those agencies that cover a large geographic area to keep track of school out days, which ensures that school aged children are not paid for AM Snack or Lunch when they are supposed to be in school.
Note: If you do not see a school district or a year-round tract for a school district, contact Minute Menu HX Support to have the district added.
-
-
Click Next. The Licensing tab opens. The available/required fields may vary according to state policies and your preferences.
-
In the Licensing tab:
-
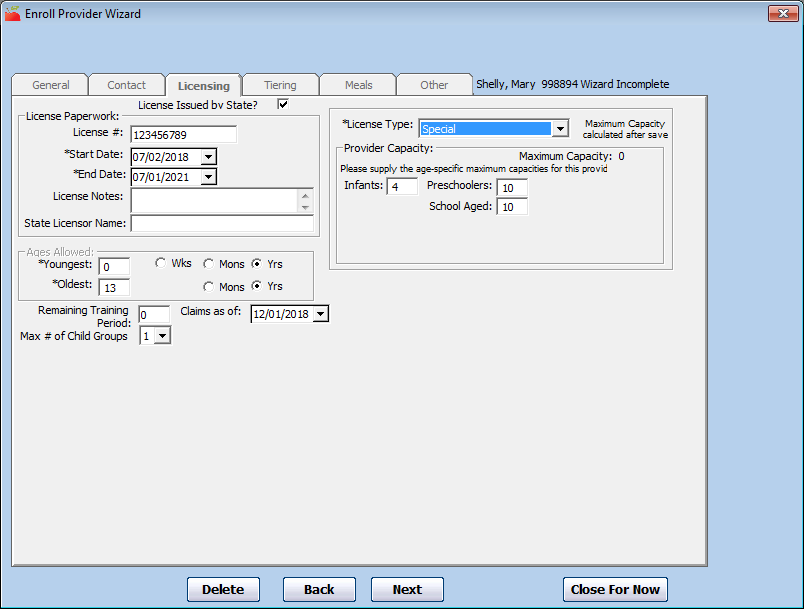
Check the License Issued by State box if your state has approved the provider's license application. If you check this box, you must provide the appropriate licensing information. If you have not received the provider's license paperwork from the state, clear this box and go to Step 8.
Note: If you do not check the License Issued by State box and do not enter any license information for this provider, they will remain at Pending status, and you cannot enter or process claims for them. You must later return, check this box, and enter the provider's license information to set them to Active.
-
Enter the following information in the License Paperwork section:
-
License #: This is the license number provided by the State. You can enter letters, numbers, and special characters in this box.
-
Start Date/End Date: This is the dates for which the State issued the provider's license. If the license is a perpetual license (has no end date), set an end date far in the future. Use the MM/DD/YYYY format.
-
License Notes: Enter any special notes/observations about the provider's license. This information is internal only. It prints on the Office Error report to assist you while reviewing claims.
-
State Licensor Name: This is the name of the official or agency that authorized the provider's license.
-
-
In the Ages Allowed section, enter the youngest and oldest ages allowed by the provider's license. You can also indicate whether the numbers you entered represent Weeks (Wks), Months (Mons), or Years (Yrs). The Oldest box is exclusive: If you enter 13, the system allows a maximum age of 12 years, 11 months, and 31 days.
Note: Ages may be set by default according to state regulations. If this is the case, you cannot change the values in these boxes.
-
Click the Max # of Child Groups drop-down menu and select the number of child groups a provider can have. One child group consists of 32 children.
-
Click the License Type drop-down menu and select the provider's license type. The appropriate capacity for the selected license type displays. In some cases, you may be able to set a variance (at the bottom of the tab) or a wavier.
-
-
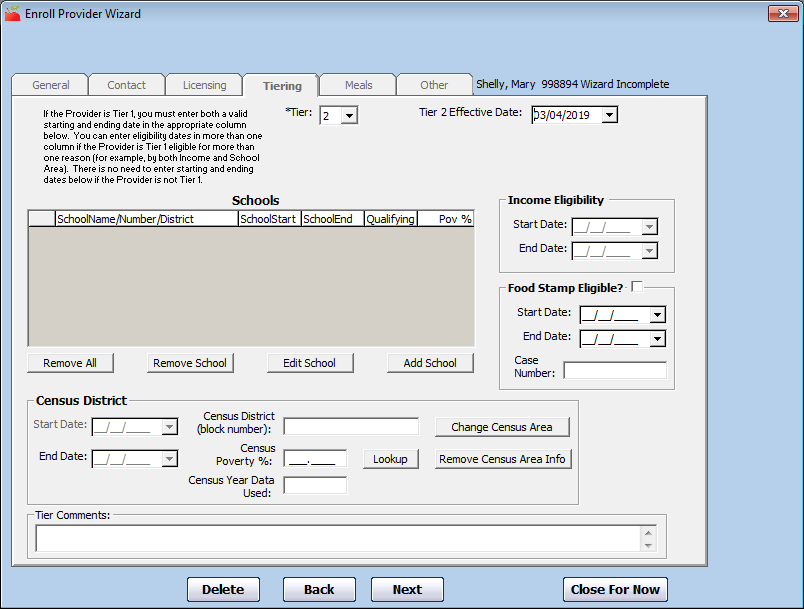
Click Next. The Tiering tab opens. The Tiering tab displays the provider's Tier and Tier-qualifying information. This determines the reimbursement rates for the provider. Note that the available fields in this tab may vary according to state regulations for your state.
-
Click the Tier drop-down menu and choose from the following:
-
Tier 1: The provider should be reimbursed at Tier 1, so all children that are to be reimbursed will be paid at Tier 1 rates, even if the children are not set up as Tier 1 by Income. If you select Tier 1, you must also provide valid dates in the appropriate section (Income Eligibility, School District, or Census District). For more information, see Provider Tiering.
-
Tier 2 (default): The provider should be reimbursed at Tier 2. If you select Tier 2, you can input a Tier 2 Effective Date, which is useful in some states as it allows you to indicate that you attempted to verify the provider's tier (even though they didn't qualify).
-
M: The provider is not Tier 1, but has enrolled children who are Tier 1.
-
-
Click Next. The Meals tab opens. This tab displays the meals and times the provider is eligible to claim.
-
In the Meals tab:
-
Check the box next to each day on which the provider is allowed to serve meals in the Days Allowed section. This may or may not impact your processed claims (depending on your system setup).
-
Check the box next to each meal plan the provider can use in the Meal Plans Allowed section. The selections made here may or may not impact claims processing. If you allow Provider Cycle Menus, you can set starting and ending dates. If Provider Cycle Menus are claimed between those dates, they may be disallowed.
-
Click the Highest Meal Shift Tracked drop-down menu and select the amount of servings (shifts or split-shifts) of each meal that the provider is allowed to claimed. If you set the provider up for multiple servings, you can provide both a first and second meal shift time. Note that this option only appears if you have notified Minute Menu that you allow providers to claim multiple servings of a single meal.
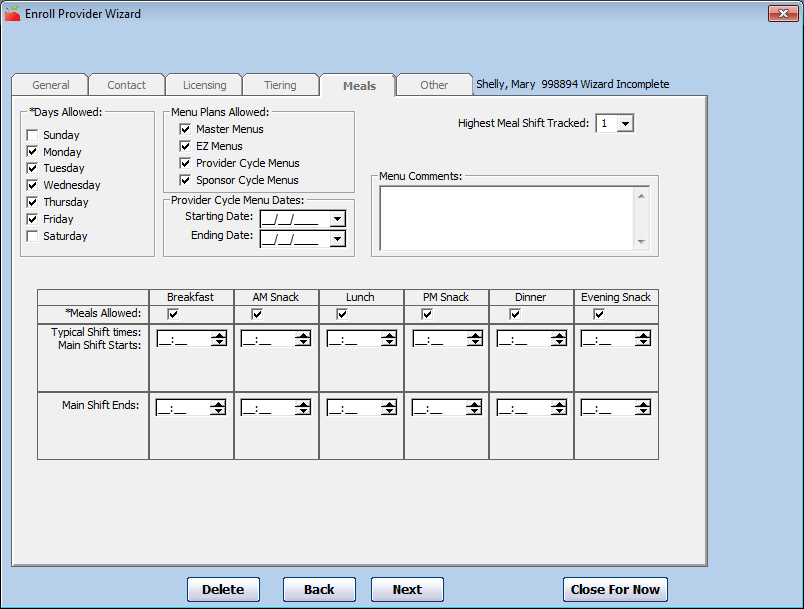
-
In the bottom portion of the tab, check the Meals Allowed box for each meal the provider is allowed to serve. Then, enter the typical meal times in the box(es) below each meal. If you allow two servings of the same meal, you must enter times for each shift. Note that meal times can affect a variety of claims processing checks.
-
Click the Menu Comments box and enter any special notes/observations regarding the provider's menu options. This information is for your own use and has no affect on claims processing.
-
-
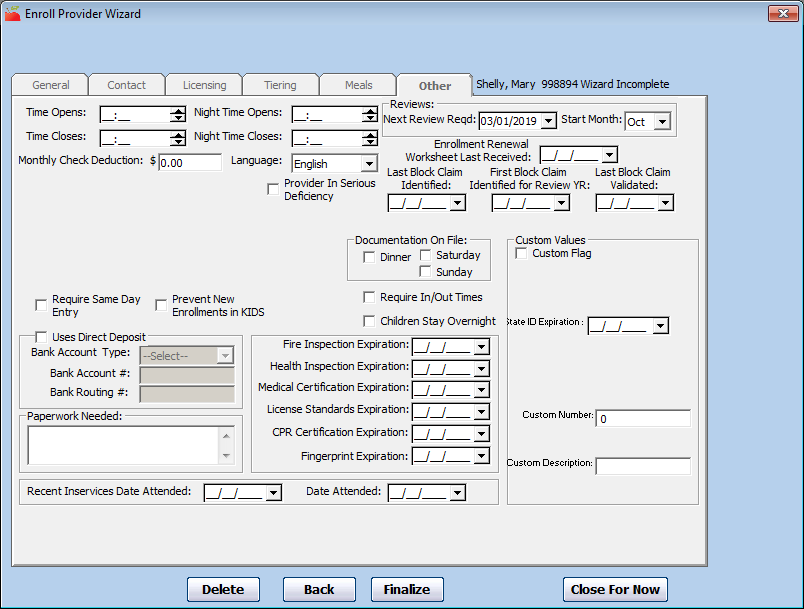
Click Next. The Other tab opens. This tab displays miscellaneous information that was not included on previous tabs.
-
In the Other tab:
-
Click the Next Review Required Date drop-down menu and select the appropriate date for the provider's next review. This is set to one month after the provider's Original CACFP Start Date. The system updates this box automatically after each review you conduct.
-
Click the Start Month drop-down menu and select the beginning of a provider's review year. This is set to October, by default.
-
Click the Language drop-down menu and select the provider's language. This is set to English by default.
-
Complete the remaining fields, as needed. The available/required fields in this tab depend on your preferences/state requirements. For more information, see Set Preferences.
-
-
Click Finalize.
Send Welcome Messages for KidKare
About Online Claiming with KidKare
KidKare is accessible from most devices that connect with the Internet and is free to providers. It allows providers to manage their business and provide accurate claim information to you. Providers can use KidKare to do the following and more:
-
Enroll children
-
Record Meal Counts and Attendance
-
Plan and Record Meals
-
Submit Claims
-
Run Reports
For more information, see the Provider Knowledge Base. Your providers can also use this site to learn how to navigate and use KidKare.
Accounting Package for Providers (Optional)
KidKare also has an Accounting package providers can add to their KidKare account for an additional fee known as Parachute. With Parachute, providers can track payments and invoices, record business expenses, calculate time/space % for tax purposes, and more. Click here to learn more.
Sending a Welcome Message
As you enroll providers, send them a Welcome Message for KidKare. This message may include the following:
- A brief, introductory message.
- A link to allow the provider to log in and reset their password.
- Get started information, including a link to Introduction to KidKare for Home Providers.
- A link to the KidKare Knowledge Base.
- A signature that includes your name and phone number.
Note that you can customize this welcome letter, and some of this information may not be included. For more information, see Customize the KidKare Welcome Letter.
To send a welcome message:
- Click the Providers menu and select Provider Information.
- Click the Provider drop-down menu and select the provider. The provider's details display, and the General tab opens by default.
Note: We recommend you also click the Contact tab and verify that the provider's email address is correct.
- Click Send Welcome Message in the Claim Source section.

Set a Provider's Claim Source
A provider's claim source is the method a provider uses to record claim information. There are three claim sources in Minute Menu HX:
-
Online (KidKare)
-
Scannable Forms
-
Manual Claims
Setting a claim source for each of your providers in Minute Menu HX can help you track incoming claim paperwork. However, this can also impact your ability to change provider passwords for KidKare. The claim source you set here display in the Track Received Claim window by default. If you change the provider's claim source in that window, you are prompted to change the claim source stored in the provider's file.
To set a provider's claim source:
-
Click the Providers menu and select Provider Information. The Provider Information window opens.
-
Click the Provider drop-down menu and select the provider to update.
-
Click the Claim Source drop-down menu and select the provider's claim source.
-
If you select Online, you can also change the provider's KidKare password.
-
If you select Scannable Forms, you can also select the menu type: Attendance Menus, Bubble Menus, or Full Month Attendance (Direct Entry).
-
-
Click Save.
