Manage Invoices on Participant Accounts
The Participant Account Details page lists all invoices associated with the selected participant, so you can see which invoices are outstanding, paid, and so on. A total account balance also displays above the invoice table, giving you a snapshot of the participant's account status. This includes the total received, and pending amounts, as well as the account balance and account totals.
- From the menu to the left, click Accounting.
- Click Accounts. The Participant Account Details page opens and displays information for the last participant you viewed.
- Click the drop-down menu at the top of the page and select the participant for whom to view invoices.
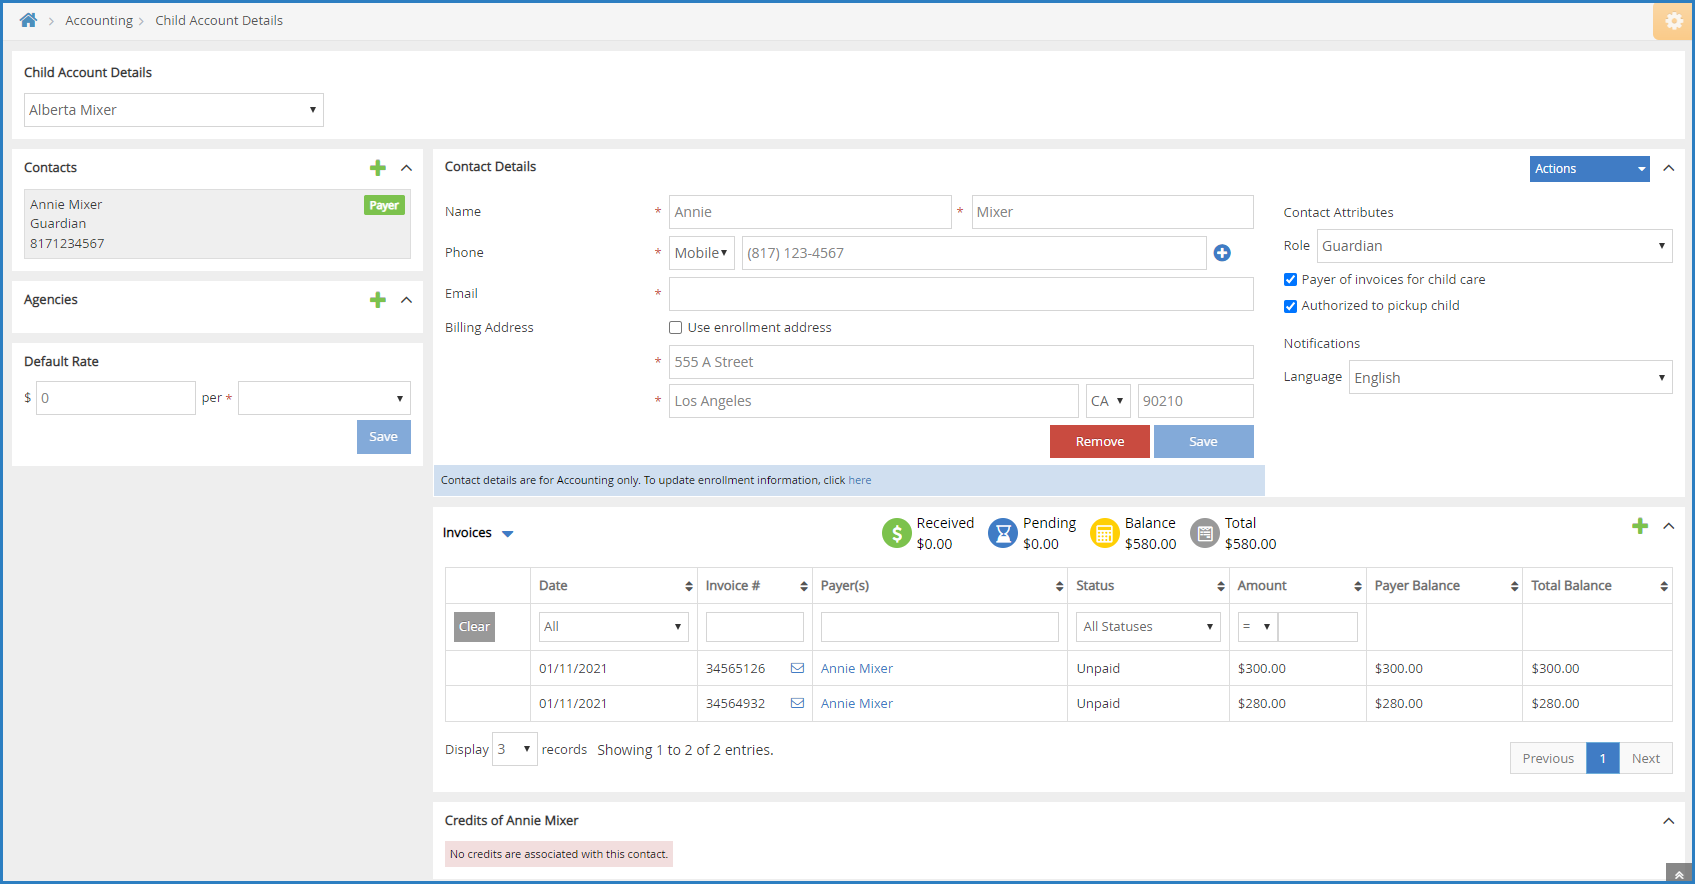
- Scroll to the Invoices section. If this section does not display, click
 to expand it.
The following columns display:- Date
- Invoice #
- Payer(s)
- Status
- Amount
- Payer Balance
- Total Balance
- Click
 and select Recurring Invoices to view any recurring invoices associated with this participant account.
The following information displays for recurring invoices:- Payer(s)
- Frequency
- Amount
- Next Invoice Date
- Status
- You can filter invoices and recurring invoices by each column. Simply use the drop-down menus to filter, or type in the text boxes.
- Click each column header to sort in ascending or descending order.
- Click Previous and Next to navigate between pages of invoices.
- Click the Display drop-down menu to change the number of invoices that display by default. You can select 3, 10, 20, 50, or 100.
- Click
 to add an invoice from this page. For more information, see Create an Invoice.
View Invoices
All invoices are stored on the Invoices page, including recurring invoices. This page gives you an overall view of pending and paid invoices, a total balance summary, and allows you to access invoice details and balance details.
View the Invoice List
- From the menu to the left, click Accounting.
- Click Income.
- Enter your Accounting PIN and click Go.
Note: If you do not have an Accounting PIN set, you are prompted to set one.
- The Invoices page opens.
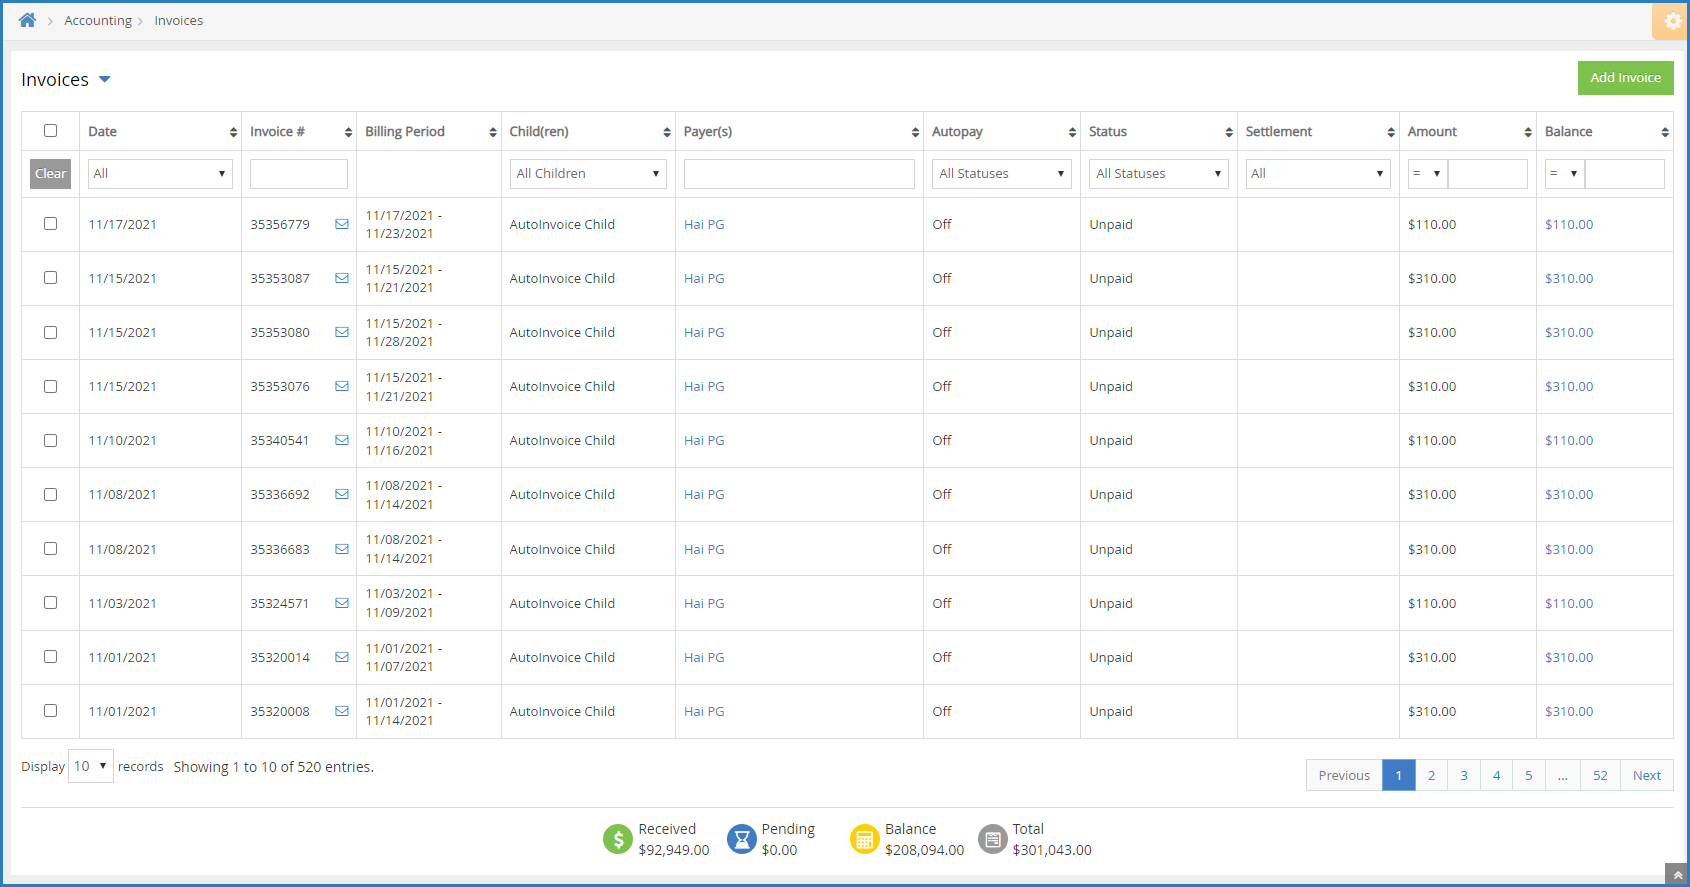 The following information displays for each invoice:
- Date: This is the date the invoice was created.
- Invoice #: This is the invoice number.
- Billing Period: This is the period for which the invoice was issued.
- Participant(s): These are the participants included on the invoice.
- Payer(s): These are the payers associated with the invoice. You can click the payer's name to quickly update that payer's contact information. These changes affect accounting data only—enrollment data is not updated.
- Autopay: This column indicates whether the payer associated with the listed invoice is using Autopay.
- Status: This is the invoice's current status. See Understand Invoice Statuses for more information.
- Settlement: This is the date the invoice was paid or deleted.
- Amount: This is the total amount billed.
- Balance: This is the remaining amount owed. Click the amount in this column to view the Balance Details pop-up. This lists each payer on the invoice and the amount owed. You can record payments and refunds from this pop-up.
- Use the boxes and menus at the top of the table to filter the invoices that display. You can filter by every column except Billing Period.
- Click each column header to sort invoices in ascending or descending order.
- Click an invoice to view invoice details. See the View Invoice Details heading, below.
View Deleted Invoices
Deleted invoices do not display in the invoices list by default. To display them:
- From the menu to the left, click Accounting.
- Click Income.
- Enter your Accounting PIN and click Go.
Note: If you do not have an Accounting PIN set, you are prompted to set one.
- Click Filters in the top-right corner.
- Select Include Deleted Invoices. Deleted invoices are now included in the invoices list. These rows are highlighted in red, so you can easily find them.

- Click Filters again to hide the display options.
View the Recurring Invoices List
- From the menu to the left, click Accounting.
- Click Income.
- Enter your Accounting PIN and click Go.
- Click
 and select Recurring Invoices.
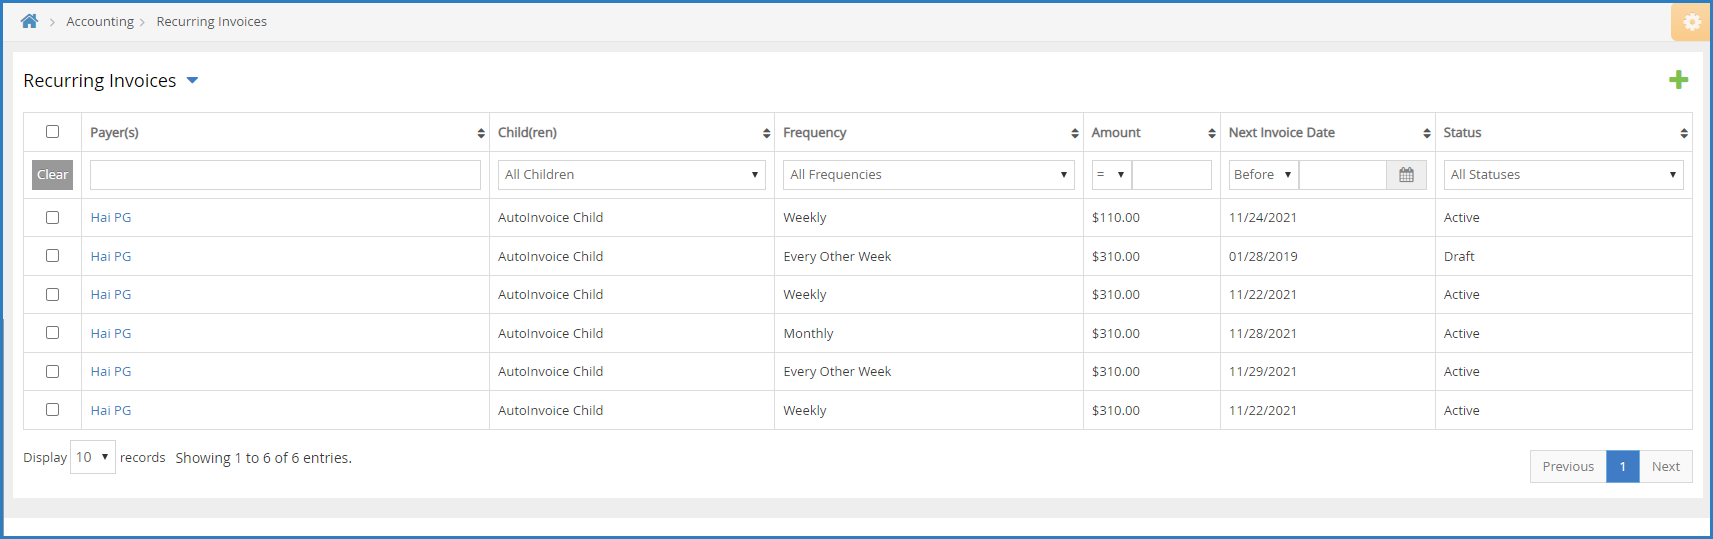 The following information displays for each invoice:
- Payer(s): These are the payers associated with the invoice.
- Participant(s): These are the participants included on the invoice.
- Frequency: This is the frequency with which the invoice is generated. For example, this column would show Weekly for invoices that run each week.
- Amount: This is the total amount billed.
- Next Invoice Date: This is the next date on which this invoice will run.
- Status: This is the status of the recurring invoice. This can be Draft, Active, or Deleted.
- Use the boxes and menus at the top of the table to filter the invoices that display.
- Click each column header to sort invoices in ascending or descending order.
- Click an invoice to view invoice details. See the View Invoice Details heading, below.
View Invoice Details
- From the menu to the left, click Accounting.
- Click Income. The Invoices page opens.
- Click the invoice to view.
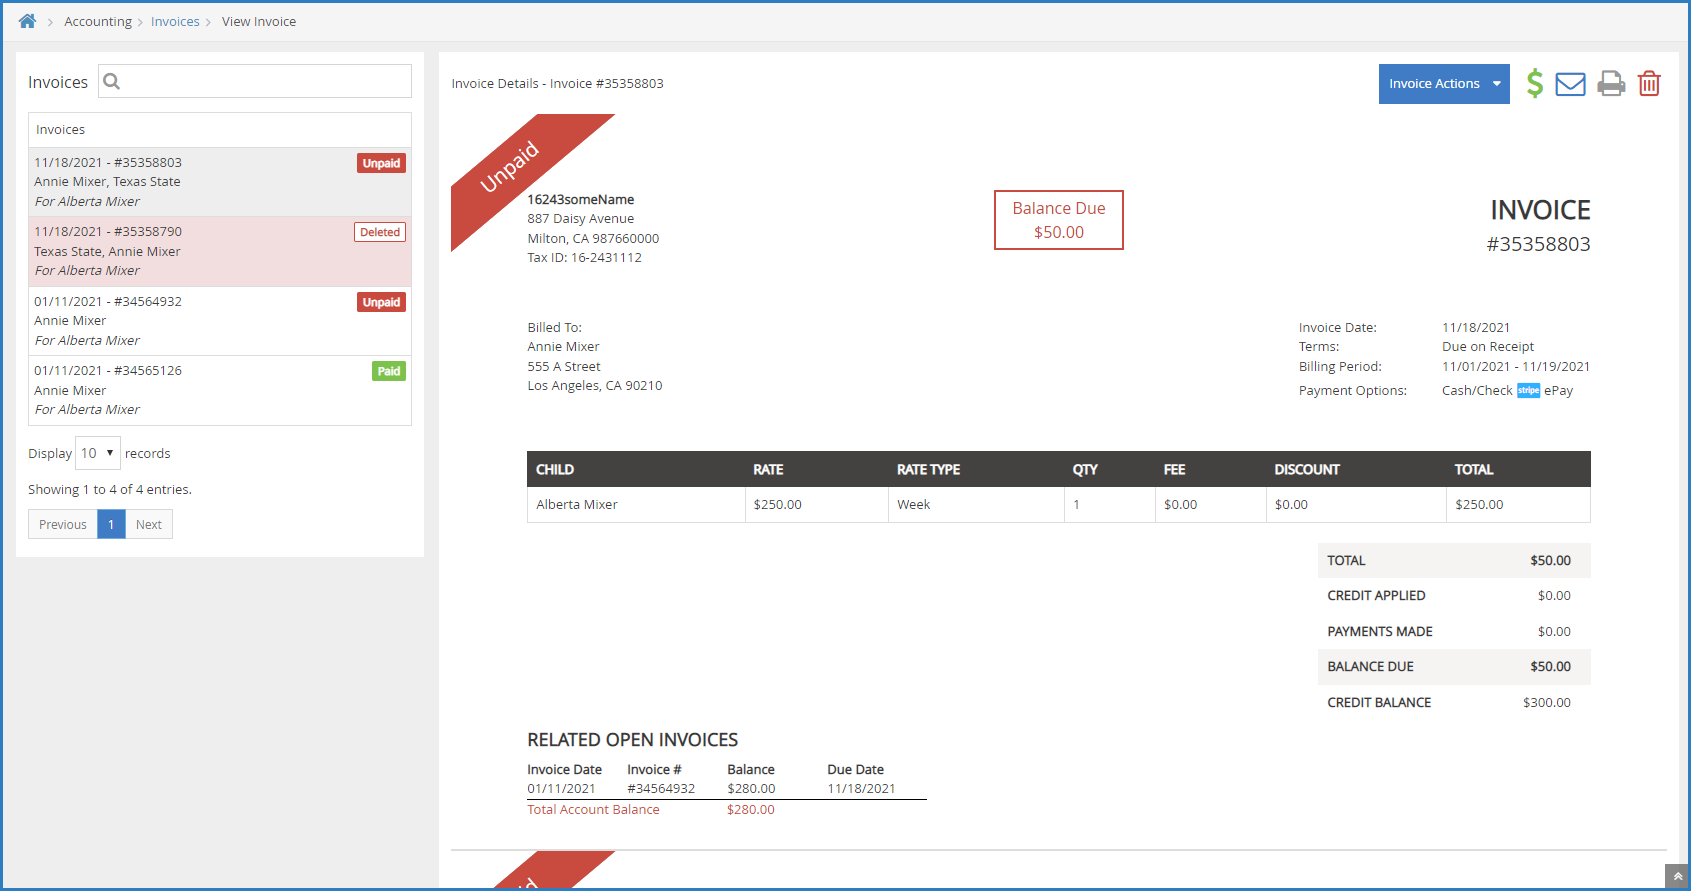 The View Invoice page opens and displays the following:
- Invoices: A list of other invoices associated with this participant displays to the left. Each one includes status markers that tell you, at-a-glance, whether the invoice is unpaid, paid, partially paid, and so on. You can click each invoice in this list to view the invoice details.
- Invoice: The invoice as the payer receives it displays to the right. It includes all line items you set up, payments made, credits applied, and so on.
- Invoice Activity: This section lists all actions taken on this invoice to date. You can filter this section to Payment Activity, Comments, and/or System Activity.
You can also access invoice details from the Invoices section on the Participant Account Details page. To do so, click the invoice to view. The Invoice Details page opens.
Viewing Payment Status At-A-Glance
Payment status for all current invoices displays at the bottom of the Invoices list. These numbers are automatically updated as you apply filters, so you always seen payment status for the particular time period, invoices, and participants you are viewing.
| Status | Definition |
| Received | This is the sum of all invoice payments for invoices where the invoice status is Paid, Partially Paid, or Declined. |
| Pending | This is the sum of all invoice payments for invoices where the invoice status is Paid or Partially Paid and the settlement is pending, and invoices that are at Declined status. |
| Balance | This is the sum of all invoice balances where the invoice status is Unpaid or Declined minus pending payments for all invoices at Partially Paid and Paid status. |
| Total | This is the sum of all invoice amounts where the invoice status is Partially Paid, Unpaid, Paid, Declined, or Closed. |
Print Invoices
You can print invoices of any status from the invoices list or from the View Invoice page. Click a link below to jump to a specific method.
Print Invoices from the Invoices List
- From the menu to the left, click Accounting.
- Select Income.
- Enter your Accounting PIN and click Go.
Note: If you do not have an Accounting PIN set, you are prompted to set one. - Filter to the invoice(s) to print.
- Check the box next to the invoice(s) to print. You can also check the box at the top of the column to select all invoices.
- Click
 . Your browser's print options display.
 - Click Print.
Print Invoices from the View Invoice Page
This can be useful if a payer requests a receipt for payment.
- From the menu to the left, click Accounting.
- Select Income.
- Enter your Accounting PIN and click Go.
Note: If you do not have an Accounting PIN set, you are prompted to set one. - Select the invoice to print. The View Invoice page opens.
- Click
 . Your browser's print options display.
 - Click Print.
Delete Invoices
You can delete invoices from the Invoices page, the Recurring Invoices page, and the View Invoice page. However, if an invoice is at Paid or Partial status, you must refund or delete the payments recorded to that invoice before you can delete it. For more information about recording refunds, see Record Refunds. For information about deleting payments, see the Delete Paid and Partially Paid Invoices heading, below.
Delete Invoices from the Invoices Page
You can delete multiple invoices at once from the Invoices page as long as they do not have any payments recorded to them. If you need to delete an invoice that is at Paid or Partial status, see the Delete Paid and Partially Paid Invoices heading, below.
- From the menu to the left, click Accounting.
- Click Income.
- Check the box next to the invoices to delete.
- Click
 .
. - At the Are You Sure prompt, click Delete. The invoices you selected are moved to Deleted status.
Delete Invoices from the View Invoice Page
- From the menu to the left, click Accounting.
- Click Income.
- Click the invoice to delete. The View Invoice page opens.
- Click
 .
. - At the Are You Sure prompt, click Delete. The invoice is moved to Deleted status.
Delete Recurring Invoices from the Recurring Invoices Page
- From the menu to the left, click Accounting.
- Click Income.
- Click
 and select Recurring Invoices. The Recurring Invoices page opens.
 - Check the box next to the invoices to delete.
- Click
 .
. - At the Are You Sure prompt, click Delete. The invoices you selected are moved to Deleted status.
Delete Recurring Invoices from the Edit Invoices Page
- From the menu to the left, click Accounting.
- Click Income.
- Click
 and select Recurring Invoices. The Recurring Invoices page opens.
 - Click the recurring invoice to delete. The Edit Invoice page pens.
- Click Delete at the bottom of the page. The recurring invoice is deleted.
Delete Paid and Partially Paid Invoices
Before you can delete invoices at Paid or Partial status, you must first refund or delete the payments recorded to those invoices. This article covers deleting payments. For more information about recording refunds, see Record Refunds.
- From the menu to the left, click Accounting.
- Click Income.
- Click the invoice to delete. The View Invoice page opens.
- Click the Invoice Actions drop-down menu and select Delete Payments.
- At the Are You Sure prompt, click Delete. If the parent paid this invoice via credit card, the payment is automatically credited back to their account as an accounting credit. If the invoice was paid via cash or check, no refund is issued in KidKare. The payment is simply deleted.
- Click
 .
. - At the Are You Sure prompt, click Delete. The invoice is moved to Deleted status.
Restore Deleted Invoices
If you delete an invoice or recurring invoice in error, you can restore it. When you restore an invoice, it is restored to its original status. Click a link below to jump to a topic.
Display Deleted Invoices
Before you can view and restore your deleted invoices, you must update your page settings to show deleted invoices. To do so:
- From the menu to the left, click Accounting.
- Click Income.
- Enter your Accounting PIN and click Go.
Note: If you do not have an Accounting PIN set, you are prompted to set one.
- Click Filters in the top-right corner.
- Select Include Deleted Invoices. Deleted invoices are now included in the invoices list. These rows are highlighted in red, so you can easily find them.

- Click Filters again to hide the display options.
Restore a Deleted Invoice
- From the menu to the left, click Accounting.
- Click Income.
- Enter your Accounting PIN and click Go.
Note: If you do not have an Accounting PIN set, you are prompted to set one.
- Click the Status drop-down menu and select Deleted. Only deleted invoices display.
- Click the invoice to restore. The View Invoice page opens.
- Click the Invoice Actions drop-down menu and select Restore.
- At the Are You Sure prompt, click Restore. The invoice is restored to its original status.
Restore a Deleted Recurring Invoice
- From the menu to the left, click Accounting.
- Click Income.
- Enter your Accounting PIN and click Go.
Note: If you do not have an Accounting PIN set, you are prompted to set one.
- Click
 and select Recurring Invoices. The Recurring Invoices page opens.
 - Click the Status drop-down menu and select Deleted. Only deleted invoices display.
- Click the invoice to restore.
- At the Are You Sure prompt, click Restore. The recurring invoice is restored to its original status.